- Rinkeby ethereum что это
- Connect Yourself – Go Ethereum: Wallet & Mist
- Connect Yourself – Go Ethereum: Android & iOS
- Puppeth – Your Ethereum private network manager
- inaword
- Блог о разработке и современных технологиях
- Как получить эфир из крана тестовой сети — на примере ethereum сети Rinkeby
- Работа с MetaMask. Децентрализация приложения
- Как получить эфир для тестовой сети Rinkeby
- Пересылка эфира с помощью MetaMask
- Взаимодействие MetaMask и браузера
Rinkeby ethereum что это
An archive node synchronizes the blockchain by downloading the full chain from the genesis block to the current head block, executing all the transactions contained within. As the node crunches through the transactions, all past historical state is stored on disk, and can be queried for each and every block.
Initial processing required to execute all transactions may require non-negligible time and disk capacity required to store all past state may be non-insignificant. High end machines with SSD storage, modern CPUs and 8GB+ RAM are recommended.
To run an archive node, download rinkeby.json and start Geth with:
A full node synchronizes the blockchain by downloading the full chain from the genesis block to the current head block, but does not execute the transactions. Instead, it downloads all the transactions receipts along with the entire recent state. As the node downloads the recent state directly, historical data can only be queried from that block onward.
Initial processing required to synchronize is more bandwidth intensive, but is light on the CPU and has significantly reduced disk requirements. Mid range machines with HDD storage, decent CPUs and 4GB+ RAM should be enough.
To run a full node, download rinkeby.json and start Geth with:
A light node synchronizes the blockchain by downloading and verifying only the chain of headers from the genesis block to the current head, without executing any transactions or retrieving any associated state. As no state is available locally, any interaction with the blockchain relies on on-demand data retrievals from remote nodes.
Initial processing required to synchronize is light, as it only verifies the validity of the headers; similarly required disk capacity is small, tallying around 500 bytes per header. Low end machines with arbitrary storage, weak CPUs and 512MB+ RAM should cope well.
To run a light node, download rinkeby.json and start Geth with:
An embedded node is a variation of the light node with configuration parameters tuned towards low memory footprint. As such, it may sacrifice processing and disk IO performance to conserve memory. It should be considered an experimental direction for now without hard guarantees or bounds on the resources used.
Initial processing required to synchronize is light, as it only verifies the validity of the headers; similarly required disk capacity is small, tallying around 500 bytes per header. Embedded machines with arbitrary storage, low power CPUs and 128MB+ RAM may work.
To run an embedded node, download rinkeby.json and start Geth with:
Connect Yourself – Go Ethereum: Wallet & Mist
The Ethereum Wallet is an Electron based desktop application to manage your Ethereum accounts and funds. Beside the usual account life-cycle operations you would expect to perform, the wallet also provides a means to send transactions from your accounts and to interact with smart contracts deployed on the network.
Under the hood the wallet is backed by a go-ethereum full node, meaning that a mid range machine is assumed. Similarly, synchronization is based on fast-sync, which will download all blockchain data from the network and make it available to the wallet. Light nodes cannot currently fully back the wallet, but it’s a target actively pursued.
To connect with the Ethereum Wallet, you’ll need to initialize your private network first via Geth as the wallet does not currently support calling Geth directly. To initialize your local chain, download rinkeby.json and run:
With your local chain initialized, you can start the Ethereum Wallet:
The Mist browser is an Electron based desktop application to load and interact with Ethereum enabled third party web DApps. Beside all the functionality provided by the Ethereum Wallet, Mist is an extended web-browser where loaded pages have access to the Ethereum network via a web3.js provider, and may also interact with users’ own accounts (given proper authorization and confirmation of course).
Under the hood the browser is backed by a go-ethereum full node, meaning that a mid range machine is assumed. Similarly, synchronization is based on fast-sync, which will download all blockchain data from the network and make it available to the wallet. Light nodes cannot currently fully back the wallet, but it’s a target actively pursued.
To connect with the Mist browser, you’ll need to initialize your private network first via Geth as Mist does not currently support calling Geth directly. To initialize your local chain, download rinkeby.json and run:
With your local chain initialized, you can start Mist:
Connect Yourself – Go Ethereum: Android & iOS
Starting with the 1.5 release of go-ethereum, we’ve transitioned away from shipping only full blown Ethereum clients and started focusing on releasing the code as reusable packages initially for Go projects, then later for Java based Android projects too. Mobile support is still evolving, hence is bound to change often and hard, but the Ethereum network can nonetheless be accessed from Android too.
Under the hood the Android library is backed by a go-ethereum light node, meaning that given a not-too-old Android device, you should be able to join the network without significant issues. Certain functionality is not yet available and rough edges are bound to appear here and there, please report issues if you find any.
The stable Android archives are distributed via Maven Central, and the develop snapshots via the Sonatype repositories. Before proceeding, please ensure you have a recent version configured in your Android project. You can find details in Mobile: Introduction – Android archive.
Before connecting to the Ethereum network, download the rinkeby.json genesis json file and either store it in your Android project as a resource file you can access, or save it as a string in a variable. You’re going to need to initialize your client.
Inside your Java code you can now import the geth archive and connect to Ethereum:
Starting with the 1.5 release of go-ethereum, we’ve transitioned away from shipping only full blown Ethereum clients and started focusing on releasing the code as reusable packages initially for Go projects, then later for ObjC/Swift based iOS projects too. Mobile support is still evolving, hence is bound to change often and hard, but the Ethereum network can nonetheless be accessed from iOS too.
Under the hood the iOS library is backed by a go-ethereum light node, meaning that given a not-too-old Apple device, you should be able to join the network without significant issues. Certain functionality is not yet available and rough edges are bound to appear here and there, please report issues if you find any.
Both stable and develop builds of the iOS framework are available via CocoaPods. Before proceeding, please ensure you have a recent version configured in your iOS project. You can find details in Mobile: Introduction – iOS framework.
Before connecting to the Ethereum network, download the rinkeby.json genesis json file and either store it in your iOS project as a resource file you can access, or save it as a string in a variable. You’re going to need to initialize your client.
Inside your Swift code you can now import the geth framework and connect to Ethereum (ObjC should be analogous):
Puppeth – Your Ethereum private network manager
Puppeth is a tool to aid you in creating a new Ethereum network down to the genesis block, bootnodes, signers, ethstats server, crypto faucet, wallet browsers, block explorer, dashboard and more; without the hassle that it would normally entail to manually configure all these services one by one.
Puppeth uses ssh to dial in to remote servers, and builds its network components out of docker containers using docker-compose. The user is guided through the process via a command line wizard that does the heavy lifting and topology configuration automatically behind the scenes.
Puppeth is distributed as part of the Geth & Tools bundles, but can also be installed separately via:
Copyright 2017. The go-ethereum Authors.
Источник
inaword
Блог о разработке и современных технологиях
Как получить эфир из крана тестовой сети — на примере ethereum сети Rinkeby
Несколько нехитрых действий дабы получить эфир в тестовой сети на примере Rinkeby.
Предисловие — можно пропустить) Тестовые сети в эфире бывают разные. И не во всех из них можно получить эфир майнингом. Если сеть позволяет получать эфир то на это нужно время. Что абсолютно неприемлемо для тестирования. Поэтому в интернете есть так называемые краны эфира (ethereum faucet — если будете гуглить). Дабы не подвергаться атакам эти краны раздают только если вы укажете Github Gist аккаунт.
Итак, получать эфир мы будем для тестовой сети Rinkeby. Перед началом у вас уже должен быть создан адрес кошелька в Rinkeby.
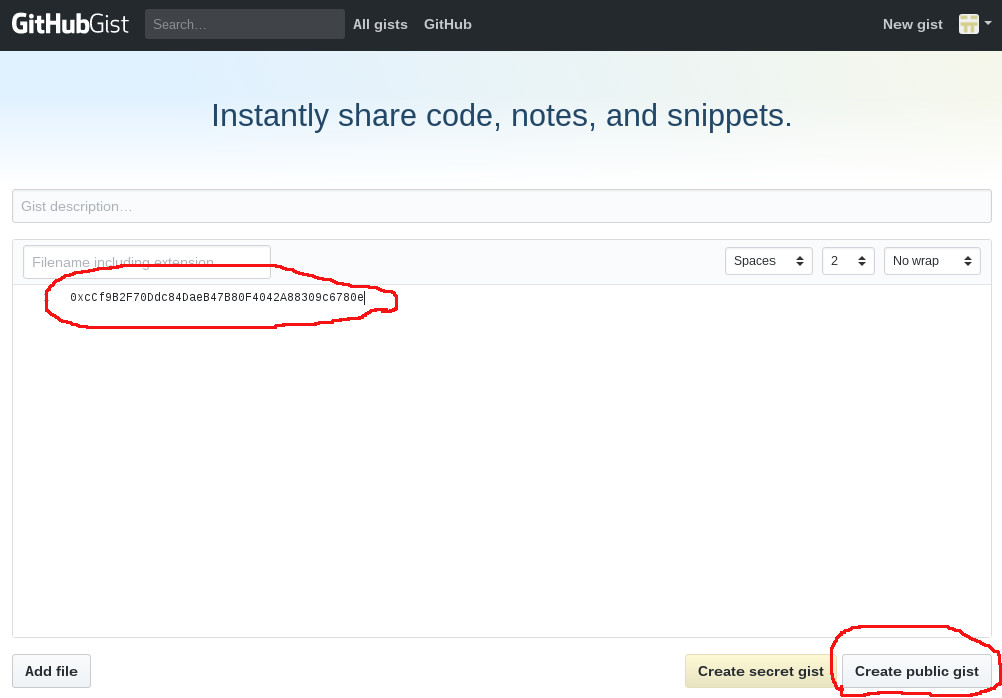
- Создайте аккаунт на GitHub и войдите в него
- Для создания Gist аккаунт перейдите по ссылке
- Вставьте в большое поле ваш адрес аккаунта сети Rinkeby и нажмите на ‘create piublic gist’ как на картинке

- Теперь скопируйте URL адрес вашего браузера
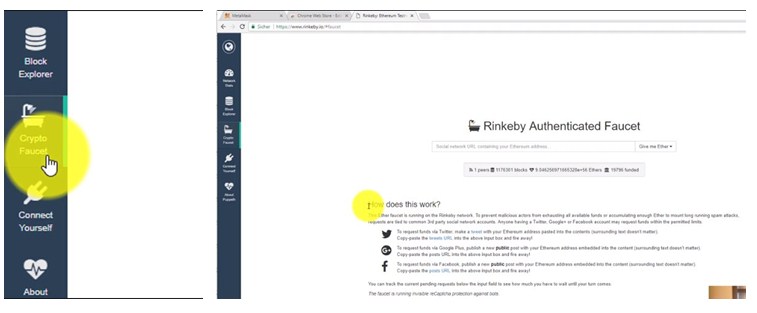
- Перейдем теперь на страничку крана сети Rinkeby — ссылка . И вставьте в появившееся поле тот адрес что скопировали на предыдущем шаге.
- Далее выберите то необходимое количество эфира. Чем больше эфира выберите, тем больше времени ждать. Мне для тестирования вполне хватает 3 единиц.
- После этого должна появится зеленая надпись, которая говорит о том что мы все сделали верно!
- Теперь ждем. Эфир появится на счету не сразу.


Проверить наличие эфира на вашем адресе в сети Rinkeby можно на Etherscan для Rinkeby.
Источник
Работа с MetaMask. Децентрализация приложения
Как получить эфир для тестовой сети Rinkeby
Чтобы получить некоторое количество эфира для использования в тестовой сети Rinkeby, потребуется открыть веб- сайт http://rinkeby.io.
В его нижнем левом углу расположена иконка Crypto Faucet, при щелчке по которой разъясняется, как можно получить эфир на счет Rinkeby.
Для получения эфира достаточно опубликовать номер своего счета в Twitter , Google Plus или Facebook, а затем скопировать адрес веб-страницы с публикацией в форму на сайте rinkeby.io. Эти меры предосторожности необходимы для защиты от автоматического массового получения эфира.
Теперь зайдем в учетную запись Twitter .
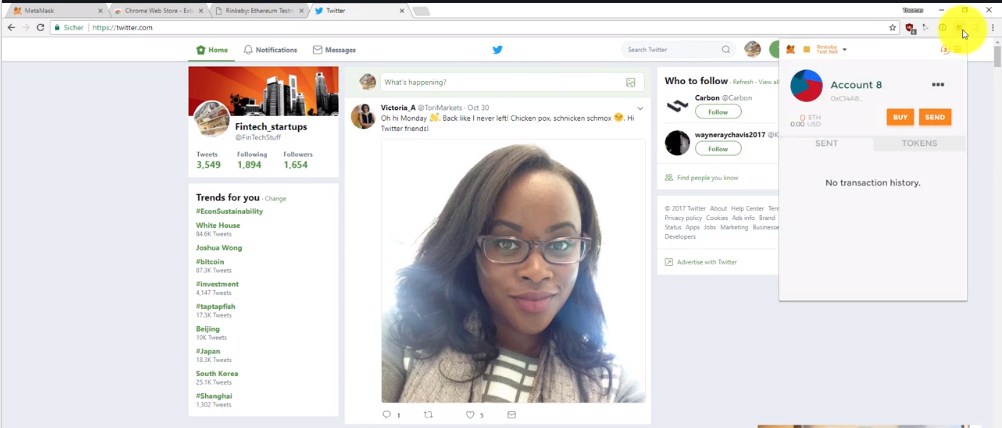
скопируем адрес счета из MetaMask,

введем в поле для публикации нового твита, допишем комментарий,
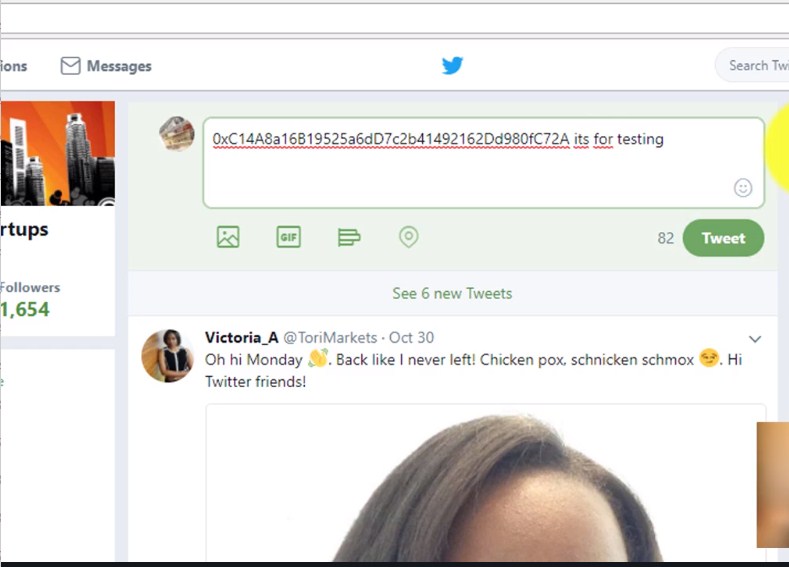
затем скопируем ссылку на твит.


То же самое можно сделать и с помощью Facebook, единственное, в чем нужно убедиться — это должен быть публичный пост. Так, запрос на выделение эфира был размещен.

Для корректной работы системы начисления эфира потребуется отключение блокировщика рекламы. Теперь убедимся, что запрос на выделение эфира был удовлетворен; через пару секунд на счету должен появиться эфир.
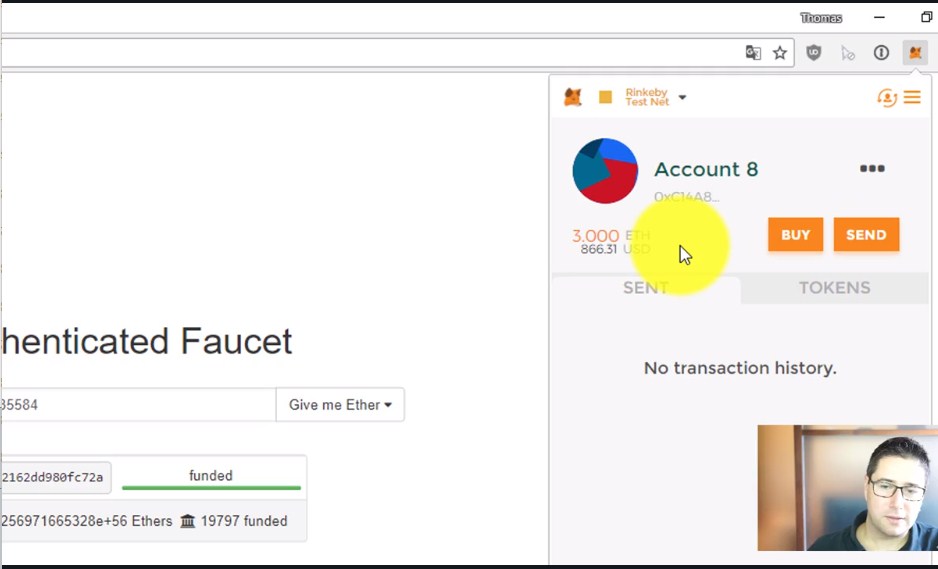
Наличие на счету эфира можно проверить с помощью сервиса Etherscan.
Пересылка эфира с помощью MetaMask
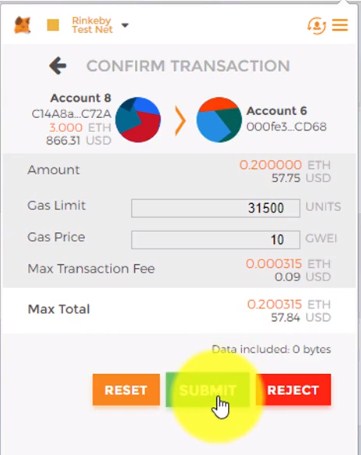
Теперь попробуем выполнить пересылку эфира между счетами с помощью MetaMask. Допустим, что на счете номер восемь есть три единицы эфира.

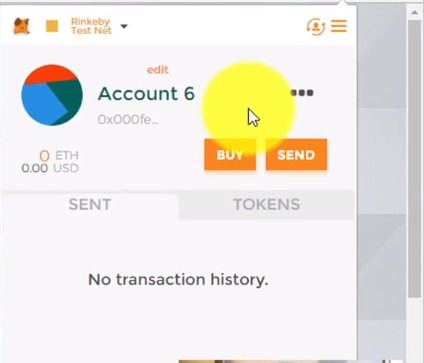
Необходимо переслать часть этих средств на счет номер шесть.
Скопируем адрес счета номер шесть, переключимся на счет номер восемь и отправим 0,2 единицы эфира.
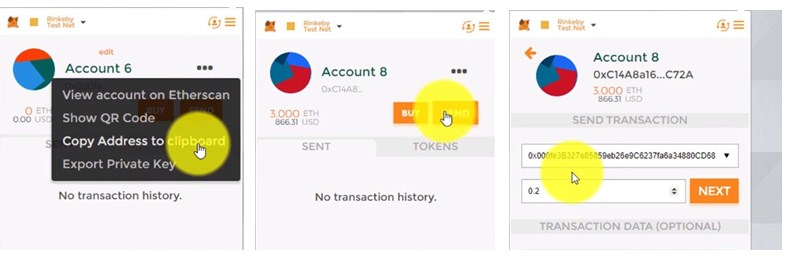
Щелкнем по Next , посмотрим на транзакцию и отправим ее в блокчейн.
Статус транзакции можно проверить с помощью сервиса Etherscan.

После успешно завершенного обсчета транзакции, средства будут отправлены, и будет отображаться адрес блока, в котором эта транзакция была впервые подтверждена.

Взаимодействие MetaMask и браузера
Следующей возможностью MetaMask является взаимодействие с блокчейном посредством веб-сайта. В этом случае веб- сайт подключается к MetaMask, MetaMask — к блокчейну с помощью сервиса Infura, а Infura, в свою очередь , содержит в себе запущенный клиент Geth. Позднее, когда будем разбирать тему подключения к блокчейну из браузера, данная схема будет рассмотрена подробнее — для нее возможны несколько реализаций. На текущем этапе достаточно посмотреть, что происходит в надстройке MetaMask, когда вы пытаетесь взаимодействовать с блокчейном. Откроем среду Remix, здесь есть простой смарт-контракт.
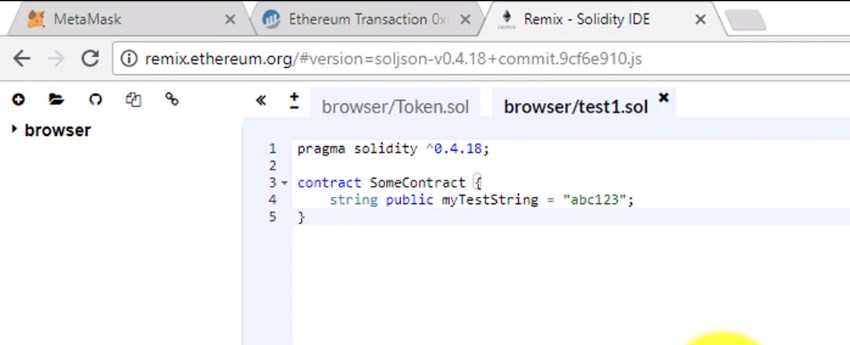
В правой стороне окна Remix видно, что в качестве опорной библиотеки выбрана Web3.

Надстройка MetaMask подключается непосредственно к окну браузера и таким образом обеспечивает связь с блокчейном. В раскрывающемся списке выбрана Injected Web3, а в окне разработки, доступном для любой веб-страницы, видно, что с помощью объекта web3.currentProvider можно работать с надстройкой MetaMask посредством обычного кода JavaScript.


Выберем Injected Web3, затем счет — тот же самый, который открыт в надстройке MetaMask. Теперь можно перейти на вкладку Run и создать контракт.
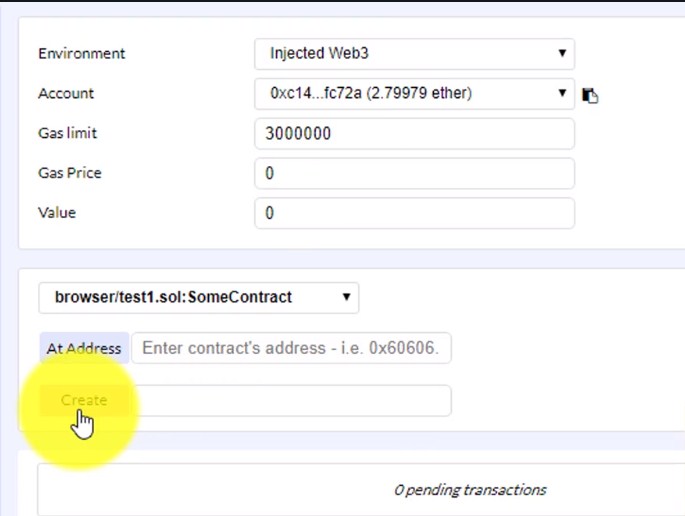
Отследим всю цепочку: контракт, написанный в среде Remix на языке JavaScript, исполняется, надстройка MetaMask отслеживает эту транзакцию и открывает всплывающее окно для подтверждения создания контракта.

Для этой процедуры потребуется израсходовать немного газа. После подтверждения MetaMask отправляет транзакцию в блокчейн.
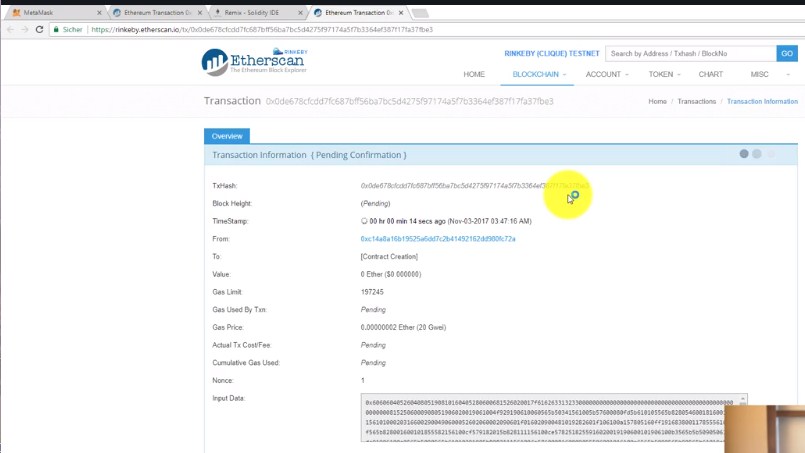
MetaMask располагает некоторым числом узлов сети, расположенных на серверах разработчиков, которые играют роль посредника между вашим браузером и блокчейном. Если вы хотите создать и использовать свой собственный блокчейн, потребуется один из клиентов: Geth, Parity , Mist. Mist обеспечивает интегрированный в браузер доступ к блокчейну, а Geth — это работающий на вашем компьютере клиент, загружающий все блоки и предоставляющий к ним непосредственный доступ . Успешность завершения транзакции подтверждается обсчитанными блоками.
Источник