- Ramp parameters
- Using a ramp parameter
- Reading a ramp parameter
- Adding a ramp parameter to a node
- Ramp parameters on VEX shaders
- In a VOP network
- In VEX code
- Position in the ramp
- About
- Ramp parameters
- Using a ramp parameter
- Reading a ramp parameter
- Adding a ramp parameter to a node
- Ramp parameters on VEX shaders
- In a VOP network
- In VEX code
- Networks and parameters
- Networks
- Editing parameters
- Next steps
- Expressions
- Guru level
- Reference
- Position in the ramp
- RAMP usage:
- Professional Society Recommendations
- Supporting Medical Literature
- Improved Safety During Extubation
Ramp parameters
Explains the tricks to working with ramp parameters.
Using a ramp parameter
Houdini support RGB color ramps and floating point (spline) ramps. One varies color along the length of the ramp, creating a gradient, and the other varies a single value, creating curve.
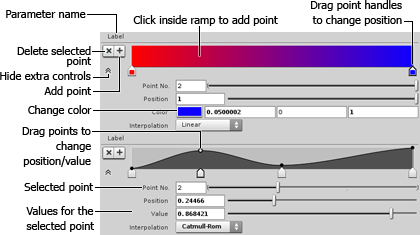
Click one of the arrow-shaped point handles along the bottom of the ramp to select an existing point.
Click in the ramp area to create a new point there.
Select a point and click the Delete button to delete it.
Drag a point handle left or right to change the point’s position.
In a spline ramp, you can also drag the circular value handle up or down to change the point’s value.
In a «Hermite» ramp, the curve passes through the odd control points, and then even points control the tangent at the previous point.
Use the Position and Value controls below the ramp to edit the selected point’s position and value exactly.
Use the Interpolation pop-up menu to control how Houdini fills in the values between the selected point and the next one.
Click the Hide controls button to hide the sliders and show only the ramp.
For smooth curves, you should evenly space the control points.
Reading a ramp parameter
Use the chramp, chrampt, and chrampf functions to read a value from a ramp parameter in an expression.
To read the value from a ramp at the current time:
chramp( ramp_path , position , component_index )
Where ramp_path is the path to the ramp parameter you want to read, and position is the position along the ramp at which to read the value (from 0 to 1). For color ramps, you must also specify the component_index , i.e. red = 0 , green = 1 , or blue = 2 . For spline ramps, use 0 as the third argument.
chrampt lets you read a value from a ramp at a specific time. chrampf lets you read a value from a ramp at a specific frame.
To read the value of a ramp parameter:
Get a reference to the hou.Parm object representing the parameter.
Call the tuple method on the object to get its hou.ParmTuple value.
Call one of the eval, evalAsRamp, or evalAsRampAtFrame methods on the ParmTuple object to get a hou.Ramp object.
You can also call the parmTemplate method on the Parm object to get a hou.RampParmTemplate object containing metadata about the parameter (i.e. its default values).
Adding a ramp parameter to a node
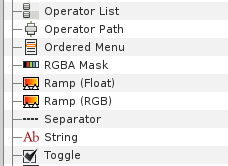
The color and floating point ramp parameter types appear in the list of available parameter types when you edit a digital asset definition or directly edit the parameter interface of a single node.
Ramp parameters on VEX shaders
In a VOP network
To add a ramp parameter to a shader in a VOP network:
Create a Ramp Parameter node.
In the parameter editor, choose the Ramp type (RGB Color ramp or Spline ramp).
Connect a float output to the ramp parameter’s input. The input controls the position in the ramp to output.
For example, you could create a Global Variables node and connect its s output to the ramp’s input, so the ramp node’s output varies across the S direction of the surface.
Connect the ramp parameter node’s output to a Color or Vector input (for the RGB ramp) or a Float input (for the Spline ramp) on another node.

In VEX code
The ramp_rgb and ramp_flt pragmas create a ramp parameter in the UI from three arguments to the shader function.
An array of strings representing the interpolation basis between each key.
An array of floats representing the position of each key along the ramp.
An array of vectors (for a color ramp) or floats (for a spline ramp) representing the value of each key.
In code generated by VOPs, the keys are made linear using spline with the «solvelinear» keyword and the index (in the code below, 0.5 ), and then the arrays and the «uniform-ized» index are passed to the spline function.
(If in your own code you already are guaranteed to have uniform key positions, you can use «» as the key positions argument to the pragma, and skip the «solvelinear» step and just use the index as the second argument to the outer spline call.)
Источник
Position in the ramp
To quikly create a ramp using the data contained in the render of «World Position» or «Ref Position».
This node has several advantages. The position of the ramp is not set by a «color picker» but with a 2D Position knob which executes callbacks. So it is possible to precisely place the ramp regardless of the channel viewed. With the «Overlay» mode, the tool is visually even more convenient. Visualization in 3D space is also a real advantage in a certain situation, as well as the integration of the «Unpremult» and «Premult» which makes it possible to obtain clean edges. The tool is fast and easy to use, and if you don’t have the position pass, ask your Comp or CG supervisor 😉

Tool details:
P Channel: To select the Position Pass channel.
Axe: To choose the ramp direction (x,y or z).
Start & End: To adjust the position of the two extremes of the ramp.
Offset (Start & End): To precisely adjust the position between the two extremes with a slider.
Overlay: To show the ramp on overlay (looking the rgb) and to change the color (none, red, green, blue or black)
3D Options:
- To visualize in 3D the input image and the ramp. This uses a «position to point» node and it gives the possibility to adjust the «Point Detail» and the «Point Size».
- To adjust the size of 3D points representing the position of the two extremes of the ramp.
(Un)Premult: To keep nice shapes on edges.
For the creation of this tool, I was strongly inspired by the article written by Matt Estela and Pedro Andrade and similar tools, such as those from Ivan Kokov.
About
To quikly create a ramp using the data contained in the render of «World Position» or «Ref Position».
Источник
Ramp parameters
Explains the tricks to working with ramp parameters.
Using a ramp parameter
Houdini support RGB color ramps and floating point (spline) ramps. One varies color along the length of the ramp, creating a gradient, and the other varies a single value, creating curve.

Click one of the arrow-shaped point handles along the bottom of the ramp to select an existing point.
Click in the ramp area to create a new point there.
Select a point and click the Delete button to delete it.
Drag a point handle left or right to change the point’s position.
In a spline ramp, you can also drag the circular value handle up or down to change the point’s value.
In a «Hermite» ramp, the curve passes through the odd control points, and then even points control the tangent at the previous point.
Use the Position and Value controls below the ramp to edit the selected point’s position and value exactly.
Use the Interpolation pop-up menu to control how Houdini fills in the values between the selected point and the next one.
Click the Hide controls button to hide the sliders and show only the ramp.
For smooth curves, you should evenly space the control points.
Reading a ramp parameter
Use the chramp, chrampt, and chrampf functions to read a value from a ramp parameter in an expression.
To read the value from a ramp at the current time:
chramp( ramp_path , position , component_index )
Where ramp_path is the path to the ramp parameter you want to read, and position is the position along the ramp at which to read the value (from 0 to 1). For color ramps, you must also specify the component_index , i.e. red = 0 , green = 1 , or blue = 2 . For spline ramps, use 0 as the third argument.
chrampt lets you read a value from a ramp at a specific time. chrampf lets you read a value from a ramp at a specific frame.
To read the value of a ramp parameter:
Get a reference to the hou.Parm object representing the parameter.
Call the tuple method on the object to get its hou.ParmTuple value.
Call one of the eval, evalAsRamp, or evalAsRampAtFrame methods on the ParmTuple object to get a hou.Ramp object.
You can also call the parmTemplate method on the Parm object to get a hou.RampParmTemplate object containing metadata about the parameter (i.e. its default values).
Adding a ramp parameter to a node
The color and floating point ramp parameter types appear in the list of available parameter types when you edit a digital asset definition or directly edit the parameter interface of a single node.

Ramp parameters on VEX shaders
In a VOP network
To add a ramp parameter to a shader in a VOP network:
Create a Ramp Parameter node.
In the parameter editor, choose the Ramp type (RGB Color ramp or Spline ramp).
Connect a float output to the ramp parameter’s input. The input controls the position in the ramp to output.
For example, you could create a Global Variables node and connect its s output to the ramp’s input, so the ramp node’s output varies across the S direction of the surface.
Connect the ramp parameter node’s output to a Color or Vector input (for the RGB ramp) or a Float input (for the Spline ramp) on another node.

In VEX code
The ramp_rgb and ramp_flt pragmas create a ramp parameter in the UI from three arguments to the shader function.
An array of strings representing the interpolation basis between each key.
An array of floats representing the position of each key along the ramp.
An array of vectors (for a color ramp) or floats (for a spline ramp) representing the value of each key.
In code generated by VOPs, the keys are made linear using spline with the «solvelinear» keyword and the index (in the code below, 0.5 ), and then the arrays and the «uniform-ized» index are passed to the spline function.
(If in your own code you already are guaranteed to have uniform key positions, you can use «» as the key positions argument to the pragma, and skip the «solvelinear» step and just use the index as the second argument to the outer spline call.)
Networks and parameters
Networks
How to create, move, copy, and edit nodes.
How to move around the networks and move between networks.
How to connect nodes to each other to make them work together.
Flags represent some state information on the node, such as which node represents the output of the network. Different network types have different flags.
Badges indicate some status information about a node. They usually appear as a row of icons below the name of the node.
How to use the Find dialog to find nodes based on various criteria.
Editing parameters
How to change the behavior of nodes by changing their parameters.
Explains the tricks to working with ramp parameters.
An explanation of the special characters available in pattern-matching parameters.
How to change the parameter interface of a node.
How to create references between parameters and create node copies that reference the original.
Next steps
How to automatically clean up, align, and distribute nodes.
How to keep your networks neat and well documented.
Every node and parameter has a unique pathname you can use to refer to it.
How to display lines and indicators representing channels references between nodes.
Guide to network editor options.
A quick reference for hotkeys and user interface shortcuts in the network editor.
Expressions
You can enter expressions into a parameter so its value is computed instead of being static or keyframe animated.
How to use variables and expressions in file path fields to generate numbered and unique filenames.
How to add extra parameters to an individual node.
Tips and tricks for writing expressions to accomplish various effects.
Expression functions let you compute the value of parameters.
Guru level
Motion Effects let you easily add secondary motion to keyframed parameters (usually translate, rotate, or scale parameters), such as jitter or overshoot.
How to add custom functions to the HScript expression language.
Reference
Explains all the menu items in the network editor menus.
Источник
Position in the ramp

RAMP usage:
- Improved laryngoscopic view
- Inflated ramped position provided greater ease of ventilation as compared to the neutral position
Professional Society Recommendations

Difficult Airway Society

Difficult Airway Society

Difficult Airway Society

International Society for the Perioperative Care of the Obese Patient

The Society for Obesity and Bariatric Anaesthesia
Supporting Medical Literature

Improved Safety During Extubation
Extubation can be risky, especially in obese patients. Desaturation after premature extubation can cause a host of adverse postoperative events, including higher cost of care, prolonged hospital stay, and greater risks for adverse discharge, ICU admissions and respiratory complications.
The PPS RAMP can be easily reinflated at the end of a case so that the ideal ramped position may be reconstituted prior to extubation. This mitigates the sequel of premature extubation or an unexpected complication.
Источник