- Ripple wallet
- Secure your (XRP) assets
- Secure your Ripple (XRP)
- How to manage your Ripple (XRP)
- Praised by our community
- What is Ripple (XRP)
- Ripple (XRP) features
- XRP’s Design and Use Cases
- Financial Products and Target Audience
- Как использовать Ledger Nano S для хранения Ripple?
- Почему Ledger?
- Безопасность
- Как добавить Ripple
- Подключение
- Как это работает
- Ledger wallet nanos ripple
- About
Ripple wallet
Secure your (XRP) assets
Secure your Ripple assets with the most trusted hardware wallet. Cold storage wallets are typically encrypted devices that store users’ Ripple assets offline, providing a layer of security against the evolving threats emerging from being connected to the Internet.
Secure your Ripple (XRP)
Secure multiple assets, including Ripple, using a Ledger Hardware Wallet.
Your private keys, giving access to your assets, remain safe in a certified secure chip.

Protect your Ripple assets with the first and only
independently-certified Ripple wallet on the market.

The Ledger Nano X is a Bluetooth® enabled secure and
CES award winning device that protect your Ripple assets.
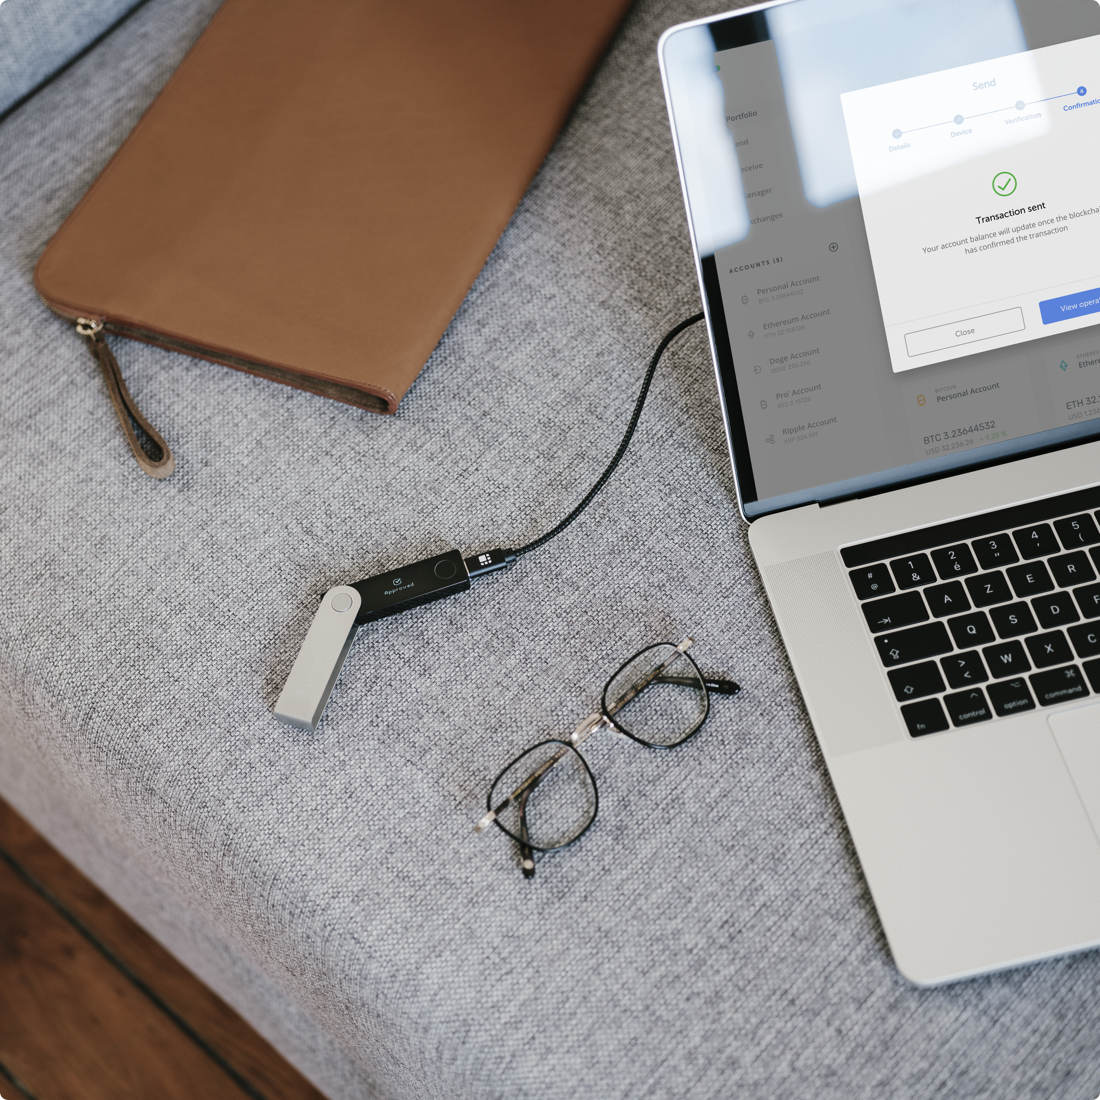
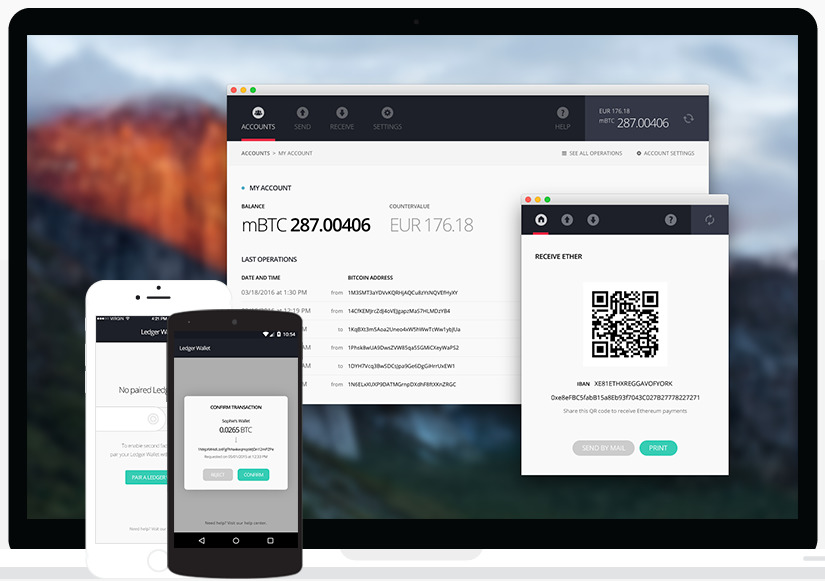
How to manage your Ripple (XRP)
Directly manage your Ripple with Ledger Live, our own desktop and mobile application. Check your balance in real-time, exchange XRP for another crypto, send and receive your Ripple and 1000+ other assets directly from Ledger Live.
Praised by our community
Simply a very elegant peace of hardware, with a gorgeous UI in the app.
Nice hardware wallet, easy to use. Runs smoothly with Linux (Ledger Live).
This is the one of best devices I ever purchased. LNS rules!
Great price, awesome product and fast shipping.
What is Ripple (XRP)
XRP is an open-source cryptocurrency project created by the private firm Ripple. Primarily a digital asset designed to overcome several problems in international banking, cross-border payments, and sourcing liquidity, XRP has remained among the top 5 cryptocurrencies by market cap since 2017.

Ripple (XRP) features
The principal target audience of XRP is for banks and payment providers, where the exceptionally fast settlement time can function as a liquidity source that circumvents pre-funding nostro accounts and provides payment services in new markets at lower costs, respectively. An optimal perspective of XRP is a cryptocurrency that unlocks several points of friction in the international banking and payments market, from transaction delays and high fees to institutional liquidity hurdles.
The firm Ripple was formed in 2012 under the corporation OpenCoin, and development on the early iteration of XRP officially began under Jed McCaleb and Chris Larsen in late 2012.
Currently led by CEO Brad Garlinghouse, Ripple has received financial backing from several prominent investors and VC funds as well as having launched three primary financial products — xCurrent, xRapid, and xVia.
XRP’s Design and Use Cases
XRP is primarily used as a means of payment and liquidity within Ripple’s RippleNet — its global payments and liquidity network. Essentially, XRP functions within a distributed ledger where transactions are processed and settled via gateways — akin to a series of private blockchains.
The Ripple Transaction Protocol is the core of the network which enables participating users and entities (i.e., financial institutions) to send and receive XRP (or fiat currencies) with a settlement time of 4 seconds and negligible transaction fees. RippleNet can process roughly 1,500 transactions per second (TPS).
There are currently more than 200 banks and payment providers in the RippleNet ecosystem.
RippleNet also enables participants to rapidly exchange fiat currencies and cryptocurrencies, making it an ideal solution for institutions moving large sums that are looking for a quick settlement and low transaction costs. However, within RippleNet, XRP functions more as a liquidity source for the exchange of currencies than a pure cryptocurrency in the sense of Bitcoin.
The network is controlled by a set of validators, which makes the network more centralized than a public blockchain such as Bitcoin or Ethereum — although Ripple plans on making more strides in decentralizing the protocol.
Financial Products and Target Audience
The primary target audience of RippleNet and XRP are financial institutions (i.e., banks) and payment providers. Ripple’s chief financial products — xCurrent, xRapid, and xVia — all target financial institutions, payment providers, and enterprises.
Of the three primary products, xCurrent is the most popular and is viewed as a rival to the outdated SWIFT system. Essentially, xCurrent empowers banks and payment providers to process cross-border payments with swift settlement times, low costs, and bidirectional messaging. The vast portion of Ripple’s financial customers are users of the xCurrent product.
However, XRP is not actually required in the xCurrent system.
Rather, xRapid is Ripple’s product that leverages XRP for liquidity sourcing. Referred to as ‘on-demand liquidity,’ xRapid is a system for reducing the need for nostro accounts that subsequently lower liquidity costs for international payments. xRapid is an add-on option to xCurrent, with XRP functioning as the intermediary digital asset that unlocks liquidity.
xVia is a payments interface with APIs for businesses to plug into the RippleNet and make payments — XRP is not required.
Ripple sells XRP to financial institutions, and reported total sales for Q1 2019 of $169.42 million, with institutional sales accounting for $61.93 million of the total. Ripple is also behind Interledger, the cross-ledger payment protocol.
Источник
Как использовать Ledger Nano S для хранения Ripple?
Ripple входит в топ-10 криптовалют мира. Это объясняется большим количеством известных партнеров и вкладчиков, среди которых есть Google. Также Ripple быстро получил свою популярность благодаря тому, что неофициально он является первой криптой. Хоть выпуск произошел в 2012 году, но разработана платформа и её валюта были ещё в 2004.
Ripple покупают во всем мире, потому главным вопросом безусловно остается выбор кошелька для хранения. Мы советуем остановиться на выборе аппаратного кошелька, поскольку они обеспечивают высокий уровень защищенности средств. Среди таковых также существует несколько отличных вариантов, однако сегодня мы остановимся на одном из лучших – Ledger Nano S.
Почему Ledger?
Компания Ledger активна на рынке с 2014 года. Согласно данным с официального сайта Ledger было продано уже более миллиона кошельков. Разработчики смогли произвести надежный продукт, который предаёт уверенности владельцу в сохранности его монет.
Безопасность
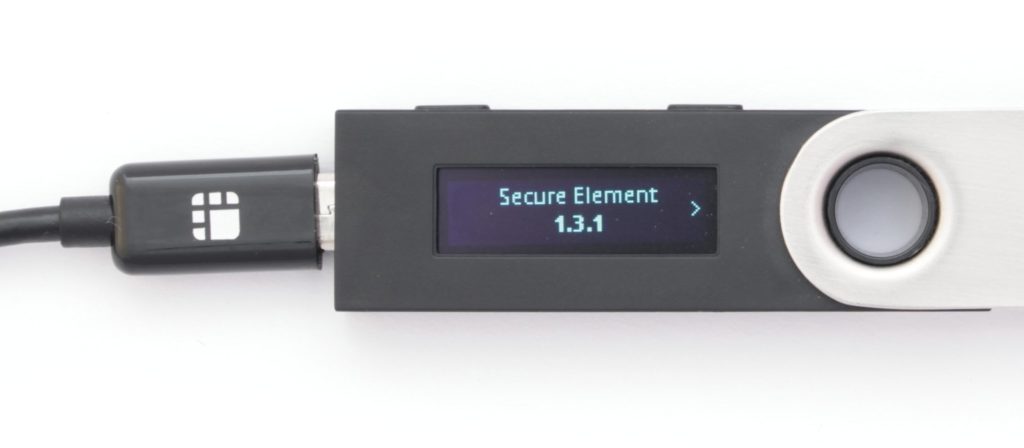
Ledger Nano S – это не первый продукт компании. Он является усовершенствованным вариантом Legder Nano. Главное улучшение – повышение уровня безопасности. Ранее, все операции проводились через компьютер, потому он был подвержен взлому. Сейчас же для входа в аккаунт нужно ввести пароль непосредственно на самом устройстве, используя маленький дисплей. Без этого он не подключается ни к одному девайсу.
Второй пункт – стирание данных. Если ввести пароль неверно трижды, аккаунт стирается с кошелька и с него уже ничего нельзя будет украсть. Произвести взлом путем использования ПО вовсе не получится, ведь после каждого неправильного ввода нужно перезагружать устройство.
Третий пункт – мнемоническая фраза. В предыдущей версии она генерировалась на компьютере. Теперь это происходит на самом дисплее при первом запуске. Её обязательно нужно записать и спрятать подальше, так как это единственный способ восстановления.
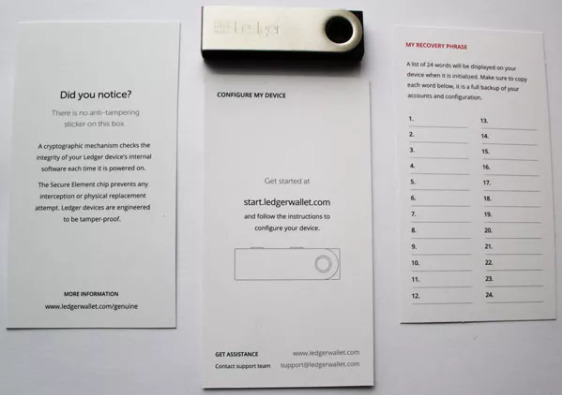
Последнее, предоставлена возможность автоматического восстановления данных по кошельку. Процесс описан в «Листе восстановления», который поставляется вместе с Ledger Nano S и является уникальным для каждого устройства.
Как добавить Ripple
Разберем шаг за шагом подключение Ripple к Ledger Nano S. Начинается работа с устройством с выбора пароля. Рекомендуется ввести максимальное значение из цифр для большей безопасности. Навигация происходит путем использования двух кнопок: левая отвечает за обратный отчет цифр, правая – за рост. Подтверждение любого действия осуществляется нажатием двух кнопок одновременно.
Второй шаг – запись 24 слов для восстановления. Они будут отображены в натуральной последовательности, после чего больше никогда не будут отображаться на устройстве, потому нужно обязательно записать их.
Подключение
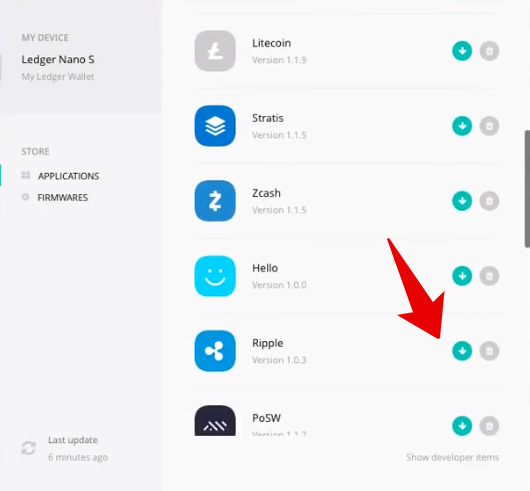
В первую очередь убедитесь, что у Вас последняя версия прошивки девайса, иначе загрузить Ripple Wallet на устройство не получится. Для проверки перейдите в раздел настройки – устройство – прошивка (Settings – Device – Firmware).
- Установите Ledger Ripple Wallet на свой компьютер, скачав его с сайта Ledger.
- Далее скачайте Ledger Manager, запустите его и подключите Ledger Nano S к компьютеру. Программа автоматически обнаружит его, после чего откроется интерфейс. Из списка кошельков стоит выбрать Ripple и загрузить его на девайс.

- Откройте приложение XRP на устройстве.
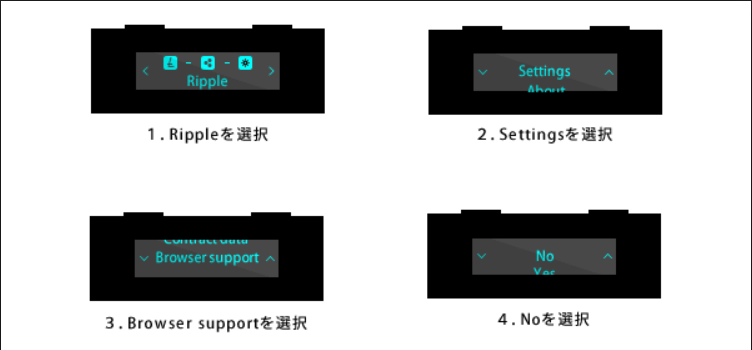
- Перейдите Ripple-Settings-Browser Support
- Отключите поддержку браузера
- Запустите Ledger Ripple Wallet на компьютере. Приложение синхронизируется с устройством и откроется Ваш кошелек.
Как это работает
Данное приложение является простым аккаунтом XRP, через которое можно проводить транзакции и проверять баланс, как через любой кошелек.
Преимущество над другими кошельками заключается в том, что открыть его можно лишь после подключения Ledger Nano S к компьютеру, ввода пароля и синхронизации девайса с приложением. Каждую транзакцию нужно будет подтвердить на самом устройстве. Без этого перевод/получение средств будет невозможным. Именно это и обеспечивает максимальный уровень безопасности.
Источник
Ledger wallet nanos ripple
XRP Wallet App for Ledger Nano S and Ledger Nano X
This repository contains the source code for the XRP wallet app that makes it possible to securely store XRP and assets issued on the XRP Ledger using Ledger Nano S and Ledger Nano X devices.
To add Ledger Nano S and Ledger Nano X support in your application, please see the NPM package hw-app-xrp and the examples below.
The XRP wallet app comes with the following features:
- Support for all transaction types:
- AccountSet
- AccountDelete
- CheckCancel
- CheckCash
- CheckCreate
- DepositPreauth
- EscrowCancel
- EscrowCreate
- EscrowFinish
- OfferCancel
- OfferCreate
- Payment
- PaymentChannelClaim
- PaymentChannelCreate
- PaymentChannelFund
- SetRegularKey
- SignerListSet
- TrustSet
- Support for all transaction common fields such as memos
- Support for issued assets such as SOLO, stocks and ETFs
- Support for signing on behalf of others
- Support for multi-signing
- Unified UI across Ledger Nano S and Ledger Nano X
The user interface primarily consists of the idle menu and the transaction review menu.
Upon starting the app on your device you are immediately greeted by the idle menu. This menu, as the name implies, is used when the device is in its idle state. At this point, an external application may initiate a transaction, which opens up the review menu.

When reviewing a transaction the entire UI is dedicated to displaying the transaction details. You can page through all the details by using the left and right buttons on your device, as indicated by arrows on the screen.

Fields in arrays are suffixed with their array index in square brackets. See example below.

PathSet fields have their index information shown in square brackets on the form [Pi: Sj] , where i is the path index and j is the step index within that path. See example below.

In order to take action on the transaction, you must first page through and review all transaction details. The last two items in the review menu are ‘Sign transaction’ and ‘Reject’.

Page to either ‘Sign transaction’ or ‘Reject’ and press both buttons simultaneously to confirm your action.
In order to initiate transactions from NodeJS or a browser client, the library hw-app-xrp can be used.
An example of a basic payment transaction using this library is shown below:
Multi-signing a Transaction
It is also possible to perform parallel multi-signing using the XRP wallet app. This is done by sourcing a list of signatures for the transaction and appending them to the Signers field of the transaction before submitting it for processing. An example of combining a couple of externally sourced signatures with a signature of the Ledger device is shown below (uses imports and functions declared in previous example).
From version 2.0.0 of the XRP wallet app it is possible to sign larger transactions than in previous versions. In order to enable support for larger transactions there have been slight modifications to the transport protocol, which is used to communicate between the client and the device.
The protocol changes are fully backwards-compatible with previous versions of hw-app-xrp, but in order to sign larger transactions you must use version 5.12.0 or above of hw-app-xrp.
Because of resource constraints the following limits apply for the respective hardware wallet:
- Maximum fields per transaction: 24 fields
- Maximum displayed field value length: 128 characters
- Maximum transaction size: 800 bytes
- Maximum number of elements per array field: 8 elements
- Multi-sign support: Parallel only
- Maximum fields per transaction: 60 fields
- Maximum displayed field value length: 1024 characters
- Maximum transaction size: 10 000 bytes
- Maximum number of elements per array field: 8 elements
- Multi-sign support: Parallel only
Make sure that you have configured a development environment as outlined in the development documentation for Ledger devices. Then run make from the repository root to build the app:
To upload the app to your device, run the following command:
Manual testing can be conducted with the help of the testing utility TowoLabs/ledger-tests-xrp. Make sure that your device is running the latest firmware and then follow the instructions in the test repository.
About
Ripple wallet application for Ledger Blue and Nano S
Источник