- RAMP Price ( RAMP )
- RAMP Links
- RAMP Contracts
- RAMP Tags
- RAMP Price Live Data
- What Is RAMP (RAMP)?
- Who Are the Founders of RAMP?
- What Makes RAMP Unique?
- Related Pages:
- How Many RAMP (RAMP) Coins Are There in Circulation?
- How Is the RAMP Network Secured?
- Where Can You Buy RAMP (RAMP)?
- If you find the ramp
- Getting Started
- The Warmup
- The Ramp
- The Results
- Ramps
- Ramps
- Contents
- Types
- Floors
- Ramps
- Angle
- Scale
- Landings
- Connecting floors, ramps and landings
- Step1: Connecting the bottom floor and ramp.
- Making Colidable (red) lines visible
- Step 2: The choice of ramp
- Step 3: Connecting the upper floor (landing) with the ramp
- Measurement tool
RAMP Price ( RAMP )
0.000006153 BTC 1.02 %
0.00009327 ETH 1.02 %
RAMP Links
Links
Explorers
Community

RAMP Contracts


Please change the wallet network
Change the wallet network in the MetaMask Application to add this contract.
RAMP Tags
Property
Please wait, we are loading chart data
RAMP Price Live Data
The live RAMP price today is $0.229498 USD with a 24-hour trading volume of $7,324,560 USD. RAMP is up 1.02% in the last 24 hours. The current CoinMarketCap ranking is #345, with a live market cap of $84,209,418 USD. It has a circulating supply of 366,928,035 RAMP coins and a max. supply of 1,000,000,000 RAMP coins.
If you would like to know where to buy RAMP , the top exchanges for trading in RAMP are currently Binance, HitBTC, Gate.io, Bibox, and MXC.COM. You can find others listed on our crypto exchanges page.
What Is RAMP (RAMP)?
RAMP DeFi is a decentralized protocol that intends to boost DeFi adoption by allowing non-Ethereum (ETH) users to stake tokens on ETH platforms; at the same time, Ethereum users can interact with the RAMP protocol and increase their yields.
RAMP DeFi allows the staked capital of non-ERC-20 staking blockchains to be collateralized into a stablecoin known as rUSD that is issued on the Ethereum blockchain. The main result of this is the maximization of capital efficiency on stacked digital assets, where users earn staking rewards, unlock liquidity from staked assets and stack multiple yield streams at the same time.
Users who are already on the Ethereum blockchain can mint eUSD by depositing their ERC20 stablecoins into RAMP’s eUSD liquidity pool. This means that rUSD and eUSD holders can exchange, lend or borrow both tokens freely and in turn create liquidity for users with capital locked into staking arrangements.
RAMP’s creation was prompted by the rapid growth of the staking economy, which has exceeded $300 billion by 2021, combined with the inefficiency of said economy’s markets.
Who Are the Founders of RAMP?
RAMP was co-founded by Lawrence Lim and Loh Zheng Rong. Before RAMP, Lim was the head of international growth at IOST and handled global sales at TradeGecko. He was also responsible for mergers and acquisitions at KPMG Corporate Finance LLC and asset management at JP Morgan Chase & Co.
Lim studied at the Nanyang Technological University and got a bachelor of business degree in banking and finance with First Class Honors.
Loh Zheng Rong co-founded NOX Pte Ltd and was a blockchain consulting partner at Merkle Ventures LLP. He was also the chief innovation officer at 2359 media, as well as the senior advisor of ICONIC Partners. He was also the chief operating officer and co-founder of Toucanapp Pte Ltd. He has a bachelor of business administration (B.B.A) degree in finance wealth management from the Singapore Management University.
What Makes RAMP Unique?
To efficiently power token exchanges between blockchain systems, the network takes advantage of liquidity on/off-ramp designs. Within this framework, the tokens that use a non-Ethereum standard are first converted into stablecoins called rUSD for use on the Ethereum blockchain.
ERC-20-based stablecoins can also be converted into eUSD for use in Ramp DeFi’s liquidity pool. rUSD holders get the ability to use funds locked in non-Ethereum blockchains as well as the ability to use fully-collateralized stablecoins and earn staking incentives after the conversion. eUSD holders earn interest from lending their digital wealth as well as a chance to provide liquidity within DeFi protocols.
Related Pages:
Learn about Mimblewimble on CMC Alexandria .
Enter the world of crypto through the CoinMarketCap blog .
How Many RAMP (RAMP) Coins Are There in Circulation?
RAMP’s circulating supply is around 176 million coins as of February 2021, with a maximum supply of 1,000,000,000 RAMP coins.
How Is the RAMP Network Secured?
RAMP network collaborates with the Crust Network for secure on-chain decentralized data storage. As such, RAMP DeFi is an open finance project and has the potential to unlock liquidity from staked digital assets, allowing all users to collateralize their digital assets while locked in staking into liquid capital.
Crust implements the incentive layer protocol for decentralized storage. It is adaptable to multiple storage layer protocols, including IPFS, and even supports the application layer. The architecture it is based on has the capability to support a decentralized computing layer and build an entire cloud ecosystem.
Where Can You Buy RAMP (RAMP)?
RAMP is available to buy, sell and trade on the following exchanges:
Unfamiliar with crypto purchasing? Learn how to buy and trade Bitcoin here.
Here are some other articles that you may be interested in:
Источник
If you find the ramp
FTP (Functional Threshold Power) is a very useful performance metric for cyclists. Not only is it a solid measure of overall fitness, it also determines power training zones for structured workouts. So whether you want to take on a structured training plan or simply track fitness gains over time, your first step should be FTP testing.
There are various ways to test your FTP, but the Ramp Test is the least daunting. It begins easy and only becomes hard in the final few minutes. You can expect 4-8 minutes of hard effort when completing a Ramp Test, making it the least intimidating option for most riders.
There are two ramp tests available in Zwift: the standard «Ramp Test» and «Ramp Test Lite». Ramp Test Lite is for lighter (under 60kg/132lbs) and more novice ( 2w/kg, the standard Ramp Test is probably better for you.
Additionally, ramp tests are a great workout by themselves. Looking for a short, max effort? Want to test your limits? Hop on and crush a ramp test!
Here’s a step by step guide to determining your FTP using Zwift’s Ramp Test.
Getting Started
Begin by selecting the Ramp Test workout:

The Warmup
The first interval is a 5-minute free ride warmup. You are free to ride at the power and cadence you’d like, but we recommend keeping your cadence high and ramping up your power over this interval so you are warmed up and ready for the test effort.

As the instructions say, keep in mind this is a seated test. This test returns its most accurate results when you work to keep your effort and technique consistent through each interval. Staying seated helps maintain this consistency.
The Ramp
After your warmup, the Ramp Test has you perform an ascending series of 1-minute intervals. These begin at 100 watts and increase by 20 watts each minute until you can’t turn the pedals any longer.

The Results
Once you stop pedaling, the screen will change:

Click “I’m toast!” or let the timer run out, and Zwift will calculate your FTP based on how far you got into your final interval. Your new FTP will be automatically saved to your profile.

That’s it, all done. Congrats on your new FTP!
Источник
Ramps
Ramps
Contents
Types
There are a variety of ramps, that are possible to create. You can make stairs, ramps, ladders, curved paths. All these vary in difficulty. In general this article describes the techniques to make a simply ramp. To make any of the other types see special ramps specific section, below.
Floors
There will be a couple of questions you will need to ask yourself when you are creating ramps. The first and foremost will be, the floor. There are 2 types of floors that you could use. The first is the property template itself. These are non editable floors, that are unmovable. They can however be edited with the World Texture Editor. The other type of floor is one that is user created. This can basically be any prop set to collidable in the prop editor. In general there are a few preferred props for this, though in essence any prop could serve this purpose. The most common and preferred ones are:
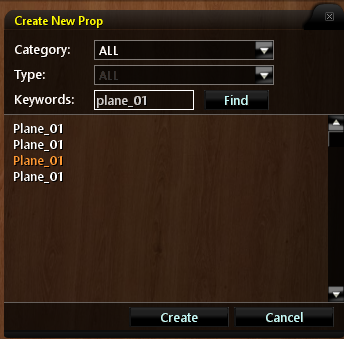
When searching for Plane_01 you will discover 4 props, the correct one is the third one down (highlighted in orange)
Flat Plane 1 Base, for really small landings (usually not used, unless making very detailed stairs, such as spiral staircases)
Why are these above props vastly better then any of the other props? When scaling them they do not deform as much, and the collidable areas are offset only by a small margin.
Now an important factor for scaling is that any of the above props, will work best with a certain scaling range.
For all of them the following is always true on the scaling tab: X and Z can be scaled from 0.25 to 1.5. However Y in general is set to 1, this pertains to the height an avatar is offset to the prop. In simple terms where the avatar will not sink under. Note that avatars all have a specific height of 591 points from where their feet touch the ground. That said, depending on the angle of the ramp, the Y value might need changing to a lower or higher number until it looks correct where the avatar will touch the visual floor.
Ramps
For ramps the best prop to use, is again up to whatever prop you desire. However the most easy and workable ramp prop is in general the Collidable Floor Plane Medium, the same Collidable Floor Plane Medium as is used as a floor. This is due to the scaling of this prop. The rest of this section assumes that you are using a Collidable Floor Plane Medium as ramp prop, other props might vary in settings.
Angle
The first thing to discuss is the angle in general the best angle is 26.4° on either X or Z . This angle works best when using a primitive staircase set to default. Of course the moment you start scaling the primitive staircase, the angle of the ramp will also change accordingly. A noteworthy fact is that between 20° and 40° the Y value does not need to be changed from 1. If you decide to venture beyond these degrees you will need to change the Y value in order to make it look like the avatar is walking on the visible floor.
Scale
For most Collidable Floor Plane Medium ramps, either the X or Z axis should be modified to 0.5 in scale for the width of the ramp or stairs. Of course if you want wider ramps or stairs, this needs to be larger. The length of the ramp set to 1 on X or Z axis can in general be considered the height and length needed to ascend 1 floor of a house. Which axis you pick for width or length is not important this is your own choice.
Landings

Above image displays 3 Plane_01 props. A scaled: 0.5x1x0.5, B scaled: 1x1x1, C scaled: 1,5x1x1,5. As you can see the deformation of the collidable edge from the Plane_01 is minimal.
Landings is a pretty simple topic, these are the exact same props as used for floors. Since they would simply be the floor for the next level and so on. As to which one to pick is simple the area you need to be walk-able, the same principle applies as to floors: Water Surface for large areas, Collidable Floor Plane Medium for the in between, and Flat Plane 1 Base for the really small areas.
Never scale landings bigger then 2 in scaling on the X or Z axis. As this will cause issues when using this landing a floor the next level. If you have the aesthetics in place, it is best to align the landing floor already up with the visible aesthetic floor. This will make sure you have already set this up correctly. This will make it however that the object you will be manipulating will be the ramp.
Connecting floors, ramps and landings
Step1: Connecting the bottom floor and ramp.
Putting it all together, for the static floors (not user created), simply put a ramp of your chosen angle to the floor. You have a margin of 200 points where this ramp can float above the floor. As Utherverse automatically will put any avatar upon this ramp. A user created floor however needs to be more exact.
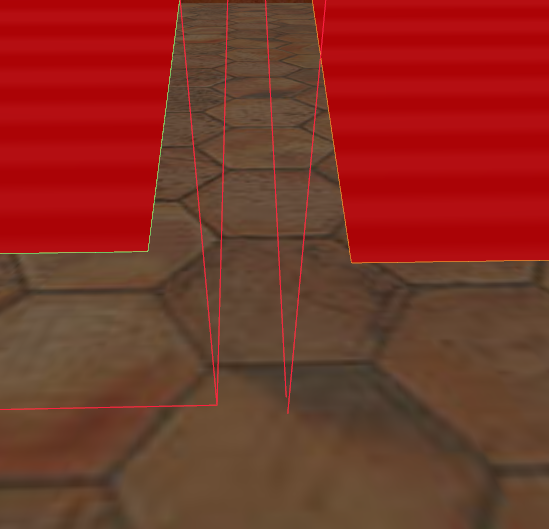
The Plane_01 on the left is wrong, the collidable (red line) is not sunk into the floor. The right Plane_01 is correctly placed with the collidable under the floor.
Therefor in both cases it is recommended to put the collidable red lines at the bottom where the ramp will start, underneath the floor. As seen in the image on the left. Sinking in this prop to the floor below these lines is not going to cause an issue. You can lower it as much as you like, though be careful with anything build underneath, as one might run into this collidable and get stuck or unable to move. Recommended is always to make the ramp as close as possible to the size it needs to be.
Making Colidable (red) lines visible
To make collidable lines visible and make them stay visible while manipulating another prop, one has to do the following: Right click the prop one wants to show the lines of, then hover your mouse cursor over the «properties» setting of the intended prop in question. Now without clicking this setting, move your mouse out of this menu to the right, then click anywhere outside of the menu. The collidable (red lines) will now stay visible. Note, that if for some reason this is not working, close and reopen the prop editor.
Step 2: The choice of ramp
The angle and distance of the ramp is something you need to decide yourself. Recommended is to never make the Collidable Floor Plane Medium larger then scale of 2 on the X or Z axis. If you really need larger ramps, Water Surface is recommended. Depending on your build style you can either build the ramp first and the aesthetics later, or visa versa. Some decorators find it more easy to visualize where the ramp will be, other find it more easy to see the actual ramp that will be in place later on. In case of this guide we set the angle to 26.4° on either axis.
Step 3: Connecting the upper floor (landing) with the ramp
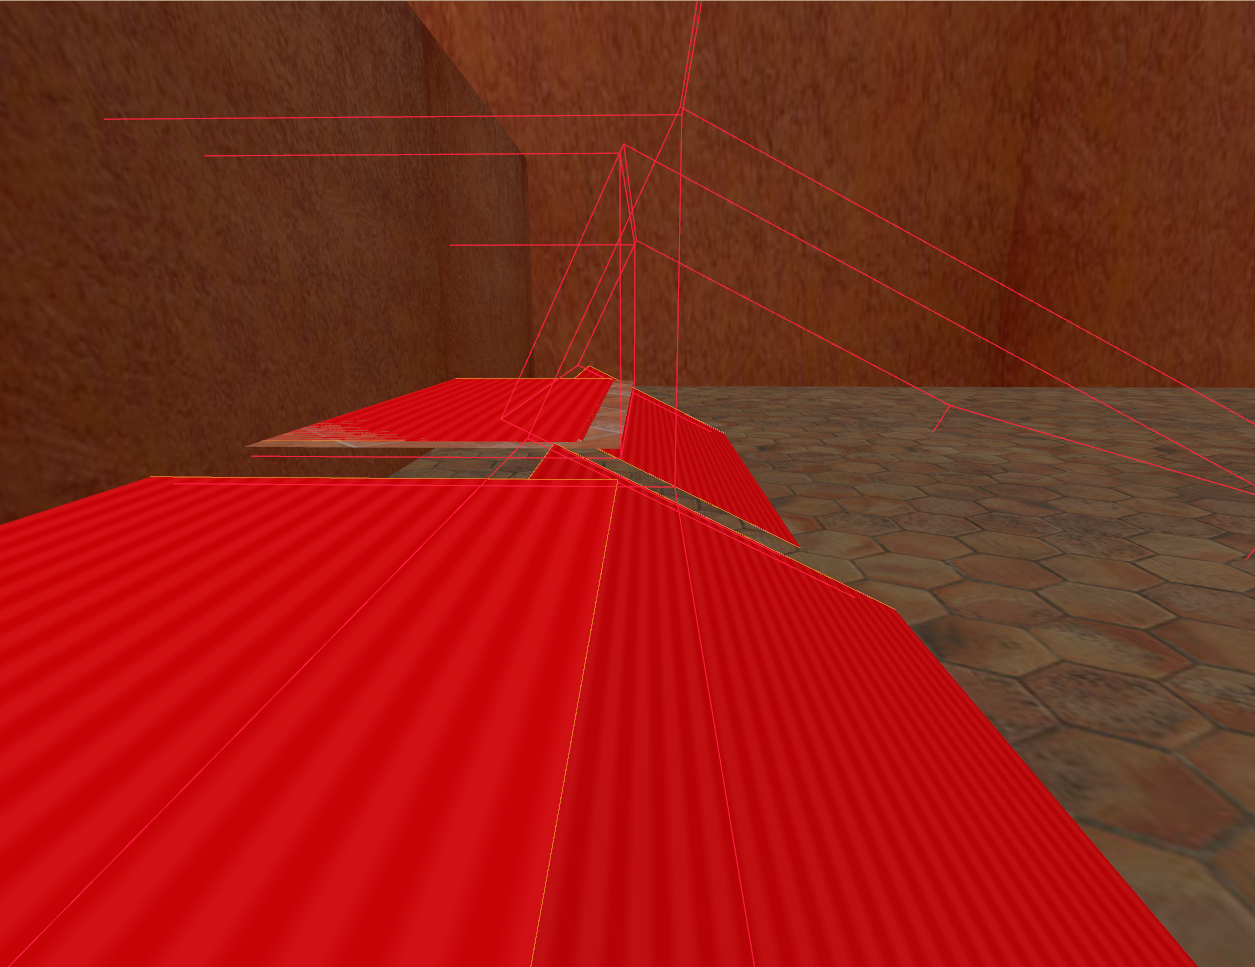
The further ramp shows the collidable landing lined up with the visable floor texture.
Probably the most important step as this in general completes the ramp and in considered the most difficult part by most. First is putting the landing in. If you have a aesthetic landing in place, you simply have to raise the landing collidable floor up to it’s level and line it up with the edge. In this scenario you will be lining the ramp up with the landing. In the other case if you have put the ramp at the right spot, then in general it is better to be moving the collidable landing to line up with the ramp. Both are viable options.
Tip: When doing step 3 it is advisable to have flying enabled. This will make it easier to test if you have the collidable walls lined up correct and if you are stuck you can simply fly out of it again. It also makes it easier to fly right up to the collidable (red) lined to see how close they are with each other.
Measurement tool
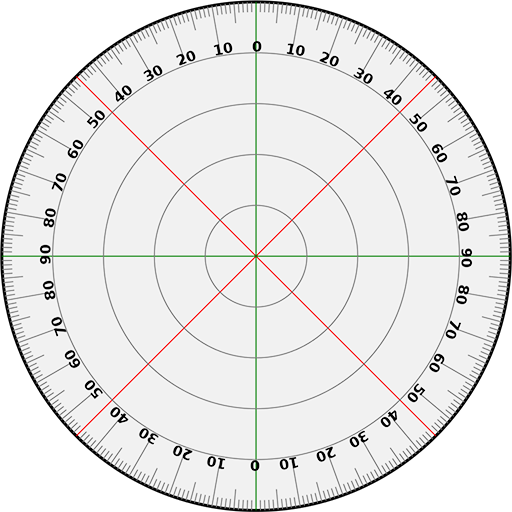
Measurement Tool (512×512) used on a Wall prop with default scaling.
Now you have the choice to do this with or without a measurement tool. As this guide is written with new decorators in mind we will use this tool. Once you get more comfortable and more used to this you can simply use the wall as a guide or even none at all. There are a variety of other options to do this, but this is deemed the most straight forward and simplified method.
Please do not hotlink this tool, rather grab the file and host it at your own hosting site!
Create a wall prop and put the tool on it. Now put this wall perpendicular to the ramp you have made. In general it is recommended to set the wall position to the level of the landing floor, but leave the wall set to default scaling. Now make the collidable lines visible and select the ramp or landing that you going to move in position. Now simply start moving the prop until the lines intersect at the center point where the wall meets prop you are lining it up to.
Источник