Ethereum Tutorial: Sending Transaction via NodeJS Backend

“ Note: In this tutorial, I use web3js 1.0 version”
Hello guys, I will explain how to send a transaction from a NodeJS backend. I will use Rinkeby testnet and will create a router, also add some node modules and using Infura HTTP provider to complete the tutorial
We need web3js, express, and ethereumjs-tx modules to perform the transaction. After that, you need to take your own API key from Infura by simply signing up for the Infura.
First of all you need to create a empty folder for this project to make it easier to access it. After creating the folder you need to open a command shell at that folder. I am assuming that you have npm installed in your computer. npm is distributed by nodejs so if you install nodejs you get npm with it. If you do not have npm download nodejs from this site. After installing npm you need to call.

If you want to keep default settings including default name which is the folder name, you can skip all lines by clicking enter. At the end of this process you will have a package.json file.
After initiating the project,inside the folder you need to create a js file with the name that you want which is gonna be our backend
In my code you can see that there are module requirements, we simply include them into the project by downloading via npm. Their npm calls are;
You need to call this lines separately from command line to install them into the project. When you finish the installing process you can see that there is a folder which name is node modules it is the folder that your modules downloaded.
When you finish the downloading modules. You need a infura api key. Api key is a crucial part to finish this tutorial. You can get it by singing up to the Infura. When you get the infura api key you need to change the 7th line (YOUR_API_KEY) with your api key.
By the way, infura is very good provider. You can also reach ipfs which is a blockchain storage provider with infura api. You can get more information about ipfs from their website
By getting the infura api key we finished the pre-requests of the code. We can start coding. From now on, I will explain the code line by line.
At the first 3 line, I added the modules to the js file.
- web3 is the module that will interact to the ethereum.
- Express is required for creating a router.
- ethereumjs-tx is required for creating transactions
At the line 5, I create my app by using express module.
After creating app, we need to write the last line of the file which is
At the line 8, I create web3js object with httpprovider which is infura at the nodejs backend. If you searched for ethereum backend before reaching this tutorial you can see that many of them coded by reactjs and they use metamask as provider. NodeJS backend cannot reach the browsers materials so NodeJS backend cannot use metamask as provider so I did a workaround for it and use infura as provider.
In some functions at web3 you need websocket provider for web3 so you need to change the line 8 with this line when needed.
At the line 10, I create my router which is a get but it needs to be post logically. I create this tutorial for just showing how sending transaction is done so it does not matter at this point.
Inside the router I need my rinkeby Ethereum address(myAddress), the adress that I will send my transaction(toAddress) ,the Contract address(contractAddress) and contract abi(contractABI).You can reach the contacts’ abi by Ethereum wallet or etherscan. I deploy my own contract for this tutorial from ethereum wallet you do not need to deploy any contract. you can simply use one of the existing ones.
Last thing that I need is my private key(privateKey). It is not a safe way but since we do not have any wallet at our frontend (because we do not have frontend 🙂 ) we do things manually at this point. you can not reach your private key from your ethereum wallet so you need to import your rinkeby ethereum account to the MyEtherWallet like sites
At the router after defining our variables, we create raw transaction then we signed it with our private key. After signing the transaction we send it to the rinkeby testnet via web3js.
After finishing the coding we need to test it. At the same folder open a command shell and start the backend. My file name is backend.js so I started it by the code
Which means you can start your backend with the code
After starting our backend you need to open your browser and you need to write http://localhost:3000/sendtx to the address line
That’s it. We created our little backend for ethereum.
Thanks for reaching out this tutorial. I am not native so the grammer is probably problematic, sorry for inconvenience. If there is any problem or if you want to ask something you can reach me via twitter
Источник
How to Buy and Send ETH

May 7, 2018 · 6 min read
Once you have your Ethereum wallet set up, you will need to buy ETH and send it to the wallet. Once you’ve done this and have ETH in your secure wallet you will be able to purchase Varyon.
Please note: the presale is for pledges above 1 ETH equivalent. Other pledges qualify for the main sale whitelist.
List of Best Ethereum Exchanges
Here’s a list of the best Ethereum exchanges available today. When examining an exchange you should usually take into account several factors such as:
- Fees
- Countries supported
- Payment methods accepted
- Exchange reputation
- Level of verification needed
- Reliable support
Coinbase is the most popular method today for buying Ethereum. The exchange is one of the oldest around and has been active since 2012. Coinbase supports 32 different countries including the US, Canada, UK, and Australia. Coinbase can act as a broker through it’s direct and easy buying service, or you can use the Coinbase exchange (GDAX) if you’re a more experienced user.
Pros: Cheapest broker around, easy to use
Cons: Support slow to respond
Coinmama has been around since 2013 and supplies a brokerage service to both Bitcoin and Ethereum. The exchange will buy or sell Ethereum directly at a premium. They also put an emphasis on quality customer support (at least better than Coinbase’s). Coinmama accepts credit and debit cards for Ethereum purchases.
Pros: Fast response time, good customer support
Cons: Relatively high exchange rate due to premium service
CEX.io Brokerage Service and Exchange
CEX.io is a Fincen registered Bitcoin and Ethereum exchange that supplies brokerage services as well. The exchange accepts credit cards, wire transfers and SEPA transfers if you live in the Eurozone. The site has a very easy to use and intuative interface that allows you to buy ETH relatively quick.
Pros: Easy to use, reputable company, multiple payment options
Cons: High fees, average response time of customer support
Bitpanda (formerly known as Coinimal) is a Bitcoin broker that specializes in buying and selling Ethereum within the Eurozone. The company was founded in late 2014 and since has grown to become one of the more popular options to purchase Bitcoins around Europe. The company has many payment options and delivers the coins to your wallet in a fast and secure manner.
Pros: Wide variety of payment options, relatively low fees, beginner friendly
Cons: Not available worldwide, fees are “hidden” within the exchange rate
Changelly was established on 2016 and within a year has managed to attract over 100,000 users which is very impressive. The exchange allows you to trade one cryptocurrency for the other. So if you own Bitcoin you can almost instantly trade it for Ethereum. From personal experience it takes around 30 minutes to get a coin traded from one type to another and the interface is very clean and intuitive. However don’t use the exchange to buy Ethereum with fiat currency since the fees are extremely high.
Pro: Fast transaction, low fees (if you use trade other cryptocurrencies), almost no verification required
Cons: Fiat transactions are very expensive
Bitfinex is the world’s biggest Bitcoin exchange by volume. The exchange offers over 50 currency pairs including ETH and is most suitable for advanced traders. Bitfixe is not available for US customers and unfortunately doesn’t allow deposit of fiat currency. This means you’ll need to buy Ethereum with another cryptocurrency if you use this exchange.
Pros: Great interface for experienced traders , High liquidity
Cons: No fiat support , Complex interface is confusing for newbies
For buying large amounts of Bitcoin
99bitcoins.com published a list exchanges for buying and selling large amounts of Bitcoin.
Buying and Sending Ether
Once you’ve chosen your exchange, you will need to create an account and transfer funds from a checking account (or credit card in some cases.) The verification and transfer process can take a few days. Some exchanges, such as Gemini, allow you to transfer funds and immediately purchase ETH without waiting for the funds to move into your account. But you won’t be able to send the ETH from Gemini into your Ethereum wallet until the funds have transferred from your bank account.
When you’ve successfuly moved USD, EUR, or other fiat into the exchange, you can then purchase Ethereum (ETH) and send it to the public address of the wallet you created. After that you can follow this guide to buying Varyon. Here we will go over how to buy and send Ether using Coinbase.
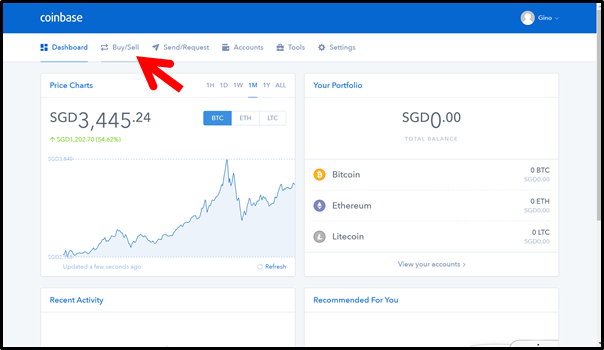
Step 1. Sign into Coinbase
Click “Buy/Sell” located at the top left-hand corner of the dashboard.
Select Ethereum and enter the desired amount to purchase in the bottom left of the page.
The right column reflects the quantity of ETH you can get for the stated amount of local currency. A transaction summary or total amount to be paid, inclusive of surcharge, is also reflected at the bottom.
Note: A flat fee of $0.99 will be charged per transaction
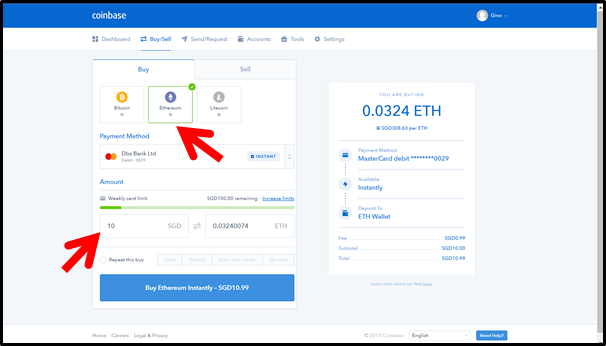
Ascertain that the purchase amount and mode of payment are correct, and click “Confirm Buy”.
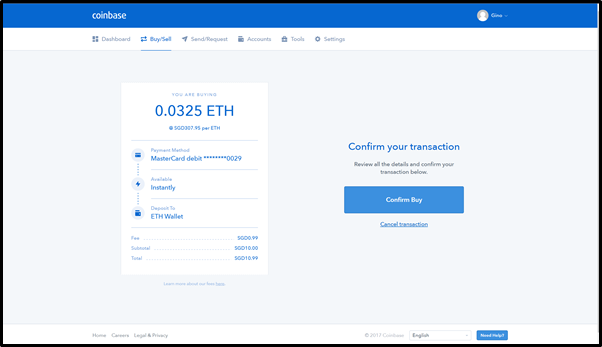
Confirm that the transaction was completed.
Once redirected back to the dashboard, your new balance should be reflected under “Your Portfolio”.
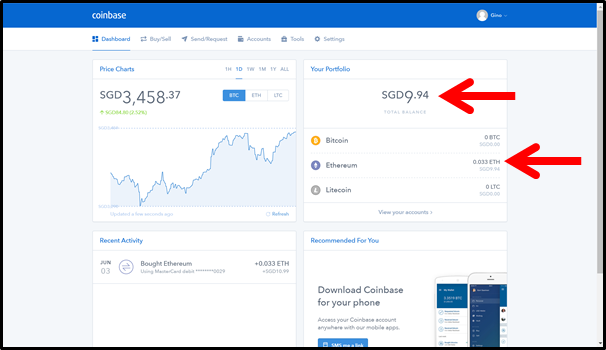
You have now bought your own ETH from Coinbase! You can’t send ETH to the token sale just yet as you will need to send it from your own wallet. To send ETH from Coinbase to your wallet, you will go to the Send/Receive page:

In this Recipient address, make sure you copy YOUR address from your MyEtherWallet website.
For Amount, put at least .002 to cover transaction fees, and make sure you select your ETH Wallet (above it says ‘BTC Wallet’).
IMPORTANT: Always test these transactions with a very LOW amount of ETH to test that everything’s working. You never want to start off with any amount of ETH that you’re not willing to lose.
Click ‘Send Funds’, and your ETH will be sent to your MyEtherWallet address to then use to buy your token(s).
Now, if you unlock your MyEtherWallet by using your Private Key or Keystore File/Password, you should see your ETH that you just sent over. If you don’t see it, wait a few minutes and refresh — it sometimes takes the blockchain a bit to confirm a transaction.
Shapeshift
If you already own Bitcoin or another cryptocurrency and would like to change it to Ether, Shapeshift is another great option. Shapeshift allows you to change from one coin to another without going through an exchange.
Here are two tutorials about how to use Shapeshift:
If you need help creating your Ether wallet to hold Varyon or another ERC20 token, please see this article.
Источник
Sending Transactions Using Web3
This is a beginner friendly guide to sending Ethereum transactions using web3. There are three main steps in order to send a transaction to the ethereum blockchain: create, sign, and broadcast. We’ll go through all three, hopefully answering any questions you might have! In this tutorial, we’ll be using Alchemy to send our transactions to the Ethereum chain. You can create a free Alchemy account here.
NOTE: This guide is for singing your transactions on the backend for your app, if you want to integrate signing your transactions on the frontend, check out integrating Web3 with a browser provider.
Like most blockchain developers when they first start, you might have done some research on how to send a transaction (something that should be pretty simple) and ran into a plethora of guides, each saying different things and leaving you a bit overwhelmed and confused. If you’re in that boat, don’t worry; we all were at some point! So, before we start, let’s get a few things straight:
1 . Alchemy does not store your private keys
- This means that Alchemy cannot sign and send transactions on your behalf. The reason for this is security purposes. Alchemy will never ask you to share your private key, and you should never share your private key with a hosted node (or anyone for that matter).
- You can read from the blockchain using Alchemy’s core API, but to write to it you’ll need to use something else to sign your transactions before sending them through Alchemy (this is the same for any other node service).
2 . What is a “signer”?
- Signers will sign transactions for you using your private key. In this tutorial we’ll be using Alchemy web3 to sign our transaction, but you could also use any other web3 library.
- On the frontend, a good example of a signer would be metamask, which will sign and send transactions on your behalf.
3 . Why do I need to sign my transactions?
- Every user that wants to send a transaction on the Ethereum network must sign the transaction (using their private key), in order to validate that the origin of the transaction is who it claims to be.
- It is super important to protect this private key, since having access to it grants full control over your Ethereum account, allowing you (or anyone with access) to perform transactions on your behalf.
4 . How do I protect my private key?
- There are many ways to protect your private key and to use it to send off transactions. In this tutorial we will be using a .env file. However, you could also use a separate provider that stores private keys, use a keystore file, or other options.
5 . What is the difference between eth_sendTransaction and eth_sendRawTransaction ?
eth_sendTransaction and eth_sendRawTransaction are both Ethereum API functions which broadcast a transaction to the Ethereum network so it will be added to a future block. They differ in how they handle signing of the transactions.
- eth_sendTransaction is used for sending unsigned transactions, which means the node you are sending to must manage your private key so it can sign the transaction before broadcasting it to the chain. Since Alchemy doesn’t hold user’s private keys, they do not support this method.
- eth_sendRawTransaction is used to broadcast transactions that have already been signed. This means you first have to use signTransaction(tx, private_key) , then pass in the result into eth_sendRawTransaction .
When using web3, eth_sendRawTransaction is accessed by calling the function web3.eth.sendSignedTransaction.
This is what we will be using in this tutorial.
6 . What is the web3 library?
- Web3.js is a wrapper library around the standard JSON-RPC calls that is quite common to use in Ethereum development.
- There are many web3 libraries for different languages. In this tutorial we’ll be using Alchemy Web3 which is written in JavaScript. You can check out other options here.
Okay, now that we have a few of these questions out of the way, let’s move on to the tutorial. Feel free to ask questions anytime in the Alchemy discord!
NOTE: This guide requires an Alchemy account, an Ethereum address or Metamask wallet, NodeJs, and npm installed. If not, follow these steps:
Steps to Sending your Transaction
1 . Create an Alchemy app on the Rinkeby testnet
Navigate to your Alchemy Dashboard and create a new app, choosing Rinkeby (or any other testnet) for your network.
2 . Request ETH from the Rinkeby faucet
Follow the instructions on the Rinkeby faucet to receive Eth. You will have to share on social media for this specific faucet. Make sure to include your Rinkeby Ethereum address (from Metamask) and not another network. After following the instructions, double check that you’ve received the ETH in your wallet.
3 . Create a new project directory and cd into it
Create a new project directory from the command line (terminal for macs) and navigate into it:
4 . Install Alchemy Web3 (or any web3 library)
Run the following command in your project directory to install Alchemy Web3:
5 . Install dotenv
We’ll use a .env file to safely store our API key and private key.
6 . Create the .env file
Create a .env file in your project directory and add the following (replacing “ your-api-url » and » your-private-key «)
- To find your Alchemy API URL, navigate to the app details page of the app you just created on your dashboard, click “View Key” in the top right corner, and grab the HTTP URL.
- To find your private key using Metamask, check out this guide.
7 . Create sendTx.js file
Great, now that we have our sensitive data protected in a .env file, let’s start coding. For our send transaction example, we’ll be sending ETH back to the Rinkeby faucet.
Create a sendTx.js file, which is where we will configure and send our example transaction, and add the following lines of code to it:
Be sure to replace the address on line 6 with your own public address.
Now, before we jump into running this code, let’s talk about some of the components here.
- nonce : The nonce specification is used to keep track of the number of transactions sent from your address. We need this for security purposes and to prevent replay attacks. To get the number of transactions sent from your address we use getTransactionCount.
- transaction : The transaction object has a few aspects we need to specify
- to : This is the address we want to send ETH to. In this case, we are sending ETH back to the Rinkeby faucet we initially requested from.
- value : This is the amount we wish to send, specified in wei where 10^18 wei = 1 ETH
- gas : There are many ways to determine the right amount of gas to include with your transaction. Alchemy even has a gas price webhook to notify you when the gas price falls within a certain threshold. For mainnet transactions, it’s good practice to check a gas estimator like ETH Gas Station to determine the right amount of gas to include. 21000 is the minimum amount of gas an operation on Ethereum will use, so to ensure our transaction will be executed we put 30000 here.
- nonce : see above nonce definition. Nonce starts counting from zero.
- [OPTIONAL] data: Used for sending additional information with your transfer, or calling a smart contract, not required for balance transfers, check out the note below.
- signedTx : To sign our transaction object we will use the signTransaction method with our PRIVATE_KEY
- sendSignedTransaction : Once we have a signed transaction, we can send it off to be included in a subsequent block by using sendSignedTransaction
A Note on data There are a two main types of transactions that can be sent in Ethereum.
- Balance transfer: Send eth from one address to another. No data field required, however, if you’d like to send additional information alongside your transaction, you can include that information in HEX format in this field.
- For example, let’s say we wanted to write the hash of an IPFS document to the ethereum chain in order to give it an immutable timestamp. Our data field should then look like data: web3.utils.toHex(‘IPFS hash‘). And now anyone can query the chain and see when that document was added.
- Smart contact transaction: Execute some smart contract code on the chain. In this case, the data field should contain the smart function you wish to execute, alongside any parameters.
- For a practical example, check out Step 8 in this Hello World Tutorial.
8 . Run the code using node sendTx.js
Navigate back to your terminal or command line and run:
9 . See your transaction in the Mempool
Open up the Mempool page in your Alchemy dashboard and filter by the app you created to find your transaction. This is where we can watch our transaction transition from pending state to mined state (if successful) or dropped state if unsuccessful. Make sure to keep it on “All” so that you capture “mined”, “pending”, and “dropped” transactions. You can also search for your transaction by looking for transactions sent to address 0x31b98d14007bdee637298086988a0bbd31184523 .
To view the details of your transaction once you’ve found it, select the tx hash, which should take you to a view that looks like this:
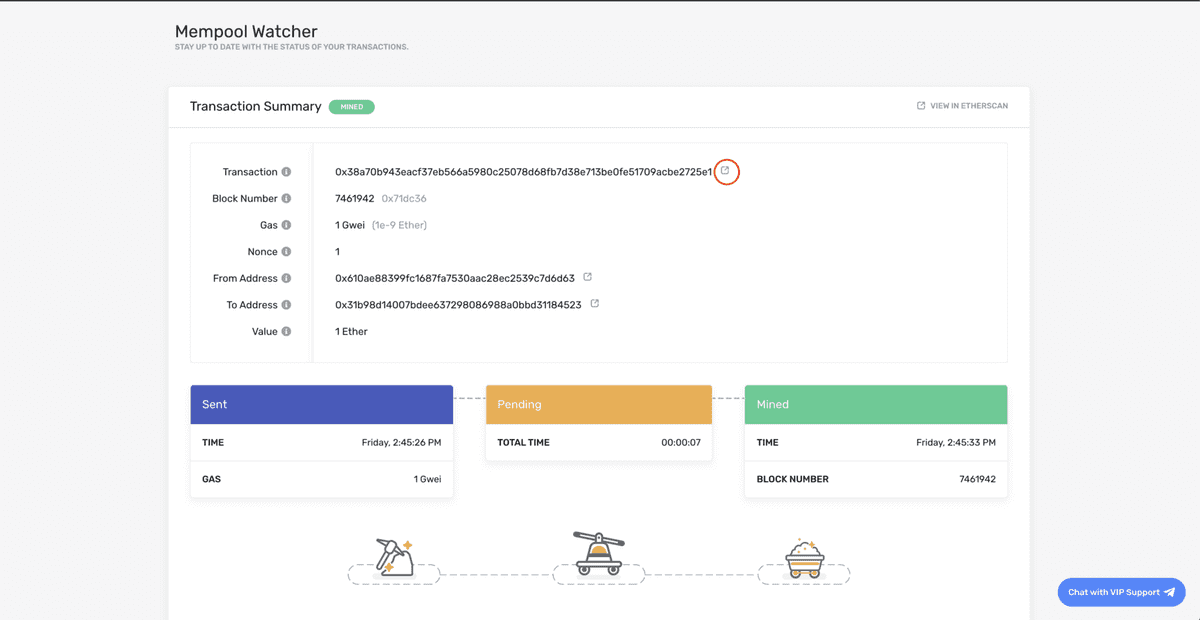
From there you can view your transaction on Etherscan by clicking on the icon circled in red!
Yippieeee! You just sent your first Ethereum transaction using Alchemy 🎉
For feedback and suggestions about this guide, please message Elan on Alchemy’s Discord!
Источник