- Setup Ethereum Mining in Linux
- Installing the AMD GPU drivers
- Setting up Claymore
- Make your miner a daemon
- Overclocking and Undervolting
- How to mine ethereum linux
- My Attention Span is > 60 seconds
- Install Ethereum Software
- Create Ethereum Wallet
- Install (proprietary) nvidia driver
- Pick Ethereum Network
- Pick a Pool
- Run ethminer
- Profit
- How to Mine Ethereum on Ubuntu 16.04/20.04
- Add Ethereum Repository
- Installing Ethminer
- Install packages
- Pick a network
- Choose a wallet
- Solo mining or pool mining
- Start mining!
- Mine Etherium With Ethminer on Ubuntu
- What Is Ethereum?
- What Is Ethminer?
- How to Install Ethminer
- How to Configure Ethminer to Mine Ether
- How to Tweak the Performance?
- Conclusion
Setup Ethereum Mining in Linux

Dec 23, 2017 · 4 min read
This guide is for people looking to get setup mining ethereum on Linux. You can use ethOS, but it is my opinion that you should not have to pay for free software. With a little bit of your time, you can save money and get a rock solid setup. If you are looking for a hassle-free way to mine on linux with overclocked GPU’s, this guide is for you.
The first step in the process is to obtain all of your hardware. Here is a list of the hardware that I have used several times to get setup.
T h is list is not the only configuration, just the one that I have used and recommended. For instance you can choose a SATA ssd, or even use a USB stick. On this particular motherboard, you can add 2 more cards using M.2 risers.
Now lets get started.
Install Ubuntu Server
There are several guides that should help you if you are new to this. It is my assumption that you are comfortable following the guided install.
- Tip: Pick Open SSH server to preinstall the secure shell if you will be using Putty or shelling in from another computer
Update your installation
Installing the AMD GPU drivers
This will compile and install the modules needed to run your cards correctly at the best hashrates possible. On Ubuntu 16.04 there is an additional step required to enable the full virtual memory page size and get the highest hashrate.
Editing GRUB for AMD GPU’s
Add the following line:
Now update grub and reboot
When the system restarts you should see several startup lines where the amdgpu drivers are initializing.
Setting up Claymore
As of dag epoch 200, Claymore v10 is deprecated. You will need to run v11.8 or later.
Now let’s create a mining executable script so we can easily stop and start mining.
Add the following to this file:
Be sure to paste the url to your mining pool above and the wallet address. Now make this file executable
Simply running ./mine.sh will start your miner!
Make your miner a daemon
Things will happen, you will need to reboot your system, your power may go out and you are not around to manually start your miner. Lets set up a systemd process to automatically start your miner when on bootup.
Put the following in this file:
Now lets run a few commands to enable and run this service. Be sure you are not running ./mine.sh manually
Great! You have now daemonized your miner! Your logs are now going into the system logger. To view them you would run this:
Now on reboot or power cycle you can be sure that your miner is always running. I have the following aliases in my
This makes life a little easier. If I want to view the claymore output, I just run watchminer . If I need to make adjustments stopminer and when I’m ready to start the miner again, startminer .
Overclocking and Undervolting
My personal advice is that you overclock and undervolt to stable levels and don’t overdo it. If you overdo it, you will run into problems on bootup, get incorrect shares and cause general instability. Mining is a long term approach to increasing your crypto position.
On linux your options to overclock and undervolt are limited. What I have found the easiest is to use the atiflash utility in linux, and modify the GPU bios on a windows VM.
Источник
How to mine ethereum linux
Install/use Debian 8 or Ubuntu 16.04 then execute:
My Attention Span is > 60 seconds
Ethereum is a crypto currency similar to Bitcoin as it is based on the blockchain technology. Ethereum is not yet another Bitcoin clone though, since it has an additional feature called Smart Contracts that makes it unique and very promising. I am not going into details how Ethereum works, you can get that into great detail on the Internet. This post is about Ethereum mining. Mining is how crypto coins are created. You need to spent computing time to get coins out. At the beginning CPU mining was sufficient, but as the Ethereum network difficulty has increased you need to use GPUs as they can calculate at a much higher hashrate than a general purpose CPU can do.
About 2 months ago I bought a new gaming rig, with a Nvidia GTX 1070 so I can experience virtual-reality gaming with a HTC Vive at a great framerate. As it turns out modern graphics cards are very good at hashing so I gave it a spin.
Initially I did this mining setup with Windows 10, as that is the operating system on my gaming rig. If you want to do Ethereum mining using your GPU, then you really want to use Linux. On Windows the GTX 1070 produced a hashrate of 6 MH/s (megahashes per second) while the same hardware does 25 MH/s on Linux. The hashrate multiplied by 4 by using Linux instead of Windows. Sounds good? Keep reading and follow this guide.
You have to pick a Linux distro to use for mining. As I am a Debian developer, all my systems run Debian, which is what I am also using for this guide. The same procedure can be done for Ubuntu as it is similar enough. For other distros you have to substitute the steps yourself. So I assume you already have Debian 8 or Ubuntu 16.04 installed on your system.
Install Ethereum Software
First we need the geth tool which is the main Ethereum «client». Ethereum is really a peer-to-peer network, that means each node is a server and client at the same time. A node that contains the complete blockchain history in a database is called a full node. For this guide you don’t need to run a full node, as mining pools do this for you. We still need geth to create the private key of your Ethereum wallet. Somewhere we have to receive the coins we are mining 
Add the Ethereum APT repository using these commands:
On Debian 8 (on Ubuntu you can skip this) you need to replace the repository name with this command:
Install ethereum, ethminer and geth:
Create Ethereum Wallet
A wallet is where coins are «stored». They are not really stored in the wallet because the wallet is just a private key that nobody has. The balance of that wallet is visible to everyone using the blockchain database. And this is what full nodes do, they contain and distribute the database to all other peers. So this this command to create your first private key for your wallet:
Be aware, that this passphrase protects the private key of your wallet. Anyone who has access to that file and knows your passphrase will have full control over your coins. And also do not forget the passphrase, as if you do, you lost all your coins!
The output of «geth account new» shows a long character/number sequence quoted in <>. This is your wallet address and you should write that number down, as if someone wants to send you money, then it is to that address. We will use that for the mining pool later.
Install (proprietary) nvidia driver
For OpenCL or CUDA to work with nvidia graphics cards, like my GTX 1070, you need to install this proprietary driver from nvidia. If you have an older card maybe the opensource drivers will work for you. For the GTX 9xx or 10xx you will need this driver package.
After you have agreed the terms, download the NVIDIA-Linux-x86_64-XXX.XX.run file. But before we can use that installer we need to install some dependencies that installer needs as it will have to compile a Linux kernel module for you. Install the dependencies using this command:
Now we can make the installer executable and run it like this:
If that step completed without error, then we should be able to run the mining benchmark!
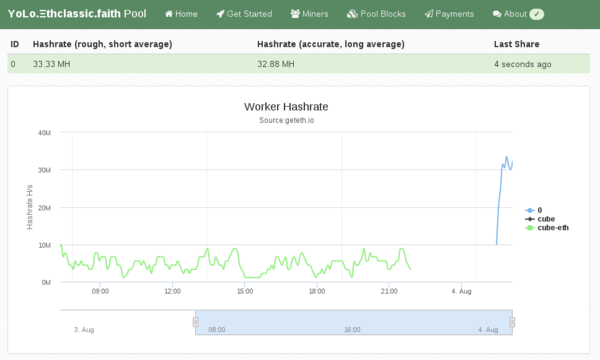
The -M means «run benchmark» and the -G is for GPU mining. The first time you run it it will create a DAG file and that will takes a while. For me it took about 12 minutes on my GTX 1070. After that is should show a inner mean hashrate. If it says H/s that is hashes per second and KH is kilo (H/1000) and MH is megahashes per second (KH/1000). I had numbers around 25-30 MH/s, but for real mining you will see an average that is a balanced number and not a min/max range.
Pick Ethereum Network
Now it gets serious, you need to decide 2 things. First which Ethereum network you want to mine for and the second is using which pool.
Ethereum has 2 networks, one is called Ethereum One or Core, while the other is called Ethereum Classic. Ethereum has made a hardfork to undo the consequences of a software bug in the DAO. The DAO is a smart contract for a decentralized organization. Because of that bug, a blackhat could use that bug to obtain money from that DAO. The Ethereum developers made a poll and decided that the consequences will be undone. Not everyone agreed and the old network stayed alive and is now called Ethereum Classic short ETC. The hardfork kept its short name ETH.
This is important to understand for mining, because the hashing difficulty has a huge difference between ETH and ETC. As of writing, the hashrate of ETC is at 20% compared to ETH. Thus you need less computing time to get ETC coins and more time to get ETH coins. Differently said, ETC mining is currently more profitable.
Pick a Pool
Hmmmm, I want a swimming pool, thanks! Just kidding. You can mine without a pool, that is called solo mining, but you will get less reward. A mining pool are multiple computers that work on the same block to find a solution quicker than others. The pool has an aggregated hashrate that is higher than other solo miners. Each found block by anyone in this pool will be rewarded to everyone in the pool. The reward of 5 ether currently per block gets split in the same ratio of hashrate each member provides (minus the pool fee). So while you get less for a found block, you still have a steady lower income rate instead of higher with less chance of finding one (in time). Simply said: you have to find a new block faster than the others to receive the reward.
If you want to mine Ethereum Classic (ETC) use one of the pools listed here (at the bottom of the page).
If you want to mine Ethereum One / Core (ETH) use one of the pools listed here.
Run ethminer
The instruction page of the pool website usually says how to start the miner program, but here is an example of the pool that I use (because pony!):
Profit
If this guide was helpful for you, you can tip me at ethereum:0x9ec1220d2f2fadd3f0c96e3007daa827bc83fbd6 or simply run the ethminer using my wallet address for a day or two:
Источник
How to Mine Ethereum on Ubuntu 16.04/20.04

As of recently, a cryptocurrency craze has swept Internet communities. The people have found out that one does not need several thousand dollar-worth rig to mine cryptocurrency with a profit. Stores are short on graphics cards, and a gold fever has overtaken the miners. If you have a card with more than 2GB of VRAM, you too can attempt mining. Let’s take a look at the most common mining avenue – Ethereum.
Ethereum is considered to be a great coin to mine, with high potential profits. To mine Ethereum, you need a piece of software called ‘ethminer’, which is a command-line tool. It can be run on multiple Linux distributions, but in this article, we will focus on Ubuntu 16.0.4/20.04 and Debian 8.
Before we begin – in order to not waste your time, do not attempt mining with a card under 2GB of VRAM, as it’s unlikely it will be detected by the software and be able to mine anything. On top of that, if you are using a Nvidia card, you must use the proprietary driver. For AMD, the AMDGPU driver works just fine.
In this guide, I will show you how to install Ethminer on Ubuntu using the terminal.
Add Ethereum Repository
First off, we need to add the Ethereum repository, so run the following commands in your terminal:
If you are running Debian, the repository name needs to be replaced:
Installing Ethminer
We can finally get to installing ethminer. However, on top of that, we will need additional packages: Geth and Ethereum:
Install packages
Run the following to install the required packages:
To use ethminer required for coin mining, we have to download it from GitHub:
At the time of writing this tutorial, the latest version was ethminer 0.19.0-alpha.0
Type the following to download and extract the binary file:
Pick a network
There are two for Ethereum. Ethereum Classic, known as ETC, and Ethereum, known as ETH.
For a miner, the main difference is in price and difficulty of mining. The higher the difficulty, the less coins you will mine. You need to choose a coin, which will bring you the best profits. As of time of writing, ETH has a better ratio. A power of 20 megahashes will bring you $29 of profit, compared to ETC’s $15, with the same power consumption.
Choose a wallet
I’ll assume you’ll be mining ETH; thus, I suggest to use this wallet. The password you set is permanent, do not lose it, as you will lose everything you keep inside the wallet. Set it up, and then we will move onto the next point.
Solo mining or pool mining
Generally, at a low hashrate, you want to mine in a pool, because of greater rewards. It will also take you a longer time to receive profits from solo mining.
Pick a pool from this list.
There might be other pools than the one from the list – find one that you find suits you the best.
Start mining!
As stated by the application, by default, ethminer will try to use all device types it can detect. Optionally you can limit this behavior setting either of the following options:
Then, execute a mining command, usually stated on the pool website.
For dwarfpool, it’s:
Instead of YOUR_WALLET, paste your wallet address.
The output on a RX480 card should be:
Although the byte count will depend on how much VRAM does your specific model have. And here you go! You’re now mining Ethereum on Linux.
With just a few commands, you’ve got a cryptocurrency miner at your disposal. Ethminer has the advantage of being free over other solutions while keeping the same speed and efficiency as proprietary software. If you would like to know more about such great Linux software, stay tuned.
Источник
Mine Etherium With Ethminer on Ubuntu
What Is Ethereum?

Figure 1 Credits to https://ethereum.org/
That being said it is actually used to fuel this ecosystem known as Ethereum. Ethereum is a decentralized platform with its block chain for its apps to function, and these apps are powdered by these tokens known as ether. So basically ether may or may not be used as a currency, but rather as a fuel to power the Ethereum ecosystem, however it’s widely used as fungible currency as an alternative to bitcoins.
Furthermore, like Bitcoins, Ethereum can be mined, and this process is known as mining ether. Even though the term Ethereum is used interchangeably, it’s more appropriate to use the term ether as it’s actually mined through this process. Ether can be mined with either CPU or GPU, and there are many miners around the world developed by various professionals specifically for this purpose only. The mined tokens then can be stored in wallets, which then can be exchanged or consumed to fuel the app running on Ethereum ecosystem.
What Is Ethminer?
This articles demonstrates how to make use of Ethminer which is used to mine ether with the help of a GPU. Ethminer is an open source cross platform application developed specifically for mining ether, and makes use of OpenCL, and Nvidia CUDA technologies for mining purposes. It also supports stratum protocol which is used for pool mining across a network; hence it can be used even without having a physical computer nearby, as long as the user has access to the Internet that’s all that is needed.
Ethminer is at the moment developed for Windows, MacOS and Linux, and uses the command line to execute its codes. App developers use AppVeyor, and Travis CI which respectively generate Windows executables and MacOS, Linux executables with each commit made in the Github repository, and thus there is no need to compile the source codes like with many Bitcoins miners available out there. Ethminer is easy to use, and extremely fast as long as the recommended hardware is utilized for mining purpose.
How to Install Ethminer
Ethminer, at a glance does seem hard to install, at least on Linux systems, but it’s actually rather easy to install given the right commands. This tutorial assumes the user has either Ubuntu 16 or 17, but it may still work for both newer and older versions as well though it isn’t recommended. Since Ubuntu is free of charge, it’s recommended to upgrade to at least Ubuntu 16.04 prior to following these steps.
The installation assumes the user has either AMD or Nvidia hardware installed on the system, and some steps of the installation should be slightly altered depending on the graphics card.
1. First install the graphics drivers. If it’s unable to locate the information related to the graphics adapter, use the following commands in the terminal. Either one is fine, however the second command requires access to the root as it returns more information of the graphics adapter.
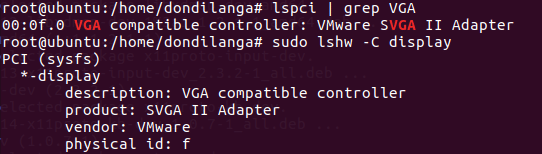
2. Once the currently installed graphics adapter is located, note it down somewhere as it’s useful in later steps.
3. Now install the appropriate graphics driver. Only Nvidia and AMD GPUs are supported at the moment, however CPU mining is also possible through Go-Ethereum which has native support for CPUs, but it’s not recommended to use CPUs to mine as it’s not feasible to generate a profit out of it.
- Visit this URL for Installation instructions for Nvidia: https://linuxhint.com/install-nvidia-drivers-linux/
- Visit this URL to download Nvidia drivers for Ubuntu http://www.nvidia.com/Download/Find.aspx?lang=en-us
- Visit this URL to download AMD drivers for Ubuntu http://support.amd.com/en-us/download/linux
4. Now depending on the hardware adapter, install the appropriate graphics driver.
5. For Nvidia adapters, install the CUDA toolkit. CUDA is a property API (application programming interface) developed for general purpose processing on CUDA enabled hardware such as most of Nvidia graphics adapters. This is useful for a range of applications such as mathematical calculations, video and audio converting, simulation applications. Make sure to use sudo su and get root access.
6. For AMD adapters, install OpenCL ICD (installable client driver) which allows multiple implementations of OpenCL to exist on the same system. OpenCL is same as CUDA, an API for general purpose processing, but works on a range of hardware devices, including Nvidia graphics adapters as well.
7. Once either step is completed, install GIT package for retrieving the latest sources of Ethminer, MESA developer package which is a 3D graphics library works on graphics adapter to assist in mining, then cmake to build the sources.
8. Now make a directory to store retrieved Ethminer sources, and then focus on that directory. Creating the directory in Terminal makes the folder in the HOME directory of the currently logged in user. CD changes the focus to the stated folder.
9. Retrieve the source codes from Github straightly to aforesaid folder with the following command.
10. Then Build the sources with cmake.
11. To gain full potential on graphics adapters, use the DETHASHCUDA=ON flag DETHASHCL=OFF flags. What these flags do are respectively enable CUDA, and disable OpenCL. So, the cmake step should be slightly altered like this
12. Additionally if pool mining is intended to be used, then append the following flag as well to enable Stratum protocol. -DETHSTRATUM=ON, then cmake is altered like this.
13. Once the package is built, now it’s time to install it. So install it with the following command. This assumes the user is already in root access as suggested earlier.
14. Now use the following command to make sure it’s installed for sure. If it shows the available command lines, it means Ethminer is installed in the system successfully, otherwise repeat these previous steps at the outset until it’s sorted out.
15. Additionally, to find out the performance of the available hardware adapter, use one of the following commands. The OpenCL one is for measuring the performance of AMD adapters, and CUDA one is for measuring the performance of NVidia adapters.
- OpenCL Benchmark
- CUDA Benchmark
How to Configure Ethminer to Mine Ether
Once Ethminer is installed on the system, the remaining part is configuring it so it’s ready to be used to mine Ether. First of all, before initiating the mining, it’s important to get a valid Ethereum address which is used to retrieve mined Ether. This address is a public; hence it’s shareable, however the given private key is supposed to be kept hidden.
- Visit the following web URL https://www.myetherwallet.com
- Type a valid password and create a wallet to store Ether.
- Now save the given Keystore file which contains relevant information of the wallet.
- After it’s downloaded, proceed by clicking “I understand, Continue” button.
- Save the Private Key. The Website lets users to print it on a paper too. Once the address is saved, proceed by clicking “Save Your Address” button.
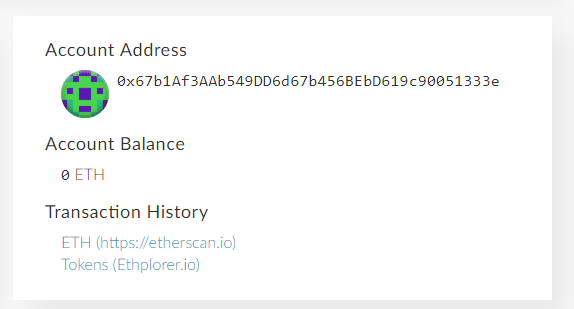
- Then it will ask how would you like to access to your wallet, what it means how to retrieve information related to the account. This basically contains “Account Address”, “Account Balance in ETH”, “Transaction History”, “Private Key”, “Public Ethereum Address”.
- Use the following command in Terminal window after filing stated placeholders. HashRate is calculated at the 15th step of the previous segment, use that retrieved value here, Ethereum Address is the public address created with previous steps, RigName is the name of the machine, which is optional, and thus can be omitted if desired. Any custom name can be used there.
How to Tweak the Performance?
Performance of mining can be improved in multiple ways, but this is only relevant for CUDA enabled graphics adapters. Use the following flags when benchmarking and then use the returned hash value at the previous segment’s 8 th step in HashRate placeholder along with the flags. The hash value is generated at 15 th step of segment before the previous segment.
–cuda-block-size: A block is a group of threads which can be executed parallelly, by increasing the block size the application can make use of many threads at the same time. But according to this report after the block size 16,32 depending on the CUDA enabled adapter, the performance gain goes downhill as the time increases. The recommended values are 16,32,64.
–cuda-grid-size: Grid is a group of blocks, as previously, increasing the grid size increases the performance. The recommended values are 8192, 16384, 32768, 65536.
–cuda-parallel-hash: Is a variable parameter which assists in increasing the performance. The recommended values are 8,16.
–cuda-streams: In CUDA stream means a sequence of operations which are executed as they are issued on the video adapter. Here operations mean the mathematical calculations performed by GPU. In both Bitcoins and Ethereum mining, mining means basically solving complex mathematical problems; hence having a higher stream value improves the performance, but there is a limit depending on the model of the graphics adapter. The recommended values are 16,32.
Conclusion
Ethereum is a rising star in the cryptocurrency ecosystem, which plans to lead the information technology to the decentralized way. In Ethereum system, ether is a token which fuels the ecosystem, which can also be traded just as Bitcoins. Ether can be mined with modern graphics adapters just as Bitcoins used to be. The popular selections for this purpose are Nvidia and AMD. Nvidia uses CUDA, whereas AMD uses OpenCL. The Ethminer slightly favors Nvidia GPUs by providing more flags for CUDA APIs, and thus it’s expected that Nvidia GPUs will out perform others. Since contemporary Nvidia graphics adapters are extremely power efficient, it’s more beneficial to use Nvidia graphics adapters compared to AMD which is still popular among Bitcoin miners. Either way Ether is an important part of the future of cryptocurrency, and will probably coexist with Bitcoins instead of replacing it altogether.
Источник