- Migrating from Electrum => Bitcoin core
- 3 Answers 3
- How to connect Bitcoin core and Electrum wallet to Bitcoin Testnet
- Bitcoin Testnet
- Connecting Bitcoin core and Electrum to Testnet
- How to connect Electrum to Testnet
- Windows:
- Testnet on Ubuntu:
- How to connect Bitcoin core wallet to Testnet?
- Windows:
- Ubuntu:
- How to receive Testnet Bitcoins?
- Как импортировать файл wallet.dat в Electrum? Перенос Биткойнов из QT в Electrum
- Почему Electrum лучше основного кошелька?
- Electrum
- Как импортировать файл wallet.dat в Electrum?
- Перенести Биткойны из QT в Electrum
- Импорт / удаление приватных ключей в Electrum
Migrating from Electrum => Bitcoin core
Seems that many people become scared as soon as they seen 1 week or over and discover they’ve to download the full blockchain(ca. 60 GB now required), so it’s full of question about migrating from bitcoin core to electrum? But what about vice versa? Bitcoin core doesn’t support sweeping, but it should support, by command line, importing private addresses. First questions, I read there is dumpwallet, is there a importwallet option that allow to import more than 1 private key at time? This could be a simply option, import all keys at time. Import each keys with importprivkey can be a long operation. Then, 2nd option, is just send electrum btc to a bitcoin core address right? What about get the electrum wallet, is bitcoin core able of read it in some ways (not with external software)? Is there a way to safely convert?
3 Answers 3
Coverting a wallet from Electrum to Bitcoin Core is very hard, as both pieces of software have a very different idea of what a wallet is. Electrum relies on servers that provide indexed blockchain information to discover transactions, so its wallet does not store much information. Bitcoin Core needs all your transactions and keys actually available in the wallet so that it can operate independently.
With Electrum’s command line you can dump all your private keys, or only those that are funded. See http://docs.electrum.org/en/latest/cmdline.html#export-private-keys-and-sweep-coins
FWIW, someone created a tool. A cursory examination doesn’t show any security issues:
Источник
How to connect Bitcoin core and Electrum wallet to Bitcoin Testnet
Beginners who just stepped into Bitcoin may find the whole concept overwhelming. If you are new then to get started you don’t need to deeply understand the technology behind Bitcoin or its technical details. Just get familiar with how a wallet works, how to send, receive coins, how to view transactions on the block explorer and some other basic stuff.
Remember that “Not your Keys, not your coins”. So do not hold your coins on the exchange. Transfer them from exchange to the wallet where you control your private keys.
For desktop there are two wallets namely Bitcoin core and Electrum. They are free, open source and offers complete control.
Now the best way to understand how to use these wallets without risking your real money is by trying out the Testnet. That is connecting both core wallet and electrum wallet to Bitcoin testnet.
Here in this beginner guide we’ll cover about Bitcoin Testnet. A zero-risk network that helps beginners to learn how to use Bitcoin and understand Bitcoin transactions.
Bitcoin Testnet
Testnet is an alternative network and a clone of original Bitcoin blockchain. This network is setup specifically for testing and experimental purposes. Whether you are a developer or a beginner; testnet allows you to test and experiment the various features of Bitcoin without risking your real coins.
Testnet just uses a different blockchain and the coins on testnet have no value. Other than that everything else remains the same as the main Bitcoin network.
There are nodes. Blocks are created every 10 minutes. Real miners are verifying each transaction and recording it on the blockchain. Even new coins are created only through mining. These coins can be obtained for free from Bitcoin testnet faucets.
To receive these coins and to start learning we first need to setup testnet wallet. Both Bitcoin core and electrum wallet have the ability to connect to test network. But the feature is not available in GUI by default. We’ll have to use a special flag that puts electrum and core wallet into testnet mode.
Here let’s see how to setup Bitcoin core and Electrum wallet and connect them to Bitcoin Testnet.
Connecting Bitcoin core and Electrum to Testnet
Should I try Bitcoin core or Electrum Bitcoin? The choice is yours.
What you need to know is that Bitcoin core is a full Bitcoin client. It takes up a lot of space and consumes enormous amount of bandwidth as it downloads the entire blockchain to your PC.
Whereas the Electrum Bitcoin wallet is a light client that uses remote network to fetch the blockchain data. It doesn’t download much data. You can just setup and start using the wallet right away.
Compared to electrum core wallet lacks some features like for example Multisignature, Lightning network and Hardware wallet support.
If you are looking to learn how multisg setup works, how recovery mnemonic seed phrases works then go with Electrum.
Anyways in this tutorial we’ll cover both electrum and core wallet. That is running Bitcoin core wallet and Electrum on testnet.
How to connect Electrum to Testnet
As we said there is no separate wallet for testnet. All you have to do is create a shortcut and start the wallet file with a special flag. This way you can switch between testnet and your regular wallets anytime on the same machine.
We hope you have the wallet downloaded and installed. If not you can download from here:
Choose the operating system and download the file. Also make sure to verify electrum signatures to ensure that your copy is genuine.
Now before setting up Electrum testnet launcher run the wallet in mainnet mode once. It will create all the essential files that is needed to run further.
Once done close the wallet and follow the guidelines below.
Windows:
1. Right click the electrum.exe file and click on create shortcut.
2. Rename the shortcut to Electrum Testnet.
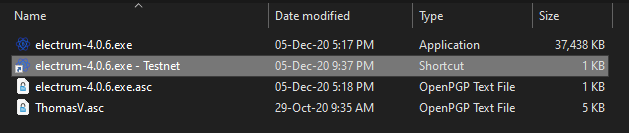
3. Now right click the testnet file and open properties. Navigate to shortcut tab and add —testnet flag at the end of the target location.
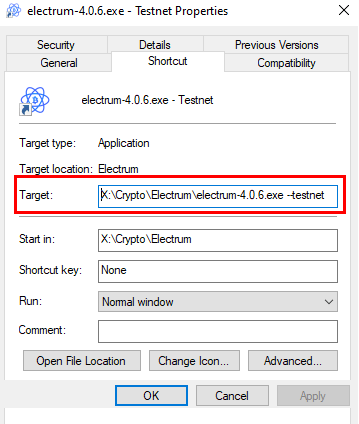
Example:
«C:\Program Files (x86)\Electrum\electrum-4.0.6.exe» —testnet
Click apply and then OK to save changes. That’s it! Now open the Electrum shortcut which will launch electrum in testnet mode.
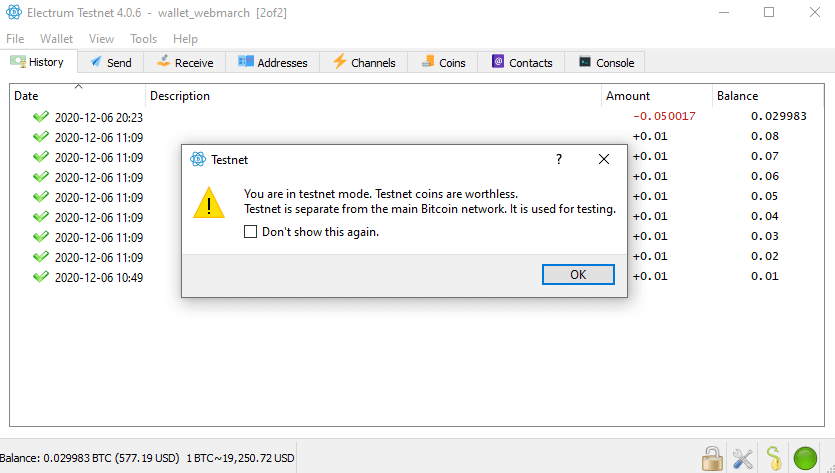
You should see the following message in your electrum wallet.
“You are in testnet mode. Testnet coins are worthless.
Testnet is separate from the main Bitcoin network. It is used for testing.”
1. Run Terminal and type the following to open Nano text editor.
2. Now in the Nano text editor paste the following code.
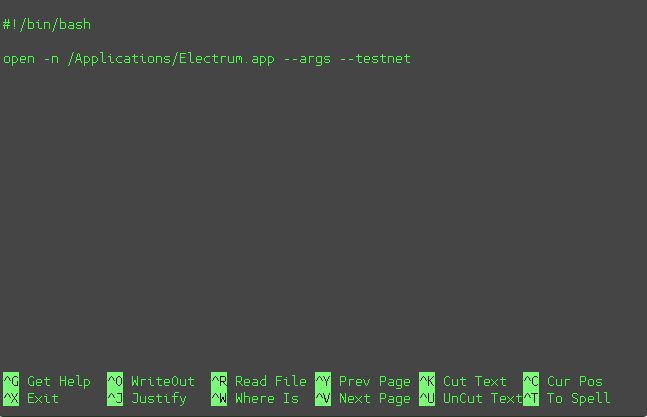
3. Once done save the file by pressing CTRL + X —>> Y followed by the return key. A new electrum file should appear on your desktop.
4. Now to make the file executable type the following code in Terminal window
You should now find the electrum icon on your Desktop. Double click it to open electrum in testnet mode.
Testnet on Ubuntu:
1. Run Terminal and open Nano text editor by typing the following code
2. When Nano editor is opened in Terminal paste the following:
3. Now save the editor by pressing CTRL + X —>> Y followed by the enter key. You should see Electrum Testnet file on your Desktop.
4. Make it an executable file by running the following command in Terminal.
That’s it. Double click the Electrum Testnet file to start it in Testnet mode.
Note: To ensure whether your wallet is connected to testnet or mainnet just check the address in receiving tab. Testnet address starts with “m”, “n” or “2M” and “2N” depending on the seed / address type you choose. Whereas Mainnet address begin with “1”, “3” and “bc”. Just keep that in mind before you make any transaction.
Alright! Let’s now see Bitcoin core setup for testnet.
How to connect Bitcoin core wallet to Testnet?
The procedure is same as electrum wallet. You need to start the Bitcoin core instance with ‘-testnet’ flag. This will direct the wallet software to connect to testnet blockchain instead of main network.
Before you connect to testnet, setup and launch the wallet which will create all the essential files.
Windows:
- Go to the installation folder. Now right click the Bitcoin-qt.exe file and create shortcut.
- Name the shortcut to Bitcoin-qt.exe – Testnet.
- Next right click the shortcut file, open properties, navigate to shortcut tab and add -testnet at the end of the target field.
Example:
C:\Program Files\bitcoin-0.20.1\bin\bitcoin-qt.exe -testnet
When done save it and open this shortcut file to open Bitcoin QT in testnet mode.
Alternatively you can also put testnet=1 in the bitcoin.conf file.
Open Bitcoin core, go to preferences and open configuration file. In the configuration file add the following command.
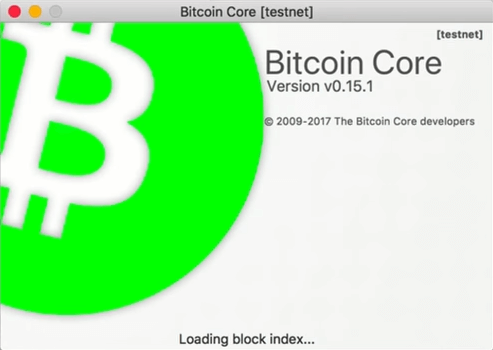
Note: Bitcoin core wallet when in testnet it shows the green logo. On mainnet it shows the orange logo.
Ubuntu:
On your Ubuntu machine download the latest version from Bitcoin.org (https://bitcoin.org/en/bitcoin-core/) and start with the following commands. As of writing this article the latest version was 0.20.1. Modify this accordingly.
This should open qt wallet on Linux in testnet mode.
Now that you’ve connected your wallet to Testnet you can start receiving testnet coins and try out Bitcoin transactions on the test network.
How to receive Testnet Bitcoins?
There are many free Bitcoin testnet faucets. Just Google the term “Bitcoin testnet faucet” and you will come across several websites offering free BTC test coins.
These coins are free and have no value. They are only great for experimenting and learning how to send / receive Bitcoin. Once you have learned how to use Bitcoin on the testnet you should move on to the mainnet.
Here are few faucets where you can get Free testnet Bitcoins:
Open your testnet wallet >> go to receiving tab and grab the receiving address. Paste your receiving address in the faucet, solve the captcha and enter amount to receive Bitcoin.
Once it gets 1 block confirmation you can start using it.
Now create another testnet wallet, create a new receiving address and practice sending coins to the other wallet. Just like actual Bitcoin transaction you’ll have to pay mining fees for transferring coins on the testnet as well. Also transaction from BTC testnet cannot be send to the mainnet or vice versa as they are two separate blockchains.
Just remember that Testnet addresses starts with “m”, “n” or “2M” and “2N” depending on the seed / address type you choose. Whereas Mainnet address begin with “1”, “3” and “bc”.
Play around with all the settings and wallet preferences. Once you got familiar with the wallet and the Testnet you can move on to real network. Before you do please do send the free testnet coins back to the faucet website as it helps others to get test coins.
You can run both testnet and mainnet wallet simultaneously.
Hope this Bitcoin testnet wallet helps you in learning how to use Bitcoin without risking your real money.
Here are few core and electrum wallet guides that you’ll find useful.
Источник
Как импортировать файл wallet.dat в Electrum? Перенос Биткойнов из QT в Electrum
Это руководство предназначено для пользователей кошелька Bitcoin core (Bitcoin-QT), которые хотят безопасно перевести свои Биткойны из резервного файла wallet.dat в альтернативный кошелек. Конкретно в кошелек Electrum.
Если вы не хотите ждать начальной синхронизации кошелька, которая обычно занимает от нескольких часов до нескольких дней, в зависимости от технических характеристик оборудования, то это руководство для вас.
Если вы хотите импортировать файл wallet.dat в Electrum или любой другой кошелек, то это руководство для вас. Здесь мы объясняем, как перемещать / переводить монеты из кошелька QT в Electrum.
Теперь, прежде чем мы расскажем, как загрузить файл wallet.dat и импортировать все в Electrum, давайте разберемся, почему кто-то рассматривает возможность переноса Биткойнов с основного кошелька на Electrum.
Почему Electrum лучше основного кошелька?
Bitcoin-QT – это официальный и оригинальный биткойн-кошелек. Это клиент полного узла, который проверяет и передает транзакции в сети Биткойн. Этот кошелек предлагает вам полный контроль над вашим Биткойном и обеспечивает высочайший уровень безопасности. Но есть и недостатки.
Одна из основных причин, по которой пользователи предпочитают Electrum базовому кошельку, заключается в том, что клиент QT работает медленно.
Вы не можете загрузить кошелек и сразу использовать его. Вам нужно подождать, пока кошелек синхронизируется с блокчейном. Проблема в том, что большинство ходлеров не открывают свой кошелек неделями, месяцами или даже годами. В результате, когда они снова откроют кошелек, им придется ждать несколько часов или даже целый день, прежде чем они смогут использовать Bitcoin-QT.
Если ваш основной кошелек зависает и не синхронизируется, то вы можете попробовать повторное сканирование, повторное индексирование кошелька. Это может исправить проблему.
Но даже после исправления проблем с синхронизацией кошелька есть некоторые плохие ситуации, например, ваш компьютер может дать сбой и повредить файлы блокчейна на вашем жестком диске. В таком случае вам придется переустановить основной кошелек, повторно загрузить и проверить весь блокчейн с нуля, размер которого превышает 300 ГБ.
Для ускорения синхронизации можно использовать файл bootstrap.dat. Но и этим большинство пользователей не пользуются, так как кошелек все равно потребляет слишком много места на диске.
Что ж, можно подумать об обрезке блокчейна. Но даже в таком режиме необходимо загружать весь блокчейн, потребляя огромную пропускную способность. Обрезка только уменьшает размер занимаемого места на вашем жестком диске.
Electrum
По сравнению с основным кошельком, Electrum имеет более низкий уровень безопасности, но этот кошелек легкий и запускается намного быстрее.
Еще одна причина для выбора Electrum заключается в том, что это HD-кошелек, который предлагает возможность резервного копирования / восстановления всех ваших ключей. Для этого необходима только seed фраза.
При первоначальной настройке кошелька программа сгенерирует для вас мнемоническую seed фразу, которая обычно состоит из 12 случайных слов. Все, что вам нужно сделать, это записать ее и хранить в надежном месте.
В случае, если ваш компьютер выйдет из строя или вы захотите выполнить миграцию, вы можете ввести seed фазу и полностью восстановить кошелек.
Вы не получите этого преимущества с основным кошельком, поскольку основной кошелек хранит все приватные ключи в файле wallet.dat, и вам необходимо сделать резервную копию этого файла.
Проблема в том, что только основной кошелек поддерживает файл wallet.dat, поэтому вы не можете использовать этот файл где-либо, кроме основного кошелька (Bitcoin-QT).
Итак, как же импортировать файл wallet.dat в Electrum и перевести туда Биткойны?
Как импортировать файл wallet.dat в Electrum?
Невозможно восстановить ваш старый кошелек Bitcoin-QT на Electrum с помощью файла .dat. Вы не можете импортировать файл wallet.dat в кошелек Electrum, поскольку Electrum не поддерживает этот тип файла.
Как мы уже говорили, файл wallet.dat не может быть импортирован в другое место, кроме как в основной кошелек.
Таким образом, лучший способ перевести ваши Биткойны из основного кошелька в Electrum — это отправить монеты на адрес в вашем кошельке Electrum. Таким образом, ваши монеты будут защищены seed фразой, сгенерированной Electrum.
Но остается проблема синхронизации кошелька. Вы не можете отправлять монеты, пока не завершите синхронизацию. Итак, как перенести Биткойны из файла wallet.dat?
Хотя Electrum не поддерживает файлы wallet.dat, он поддерживает импорт приватных ключей. Используя приватные ключи, вы можете либо импортировать, либо использовать операцию очистки.
Приватные ключи хранятся в файле wallet.dat, и вам необходимо их получить для передачи Биткойнов из основного кошелька в Electrum.
К сожалению, чтобы экспортировать приватные ключи, вам нужно снова запустить Bitcoin core (Bitcoin-QT), используя исходный файл wallet.dat.
Но, что хорошо, вам не нужно ждать, пока загрузится весь блокчейн.
Прежде чем экспортировать приватные ключи из основного кошелька, знайте, что работа с приватными ключами опасна. Приватные ключи чувствительны к регистру, и очень часто случаются ошибки. Это может вызвать у вас проблемы, и если с этим не справиться должным образом, вы можете потерять свои Биткойны.
Если вы можете подождать, пока основной кошелек синхронизируется, тогда будет лучше, если вы переведете монеты в блокчейн. Однако, если вы нетерпеливы и если основной кошелек доставляет вам больше проблем, следуйте приведенному ниже руководству.
Но будьте осторожны, когда имеете дело с необработанными приватными ключами.
Перенести Биткойны из QT в Electrum
Идея состоит в том, чтобы экспортировать приватные ключи из Bitcoin core (Bitcoin-QT). Приватные ключи можно экспортировать, даже если кошелек не синхронизирован с блокчейном.
Вы можете либо экспортировать приватный ключ определенного адреса из своего основного кошелька, либо экспортировать ключи для всего адреса.
Используя проводник блоков (block explorer), найдите адрес, на котором хранятся монеты. Затем вы можете импортировать или перенести приватные ключи этих адресов в свой кошелек Electrum.
Выполните следующие действия, чтобы экспортировать приватный ключ из своего кошелька Bitcoin core или клиента bitcoin-QT:
- Запустите кошелек Bitcoin core как обычно. Если ваш старый кошелек поврежден, загрузите новый кошелек, настройте, запустите его, а затем замените исходный файл wallet.dat.
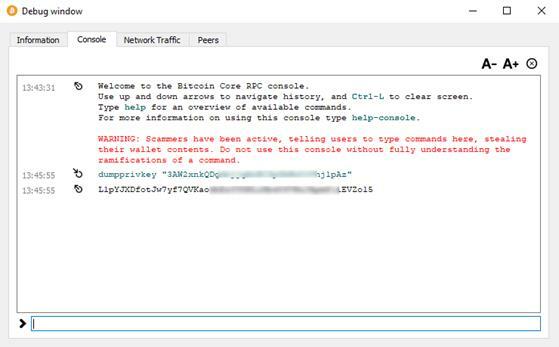
- Откройте вкладку консоли окна отладчика. Узнайте, как использовать консольные команды основного кошелька Bitcoin.
- Если ваш Bitcoin-QT кошелек зашифрован, введите: walletpassphrase “ваш пароль” 500. Это разблокирует ваш кошелек. Просто замените строку ввода парольной фразы парольной фразой своего кошелька. Если ваш кошелек не зашифрован, пропустите этот шаг.
- Как только кошелек будет разблокирован, введите: dumpprivkey “ваш bitcoin адрес” и нажмите Enter.
- Это вернет приватный ключ этого конкретного биткойн-адреса.
- Введите: walletlock в окне консоли, чтобы заблокировать кошелек.
Чтобы получить приватный ключ всего вашего адреса, выполните следующие действия.
Выполните первые 3 шага сверху. После того, как вы разблокируете кошелек, введите: dumpwallet “bitcoinkeys” в окне консоли и нажмите Enter.
Кошелек экспортирует все приватные ключи в один файл (формат WIF) и вернет путь к файлу.
Перейдите в папку с файлом и откройте его в текстовом редакторе или блокноте ++. Вы должны увидеть весь адрес и связанные с ним приватные ключи. Теперь вы можете либо импортировать их, либо перенести в свой кошелек Electrum.
Поскольку вы экспортировали приватные ключи из основного кошелька, ключи и кошелек больше не считаются безопасными. Немедленно переместите средства в свой новый кошелек Electrum. Также не забудьте очистить буфер обмена / историю после копирования и использования приватных ключей.
Импорт / удаление приватных ключей в Electrum
Прежде всего убедитесь, что вы скачали Electrum с сайта electrum.org. Потом проверяем Electrum. Создайте новый кошелек, а затем безопасно храните свою seed фразу Electrum в автономном режиме.
Теперь есть два способа использовать приватные ключи в электронном кошельке. Вы можете импортировать или удалить ключи.
Если вы импортируете приватные ключи, помните, что они не станут частью seed фразы Electrum. Таким образом, вам придется хранить резервную копию этих ключей отдельно.
По этой причине импорт ключей в Electrum — плохая идея, так как он не может быть восстановлен с помощью seed фразы. Если вы импортируете ключи, используйте кошелек временно. После импорта переместите монеты в другой кошелек или на биржу и откажитесь от временного кошелька. Никогда не используйте его снова.
Принцип работы HD кошелька заключается в том, что все приватные ключи являются производными от одного мнемонической seed фразы. Если вы импортируете внешний приватный ключ, он не станет частью кошелька. Ключи не могут быть восстановлены из seed фразы.
Таким образом, самый безопасный и предпочтительный способ передачи BTC из Bitcoin-QT в Electrum — это быстрый перевод монет во временный кошелек с последующим переводом их в новый кошелек.
Источник