- From binance chain wallet
- From binance chain wallet
- How to Use Binance Chain Wallet
- Introduction
- What makes Binance Chain Wallet unique?
- Setting up Binance Chain Wallet
- Depositing BNB with Wallet Direct
- Depositing from another wallet
- Adding new tokens to your Binance Chain Wallet list
- Connecting Binance Chain Wallet to Binance Smart Chain
- Use Binance Chain Extension Wallet
- What is it?
- Download Link
- Install
- Create an account in extension wallet for Binance Smart Chain
- Recover your account with Mnemonic Phrase
- Get Testnet BNB from Faucet
- Transfer Testnet BNB from BSC to BC
- Transfer Testnet BNB from BC to BSC
- Swap Testnet BEP2 token to its BEP20 equivalent
- Swap Testnet BEP20 token to its BEP2 equivalent
From binance chain wallet
Here’s how you can get set up on Trust Wallet and start using Binance Smart Chain in just a couple of minutes.
Setting up your wallet for Binance Smart Chain
1) Download Trust Wallet here . If you already have Trust Wallet, make sure your app is up to date.
2) Complete basic setup of a multi-coin wallet . Remember to save your backup phrases.
3) Go to your Smart Chain wallet and press receive to find your address.

4) Deposit BEP20 assets to your wallet. The easiest way to do this is with Binance. Choose an asset on Binance that supports BEP20 withdrawals and withdraw to your Trust Wallet Binance Smart Chain address. Keep in mind that BNB is required to make any transactions on Binance Smart Chain.

5) That’s it! You’re ready to start using Binance Smart Chain.
6) Once you’ve received a BEP20 token, to view your transaction ID you can click on the transaction, press the share button in the top right and then copy the transaction ID.

Using Binance Smart Chain Dapps
7) For this part, iOS users will need the Dapp browser, which you can get by following this guide . Android users have the Dapp browser by default.
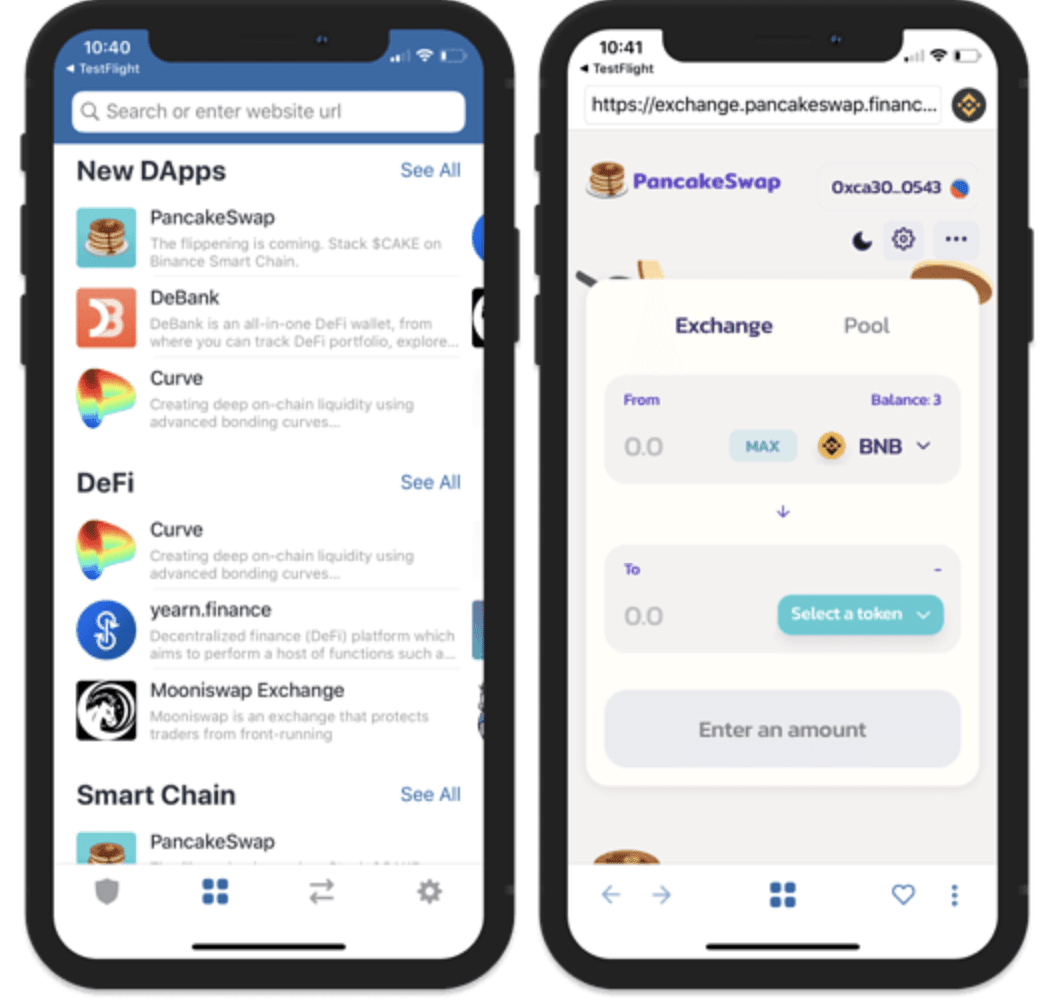
8) Once you’ve topped up your wallet, open the Dapp browser by pressing on the four squares at the bottom of the app.
9) Navigate to a Binance Smart Chain Dapp like PancakeSwap or BurgerSwap.
10) Use the Dapp and have fun!
Here are some more detailed guides on how to interact with Binance Smart Chain Dapps with Trust Wallet:
Источник
From binance chain wallet
Ниже мы расскажем, как всего за несколько минут настроить Trust Wallet и начать использовать Binance Smart Chain.
Настройка вашего кошелька для Binance Smart Chain
1) Загрузите Trust Wallet здесь . Если у вас уже есть Trust Wallet, убедитесь, что вы используете последнюю версию приложения.
2) Завершите базовую настройку мультивалютного кошелька . Обязательно сохраните вашу резервную фразу.
3) Перейдите в свой кошелек Smart Chain и нажмите «Получить», чтобы узнать свой адрес.

4) Внесите активы BEP20 на свой кошелек. Проще всего сделать это через Binance. Выберите актив, который поддерживает ввод и вывод токенов на BEP20 на Binance, и переведите его на свой адрес Binance Smart Chain в Trust Wallet. Помните, что для любых транзакций на Binance Smart Chain необходим BNB.

5) Вот и всё! Вы можете использовать Binance Smart Chain.
6) Чтобы проверить ID транзакции после получения токена BEP20, нажмите на транзакцию, затем нажмите «Поделиться» в правом верхнем углу и скопируйте ID транзакции.

Использование децентрализованных приложений Binance Smart Chain
7) В этой части пользователям iOS потребуется Dapp браузер, который можно найти в этой инструкции . У пользователей Android браузер Dapp установлен по умолчанию.
8) После пополнения кошелька откройте браузер Dapp, нажав на иконку с четырьмя квадратами в нижней части приложения.
9) Перейдите в децентрализованное приложение Binance Smart Chain, к примеру, в PancakeSwap или BurgerSwap.

10) С удовольствием пользуйтесь децентрализованным приложением!
Вот еще несколько подробных инструкций по взаимодействовию с децентрализованными приложениями Binance Smart Chain через Trust Wallet:
Ниже мы расскажем, как всего за несколько минут настроить Trust Wallet и начать использовать Binance Smart Chain.
Настройка вашего кошелька для Binance Smart Chain
1) Загрузите Trust Wallet здесь . Если у вас уже есть Trust Wallet, убедитесь, что вы используете последнюю версию приложения.
2) Завершите базовую настройку мультивалютного кошелька . Обязательно сохраните вашу резервную фразу.
3) Перейдите в свой кошелек Smart Chain и нажмите «Получить», чтобы узнать свой адрес.
4) Внесите активы BEP20 на свой кошелек. Проще всего сделать это через Binance. Выберите актив, который поддерживает ввод и вывод токенов на BEP20 на Binance, и переведите его на свой адрес Binance Smart Chain в Trust Wallet. Помните, что для любых транзакций на Binance Smart Chain необходим BNB.
5) Вот и всё! Вы можете использовать Binance Smart Chain.
6) Чтобы проверить ID транзакции после получения токена BEP20, нажмите на транзакцию, затем нажмите «Поделиться» в правом верхнем углу и скопируйте ID транзакции.
Использование децентрализованных приложений Binance Smart Chain
7) В этой части пользователям iOS потребуется Dapp браузер, который можно найти в этой инструкции . У пользователей Android браузер Dapp установлен по умолчанию.
8) После пополнения кошелька откройте браузер Dapp, нажав на иконку с четырьмя квадратами в нижней части приложения.
9) Перейдите в децентрализованное приложение Binance Smart Chain, к примеру, в PancakeSwap или BurgerSwap.
10) С удовольствием пользуйтесь децентрализованным приложением!
Вот еще несколько подробных инструкций по взаимодействовию с децентрализованными приложениями Binance Smart Chain через Trust Wallet:
Источник
How to Use Binance Chain Wallet
Introduction
Binance Chain Wallet is the official Binance cryptocurrency wallet for accessing Binance Smart Chain, Binance Chain, and Ethereum. You can use it to securely store your crypto and connect to thousands of projects across different blockchains.
Whether you’re looking to swap BNB for other tokens, mint NFTs, or do yield farming, you can easily do it all with the browser extension wallet. The Binance Chain Wallet currently supports Chrome, Firefox, and Brave.
What makes Binance Chain Wallet unique?
At first glance, Binance Chain Wallet looks similar to other extension-based wallets. There are, however, a few features that differentiate Binance Chain Wallet from the rest. If you already have a Binance account, you can easily link it to your wallet with Wallet Direct. This feature saves you from copying and pasting addresses when transferring digital assets between the two.
- Through your Gmail login
- By using your local device
- With your account password created during set-up
Setting up Binance Chain Wallet
2. After installing the extension, you will see the sign-up page. In this example, we’re going to create a brand new wallet with a Gmail account.
3. Click [Create Wallet] and then select [Continue with tKey via: G].
4. A pop-up will appear asking you to log in using Gmail. tKey and Binance Chain Wallet will use your Gmail account as a way of authenticating your identity in the future if needed.
5. The next step is to create a password that can act as a second layer of protection should you lose your private key.
You should never share your seed phrase with anyone. Treat it similar to a banking account password or pin. If you lose it, you can still gain access to your Binance Chain Wallet using your email address in combination with your tKey password.
7. Click continue once you are sure that you have securely stored the seed phrase.
Depositing BNB with Wallet Direct
If you already have some BNB in your Binance spot wallet, you can connect your account with your Binance Chain Wallet using the [Wallet Direct] feature.
1. Click the icon on the top right of the wallet’s homepage, and then click [Connect to Binance.com account].
2. Log in to your Binance account and click [Verify and connect my address].
3. You’ll now see a pop-up asking you to [Connect to wallet]. Clicking this will open up Binance Chain Wallet, where you can click [Connect].
4. Next, you will need to give permission for your wallet to sign Binance’s message. This step verifies you are the owner of the wallet and permits it to connect.
5. Once you have completed the previous steps, you will have to go through Binance’s authentication process as a final layer of security. If you have 2FA linked to your account, you will also have to use it.
7. To start transferring funds from your Binance account, click the [Receive] button and choose [Wallet Direct].
8. You’ll now see the balance of your available assets to transfer.
Depositing from another wallet
You can also deposit directly from another wallet. In this example, we will transfer BNB from our Binance account wallet to the Binance Chain Wallet.
2. On your Binance Chain Wallet, click [Binance Chain Native Token] and then [Receive].
Adding new tokens to your Binance Chain Wallet list
1. After setting up your Binance Chain Wallet, you will by default only see your BNB balance. You can add more coins by searching from the list available by clicking the [+] button.
2. Look for the token you want to add and click the check box. In this example, we’ve added Binance-Peg Ether. Your wallet will still accept deposits of a token even if you haven’t checked it on the list. Checking a token simply makes the balance visible.
Connecting Binance Chain Wallet to Binance Smart Chain
It’s easy to interact with Binance Smart Chain using your Binance Chain Wallet. It only takes a couple of clicks, and you can get started staking, swapping, and interacting with DApps. Let’s take a look at how to connect with PancakeSwap. Almost all DApps will have the same UI for connecting your wallet.
1. Click the [Connect] button in the top right corner of the screen.
2. Select [Binance Chain Wallet]. Note that not every DApp will support using Binance Chain Wallet.
3. A pop-up will appear asking if you want to connect to the DApp. Click the [Connect] button to confirm.
4. Your wallet address should now appear in the top right corner.
Источник
Use Binance Chain Extension Wallet
What is it?
Binance Chain Extension Wallet is a Crypto Wallet for Binance Chain, Binance Smart Chain. You can send and receive funds on Binance Chain, Binance Smart Chain and cross-chain transfers between both of Binance’s blockchains.
In the future, Binance Chain Extension Wallet will add support for Ethereum blockchain and enable access for distributed applications, or «Dapps» in your browser!
It’s supported in Firefox and Chrome browsers.
Firefox users are more likely to access the latest version timely
Download Link
Install
Example: Install Binance Chain Wallet in Firefox browser
Search for Binance Chain
Note: Make sure it’s offered by Binance Chain
- Click on “Add to Firefox”

That’s it! You have successfully installed the Binance Chain Wallet extension in Firefox!
The workflow is the same for all browsers
Create an account in extension wallet for Binance Smart Chain
- Click on “I do not own a wallet”
- Choose your own Password
Note: it has to be a strong password
Click on “Continue”
Backup your recovery phrase
Congratulations! you have created your account!
Recover your account with Mnemonic Phrase
- Install Binance Chain extension by following the previous steps
firstClick on “I own a wallet”
Type your recovery phrase and choose a strong password
Now you are all set!
Get Testnet BNB from Faucet
- Switch to Binance Smart Chain Testnet after unlock your extension wallet
- Paste your address in the box and click on “Give me BNB”
- Click on the “+” and add “BNB” token
After the transfer transaction is sent, you will see an increase in your balance
Transfer Testnet BNB from BSC to BC
- Switch to Binance Chain testnet and copy your address after unlock your extension wallet, start with tbnb1
Click on the “+” and add “BNB” token
Switch to Binance Smart Chain testnet and click on “Send”
- Click on “Send” when you have filled in other information. You have to confirm it too
- Switch back to Binance Chain Testnet to confirm this cross-chain transfer
Transfer Testnet BNB from BC to BSC
- Switch to Binance Smart Chain testnet after unlock your extension wallet and copy your address, start with 0x
Click on the “+” and add “BNB” token
Switch to Binance Chain testnet and click on “Send”
- Click on “Send” when you have filled in other information. You have to confirm it too
- Switch back to Binance Smart Chain Testnet to confirm this cross-chain transfer
Swap Testnet BEP2 token to its BEP20 equivalent
- Follow the instructions above to Install Binance Chain extension wallet if not ready
- Follow the instructions above to create or Recover your account
- Switch to Binance Chain testnet after unlock your extension wallet and Click at “+” to add your BEP2 token if necessary
Verify your balance has enough BNB to pay transfer fee
- Switch to Binance Smart Chain testnet and copy your address, start with 0x
Click at “+” to add your BEP20 token if necessary
- Switch to Binance Chain testnet and click on “Send”
- Click on “Send” when you have filled in other information. You have to confirm it too
- Switch to Binance Smart Chain testnet, you should see your BEP20 token balance change
Swap Testnet BEP20 token to its BEP2 equivalent
- Follow the instructions above to Install Binance Chain extension wallet if not ready
- Follow the instructions above to create or Recover your account
- Switch to Binance Smart Chain testnet and Click at “+” to add your BEP20 token if necessary
Verify your balance has enough BNB to pay transfer fee
- Switch to Binance Chain testnet and copy your address, start with tbnb1
Note: for mainnet, the address starts with bnb1
- Click at “+” to add your BEP2 token if necessary
- Switch to Binance Smart Chain testnet and click on “Send”
- Confirm your transaction and verify your balance change
Источник