Transactions
Transactions are cryptographically signed instructions from accounts. An account will initiate a transaction to update the state of the Ethereum network. The simplest transaction is transferring ETH from one account to another.
To help you better understand this page, we recommend you first read Accounts and our introduction to Ethereum.
What’s a transaction?
An Ethereum transaction refers to an action initiated by an externally-owned account, in other words an account managed by a human, not a contract. For example, if Bob sends Alice 1 ETH, Bob’s account must be debited and Alice’s must be credited. This state-changing action takes place within a transaction.
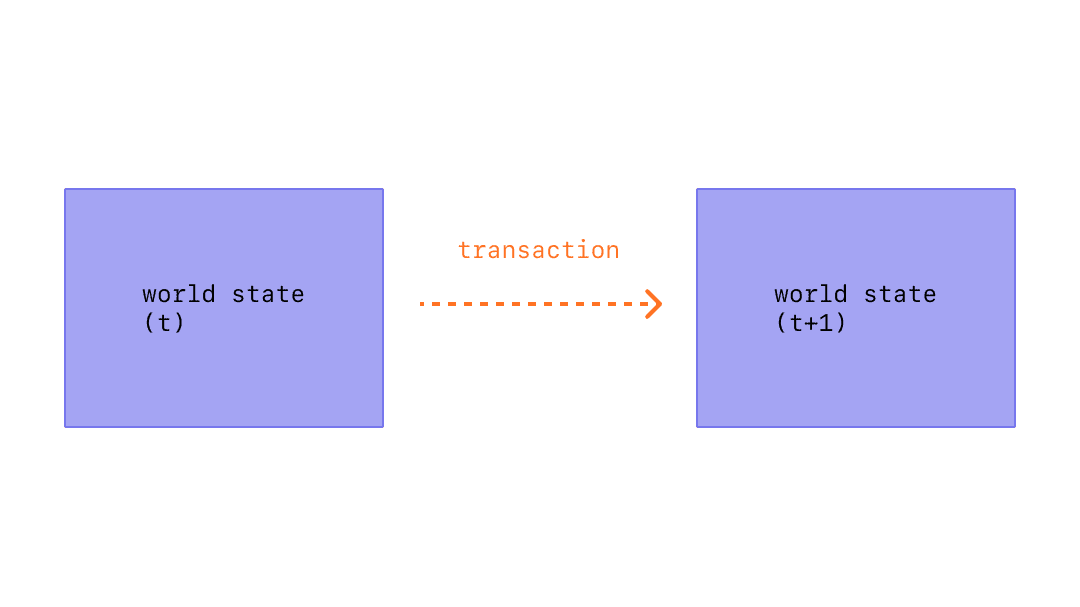 Diagram adapted from Ethereum EVM illustrated
Transactions, which change the state of the EVM, need to be broadcast to the whole network. Any node can broadcast a request for a transaction to be executed on the EVM; after this happens, a miner will execute the transaction and propagate the resulting state change to the rest of the network.
Transactions require a fee and must be mined to become valid. To make this overview simpler we’ll cover gas fees and mining elsewhere.
A submitted transaction includes the following information:
- recipient – the receiving address (if an externally-owned account, the transaction will transfer value. If a contract account, the transaction will execute the contract code)
- signature – the identifier of the sender. This is generated when the sender’s private key signs the transaction and confirms the sender has authorised this transaction
- value – amount of ETH to transfer from sender to recipient (in WEI, a denomination of ETH)
- data – optional field to include arbitrary data
- gasLimit – the maximum amount of gas units that can be consumed by the transaction. Units of gas represent computational steps
- gasPrice – the fee the sender pays per unit of gas
Gas is a reference to the computation required to process the transaction by a miner. Users have to pay a fee for this computation. The gasLimit and gasPrice determine the maximum transaction fee paid to the miner. More on Gas.
The transaction object will look a little like this:
But a transaction object needs to be signed using the sender’s private key. This proves that the transaction could only have come from the sender and was not sent fraudulently.
An Ethereum client like Geth will handle this signing process.
- the raw is the signed transaction in Recursive Length Prefix (RLP) encoded form
- the tx is the signed transaction in JSON form
With the signature hash, the transaction can be cryptographically proven that it came from the sender and submitted to the network.
As mentioned, transactions cost gas to execute. Simple transfer transactions require 21000 units of Gas.
So for Bob to send Alice 1 ETH at a gasPrice of 200 gwei, Bob will need to pay the following fee:
Bob’s account will be debited -1.0042 ETH
Alice’s account will be credited +1.0 ETH
The miner processing the transaction will get +0.0042 ETH
Gas is required for any smart contract interaction too.
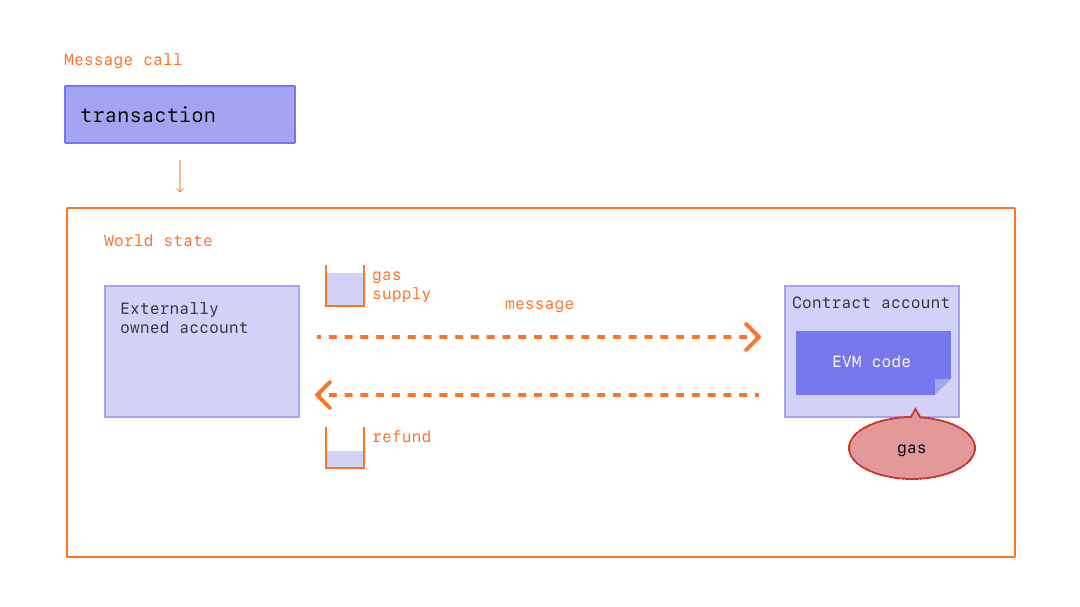 Diagram adapted from Ethereum EVM illustrated
Any gas not used in a transaction is refunded to the user account.
Once the transaction has been submitted the following happens:
- Once you send a transaction, cryptography generates a transaction hash: 0x97d99bc7729211111a21b12c933c949d4f31684f1d6954ff477d0477538ff017
- The transaction is then broadcast to the network and included in a pool with lots of other transactions.
- A miner must pick your transaction and include it in a block in order to verify the transaction and consider it «successful».
- You may end up waiting at this stage if the network is busy and miners aren’t able to keep up. Miners will always prioritise transactions with higher GASPRICE because they get to keep the fees.
- Your transaction will also get a block confirmation number. This is the number of blocks created since the block that your transaction was included in. The higher the number, the greater the certainty that the transaction was processed and recognised by the network. This is because sometimes the block your transaction was included in may not have made it into the chain.
- The larger the block confirmation number the more immutable the transaction is. So for higher value transactions, more block confirmations may be desired.
Watch Austin walk you through transactions, gas, and mining.
Know of a community resource that helped you? Edit this page and add it!
Источник
Transactions
Transactions are cryptographically signed instructions from accounts. An account will initiate a transaction to update the state of the Ethereum network. The simplest transaction is transferring ETH from one account to another.
To help you better understand this page, we recommend you first read Accounts and our introduction to Ethereum.
What’s a transaction?
An Ethereum transaction refers to an action initiated by an externally-owned account, in other words an account managed by a human, not a contract. For example, if Bob sends Alice 1 ETH, Bob’s account must be debited and Alice’s must be credited. This state-changing action takes place within a transaction.
Diagram adapted from Ethereum EVM illustrated
Transactions, which change the state of the EVM, need to be broadcast to the whole network. Any node can broadcast a request for a transaction to be executed on the EVM; after this happens, a miner will execute the transaction and propagate the resulting state change to the rest of the network.
Transactions require a fee and must be mined to become valid. To make this overview simpler we’ll cover gas fees and mining elsewhere.
A submitted transaction includes the following information:
- recipient – the receiving address (if an externally-owned account, the transaction will transfer value. If a contract account, the transaction will execute the contract code)
- signature – the identifier of the sender. This is generated when the sender’s private key signs the transaction and confirms the sender has authorised this transaction
- value – amount of ETH to transfer from sender to recipient (in WEI, a denomination of ETH)
- data – optional field to include arbitrary data
- gasLimit – the maximum amount of gas units that can be consumed by the transaction. Units of gas represent computational steps
- gasPrice – the fee the sender pays per unit of gas
Gas is a reference to the computation required to process the transaction by a miner. Users have to pay a fee for this computation. The gasLimit and gasPrice determine the maximum transaction fee paid to the miner. More on Gas.
The transaction object will look a little like this:
But a transaction object needs to be signed using the sender’s private key. This proves that the transaction could only have come from the sender and was not sent fraudulently.
An Ethereum client like Geth will handle this signing process.
- the raw is the signed transaction in Recursive Length Prefix (RLP) encoded form
- the tx is the signed transaction in JSON form
With the signature hash, the transaction can be cryptographically proven that it came from the sender and submitted to the network.
As mentioned, transactions cost gas to execute. Simple transfer transactions require 21000 units of Gas.
So for Bob to send Alice 1 ETH at a gasPrice of 200 gwei, Bob will need to pay the following fee:
Bob’s account will be debited -1.0042 ETH
Alice’s account will be credited +1.0 ETH
The miner processing the transaction will get +0.0042 ETH
Gas is required for any smart contract interaction too.
Diagram adapted from Ethereum EVM illustrated
Any gas not used in a transaction is refunded to the user account.
Once the transaction has been submitted the following happens:
- Once you send a transaction, cryptography generates a transaction hash: 0x97d99bc7729211111a21b12c933c949d4f31684f1d6954ff477d0477538ff017
- The transaction is then broadcast to the network and included in a pool with lots of other transactions.
- A miner must pick your transaction and include it in a block in order to verify the transaction and consider it «successful».
- You may end up waiting at this stage if the network is busy and miners aren’t able to keep up. Miners will always prioritise transactions with higher GASPRICE because they get to keep the fees.
- Your transaction will also get a block confirmation number. This is the number of blocks created since the block that your transaction was included in. The higher the number, the greater the certainty that the transaction was processed and recognised by the network. This is because sometimes the block your transaction was included in may not have made it into the chain.
- The larger the block confirmation number the more immutable the transaction is. So for higher value transactions, more block confirmations may be desired.
Watch Austin walk you through transactions, gas, and mining.
Know of a community resource that helped you? Edit this page and add it!
Источник
How to create Raw Transactions in Ethereum ? — Part 1

In this post, we will find out how to create, sign and send raw transactions between accounts using NodeJs.
Raw transactions are a way by which we can separate the process of creating, signing and sending raw transactions, which gives us more control over how a transaction is to be done on Ethereum. Raw transactions helps us to create transactions outside the geth console.
What is a transaction made up of ?
When we send a transaction between two accounts from a geth console, we need 3 parameters i.e from account, to account and value. But, there are some more parameters underneath, which geth console fills for us, they are gasPrice, gasLimit and nonce.
- gasPrice is the maximum price of gas you are willing to pay for this transaction.
- gasLimit is the maximum gas you are willing to pay for this transaction.
- nonce which you see here is not to be confused with the nonce that is used in the mining process. As it turns out, nonce for a transaction is a parameter that is used to maintain the order in which transactions are processed. So if you send a transaction with a nonce which is not one more then the previous transaction from that same account then that transaction will be rejected.
So we have to take care that nonce value is correctly sent, without which the transaction fails.
Raw transactions between accounts
We will use a node module called ethereum-js to create raw transactions outside geth console. From what we talked above, we need correct value of nonce to send the transaction, so let us the find out the nonce from the geth node we will be sending the transaction from, which can be found using
We should also know the private key of the account we want to send the transaction from. Easiest way to get the private key is by using recover feature of keythereum module to find out the private key from the geth keystore file. Below is the code to get the private key from keyfile
We can create a raw transaction from one account to another using the following code
We will now get a raw transaction string as output of the program. This can be submitted to Ethereum Network using following command in geth console.
You will now be able to see the transaction hash of the transaction.
In the next post we will find out how to send raw transactions to a contract.
- Use this method while working with Ethereum mainnet, only if you know what you are doing as this could have security implications as your private key is extracted here.
- Another way to create a raw Transaction in Go in mentioned here.
Источник
Sending Transactions Using Web3
This is a beginner friendly guide to sending Ethereum transactions using web3. There are three main steps in order to send a transaction to the ethereum blockchain: create, sign, and broadcast. We’ll go through all three, hopefully answering any questions you might have! In this tutorial, we’ll be using Alchemy to send our transactions to the Ethereum chain. You can create a free Alchemy account here.
NOTE: This guide is for singing your transactions on the backend for your app, if you want to integrate signing your transactions on the frontend, check out integrating Web3 with a browser provider.
Like most blockchain developers when they first start, you might have done some research on how to send a transaction (something that should be pretty simple) and ran into a plethora of guides, each saying different things and leaving you a bit overwhelmed and confused. If you’re in that boat, don’t worry; we all were at some point! So, before we start, let’s get a few things straight:
1 . Alchemy does not store your private keys
- This means that Alchemy cannot sign and send transactions on your behalf. The reason for this is security purposes. Alchemy will never ask you to share your private key, and you should never share your private key with a hosted node (or anyone for that matter).
- You can read from the blockchain using Alchemy’s core API, but to write to it you’ll need to use something else to sign your transactions before sending them through Alchemy (this is the same for any other node service).
2 . What is a “signer”?
- Signers will sign transactions for you using your private key. In this tutorial we’ll be using Alchemy web3 to sign our transaction, but you could also use any other web3 library.
- On the frontend, a good example of a signer would be metamask, which will sign and send transactions on your behalf.
3 . Why do I need to sign my transactions?
- Every user that wants to send a transaction on the Ethereum network must sign the transaction (using their private key), in order to validate that the origin of the transaction is who it claims to be.
- It is super important to protect this private key, since having access to it grants full control over your Ethereum account, allowing you (or anyone with access) to perform transactions on your behalf.
4 . How do I protect my private key?
- There are many ways to protect your private key and to use it to send off transactions. In this tutorial we will be using a .env file. However, you could also use a separate provider that stores private keys, use a keystore file, or other options.
5 . What is the difference between eth_sendTransaction and eth_sendRawTransaction ?
eth_sendTransaction and eth_sendRawTransaction are both Ethereum API functions which broadcast a transaction to the Ethereum network so it will be added to a future block. They differ in how they handle signing of the transactions.
- eth_sendTransaction is used for sending unsigned transactions, which means the node you are sending to must manage your private key so it can sign the transaction before broadcasting it to the chain. Since Alchemy doesn’t hold user’s private keys, they do not support this method.
- eth_sendRawTransaction is used to broadcast transactions that have already been signed. This means you first have to use signTransaction(tx, private_key) , then pass in the result into eth_sendRawTransaction .
When using web3, eth_sendRawTransaction is accessed by calling the function web3.eth.sendSignedTransaction.
This is what we will be using in this tutorial.
6 . What is the web3 library?
- Web3.js is a wrapper library around the standard JSON-RPC calls that is quite common to use in Ethereum development.
- There are many web3 libraries for different languages. In this tutorial we’ll be using Alchemy Web3 which is written in JavaScript. You can check out other options here.
Okay, now that we have a few of these questions out of the way, let’s move on to the tutorial. Feel free to ask questions anytime in the Alchemy discord!
NOTE: This guide requires an Alchemy account, an Ethereum address or Metamask wallet, NodeJs, and npm installed. If not, follow these steps:
Steps to Sending your Transaction
1 . Create an Alchemy app on the Rinkeby testnet
Navigate to your Alchemy Dashboard and create a new app, choosing Rinkeby (or any other testnet) for your network.
2 . Request ETH from the Rinkeby faucet
Follow the instructions on the Rinkeby faucet to receive Eth. You will have to share on social media for this specific faucet. Make sure to include your Rinkeby Ethereum address (from Metamask) and not another network. After following the instructions, double check that you’ve received the ETH in your wallet.
3 . Create a new project directory and cd into it
Create a new project directory from the command line (terminal for macs) and navigate into it:
4 . Install Alchemy Web3 (or any web3 library)
Run the following command in your project directory to install Alchemy Web3:
5 . Install dotenv
We’ll use a .env file to safely store our API key and private key.
6 . Create the .env file
Create a .env file in your project directory and add the following (replacing “ your-api-url » and » your-private-key «)
- To find your Alchemy API URL, navigate to the app details page of the app you just created on your dashboard, click “View Key” in the top right corner, and grab the HTTP URL.
- To find your private key using Metamask, check out this guide.
7 . Create sendTx.js file
Great, now that we have our sensitive data protected in a .env file, let’s start coding. For our send transaction example, we’ll be sending ETH back to the Rinkeby faucet.
Create a sendTx.js file, which is where we will configure and send our example transaction, and add the following lines of code to it:
Be sure to replace the address on line 6 with your own public address.
Now, before we jump into running this code, let’s talk about some of the components here.
- nonce : The nonce specification is used to keep track of the number of transactions sent from your address. We need this for security purposes and to prevent replay attacks. To get the number of transactions sent from your address we use getTransactionCount.
- transaction : The transaction object has a few aspects we need to specify
- to : This is the address we want to send ETH to. In this case, we are sending ETH back to the Rinkeby faucet we initially requested from.
- value : This is the amount we wish to send, specified in wei where 10^18 wei = 1 ETH
- gas : There are many ways to determine the right amount of gas to include with your transaction. Alchemy even has a gas price webhook to notify you when the gas price falls within a certain threshold. For mainnet transactions, it’s good practice to check a gas estimator like ETH Gas Station to determine the right amount of gas to include. 21000 is the minimum amount of gas an operation on Ethereum will use, so to ensure our transaction will be executed we put 30000 here.
- nonce : see above nonce definition. Nonce starts counting from zero.
- [OPTIONAL] data: Used for sending additional information with your transfer, or calling a smart contract, not required for balance transfers, check out the note below.
- signedTx : To sign our transaction object we will use the signTransaction method with our PRIVATE_KEY
- sendSignedTransaction : Once we have a signed transaction, we can send it off to be included in a subsequent block by using sendSignedTransaction
A Note on data There are a two main types of transactions that can be sent in Ethereum.
- Balance transfer: Send eth from one address to another. No data field required, however, if you’d like to send additional information alongside your transaction, you can include that information in HEX format in this field.
- For example, let’s say we wanted to write the hash of an IPFS document to the ethereum chain in order to give it an immutable timestamp. Our data field should then look like data: web3.utils.toHex(‘IPFS hash‘). And now anyone can query the chain and see when that document was added.
- Smart contact transaction: Execute some smart contract code on the chain. In this case, the data field should contain the smart function you wish to execute, alongside any parameters.
- For a practical example, check out Step 8 in this Hello World Tutorial.
8 . Run the code using node sendTx.js
Navigate back to your terminal or command line and run:
9 . See your transaction in the Mempool
Open up the Mempool page in your Alchemy dashboard and filter by the app you created to find your transaction. This is where we can watch our transaction transition from pending state to mined state (if successful) or dropped state if unsuccessful. Make sure to keep it on “All” so that you capture “mined”, “pending”, and “dropped” transactions. You can also search for your transaction by looking for transactions sent to address 0x31b98d14007bdee637298086988a0bbd31184523 .
To view the details of your transaction once you’ve found it, select the tx hash, which should take you to a view that looks like this:
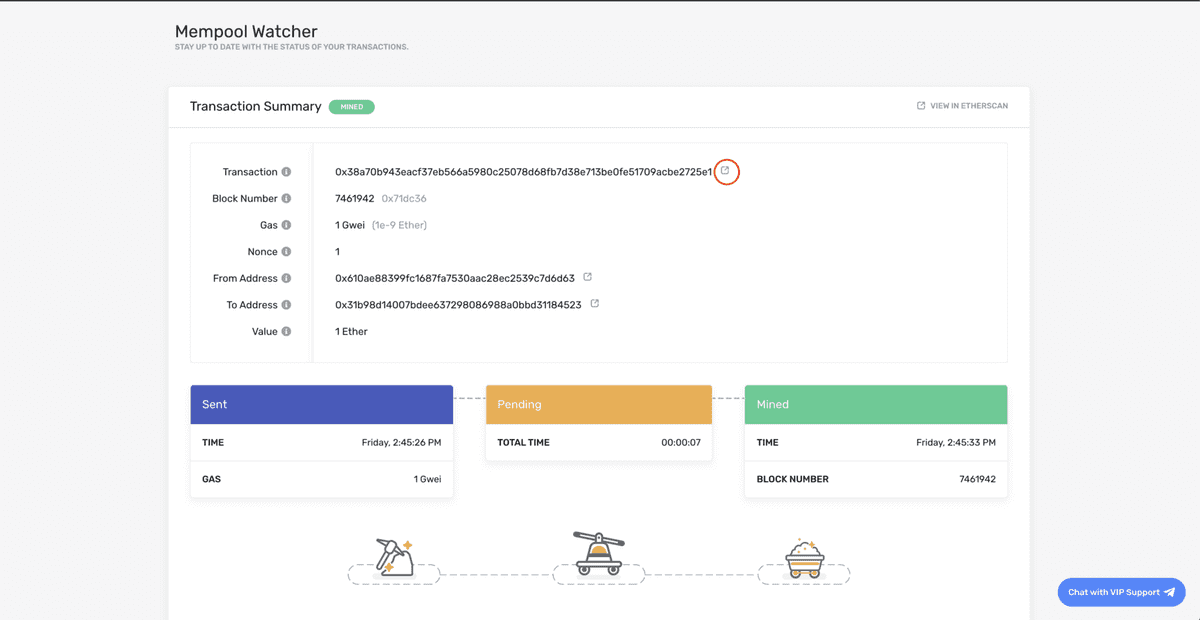
From there you can view your transaction on Etherscan by clicking on the icon circled in red!
Yippieeee! You just sent your first Ethereum transaction using Alchemy 🎉
For feedback and suggestions about this guide, please message Elan on Alchemy’s Discord!
Источник