- 1 Pib have not harvest anymore? #5815
- Replies
- losingle May 22, 2021
- metoos003 May 23, 2021
- losingle May 24, 2021
- Please confirm expected output for remote harvester. #3157
- Comments
- dxyzab commented Apr 30, 2021
- kswtch commented Apr 30, 2021
- dxyzab commented Apr 30, 2021 •
- kswtch commented Apr 30, 2021
- dxyzab commented Apr 30, 2021
- kswtch commented Apr 30, 2021
- franco-101 commented May 9, 2021
- thauburger commented May 10, 2021 •
- How to Use Your Raspberry Pi as a Chia Harvester
- A complete step-by-step guide from a Chia novice to other Chia novices for using the Raspberry Pi 4 as a secondary harvester machine.
- I. General Setup
- II. Setting Up the Pi
- III. Installing Chia
- IV. Configuring Chia
- V. Conclusion
1 Pib have not harvest anymore? #5815
I have more than 2Pib of farm, bin has not harvested for more than 1 week, how to check the problem
same problem #1796
Replies
- report your OS and chia version
- report output of chia farm summary 3. 3.
- attach the latest portion of your log (with INFO level)
- do chia plots check
losingle May 22, 2021
- report your OS and chia version
- report output of chia farm summary 3. 3.
- attach the latest portion of your log (with INFO level)
- do chia plots check
chia: 1.1.6
os: ubuntu 20.04 LTS
disable timelord, chia plots check is all right
harvester someone logs:
metoos003 May 23, 2021
losingle May 24, 2021
How are you doing now?
I have more than 2Pib of farm, bin has not harvested for more than 1 week, how to check the problem
peta-byte is 10e15, a plot is 1.08e11, this mean you have 10e4 plots,
When in the hell are you not using HPOOL? You would be earning 24 plots/mon, at today space of 8+ EB, you would be earning almost 1XCH/day risk free 100%
The chia calculator is BS, its sponsored by a guy who sells plots. You should be winning by solo-mining at 10k as that’s the scale that would work at the current ‘space’, last month 1k worked, this month you need 10k to solo. The problem is the main-net on chia-net doesn’t work, the harvester doesn’t work all the software is broken most of the time.
On hpool you don’t have to use anything from chia-net, not only do they include the miner for your plots, they also include a plotter to make the plots, right now I use their miner, and I have hacked chia’s chai-pos plotter so that it has quit kililing my NVME drives, but in the future I quit running all software provided by chia-net, as its all shit.
Источник
Please confirm expected output for remote harvester. #3157
Comments
dxyzab commented Apr 30, 2021
Describe the issue
After following the instructions at https://github.com/Chia-Network/chia-blockchain/wiki/Farming-on-many-machines
and confirming the connections in logs are as expected. On the harvester
chia farm summary shows
Connection error. Check if wallet is running at 9256
Connection error. Check if full node is running at 8555
Connection error. Check if farmer is running at 8559
Farming status: Not available
Total chia farmed: Unknown
User transaction fees: Unknown
Block rewards: Unknown
Last height farmed: Unknown
Plot count: 91
Total size of plots: 9.008 TiB
Estimated network space: Unknown
Expected time to win: Unknown
To Reproduce
Set up a remote harvester according to the instructions.
Expected behavior
I would expect to see a connection to the wallet, full node and the farmer on the main machine.
Screenshots
If applicable, add screenshots to help explain your problem.
Additional context
This is concerning as it suggests any rewards on the remote harvester will not be put into the wallet.
The text was updated successfully, but these errors were encountered:
kswtch commented Apr 30, 2021
On your Harvester and Main Node change your Logging output to «INFO» and check
On Harvesters you should see:
On Main Node you should see:
dxyzab commented Apr 30, 2021 •
These were checked after the harvester was started and are present.
My concern is that the harvester will not be able to connect to the wallet should it find a proof. How can I verify this?
kswtch commented Apr 30, 2021
From my understanding:
Your harvesters don’t need to connect to the wallet. In fact they can’t. They connect to the farmer. The farmer connects to the Full Node. The wallet also connects to the Full Node. See this image as an example: https://raw.githubusercontent.com/wiki/Chia-Network/chia-blockchain/images/chia-network-architecture.png
dxyzab commented Apr 30, 2021
I see — thank you for the diagram. Its just a little worrying to the novice (me) that I won’t get the rewards should my harvester find a proof. I seems my harvester is connected to the farmer.
If the main node were able to report the status of the entire farm this would be helpful. I upvoted
#3194
Thanks Daniel for your help.
kswtch commented Apr 30, 2021
You get a reward if your harvester finds a proof. Your harvester has 30 seconds to report a proof to the farmer and then to the full node (on most setups, farmer and full node are the same). So keep your harvesters running 🙂
franco-101 commented May 9, 2021
Does this mean I need to keep the full node running? Can I just not have the harvester running separately on a RPI with no full node?
thauburger commented May 10, 2021 •
There always needs to be at least one full node (synced) somewhere in your system to farm successfully.
It does not have to be on the same machine (necessarily) as the harvester, so long as the remote harvester is configured to talk to a farmer service that does have access to that full node.
Example (with fake IP addresses for illustration)
Primary
Machine A (10.0.0.1): Runs full node, farmer, wallet, and harvester service surveying plots on A’s storage
Remote Harvesters
Machine B (10.0.0.2): Remote harvester service only — surveying plots on B’s storage
Machine C (10.0.0.3): Remote harvester service only — surveying plots on C’s storage
B and C do NOT need to host a full node (or farmer, or wallet), so long as you follow the configuration steps for Farming on many machines
Basically, on each remote harvester node (B and C), you just need to follow the cert instructions (using’s A’s certs for signing), and point B and C each toward A as each harvester’s farmer peer.
The most challenging part of this process is that it’s hard to see your total active farm size (and estimated time to win) because Chia doesn’t do a great job of consolidating plot and farming information across multiple harvesters. So you have to do a sanity check in logs.
There’s an open feature request for better remote harvester support in #3194
Источник
How to Use Your Raspberry Pi as a Chia Harvester
A complete step-by-step guide from a Chia novice to other Chia novices for using the Raspberry Pi 4 as a secondary harvester machine.

If you’re anything like me, you’ve likely spent the last few weeks filling every unused hard drive you could get your hands on with Chia plots. Now you may be looking for an easy way to farm the filled hard drives. This is exactly the position I found myself in when I started to look into using my Raspberry Pi 4 as a harvester.
Although there is information available on the official Chia GitHub wiki for setting up a Raspberry Pi and farming on many machines, I found a lot of the instructions to be poorly explained for somebody with limited command line experience. After many hours of figuring things out for myself, I decided to put this instructional guide together as a single point of reference to help fellow Chia novices. I do not claim that my approach is the best approach. However, my approach has worked satisfactorily for me and I hope that others will be able to benefit from my endeavors.
I. General Setup
Farming Chia is a two part process. The first step consists of creating Chia “plots” which are created on a temporary drive and then saved to a final destination drive. The second step consists of “farming” the plots. The plotting and farming steps can be done on different computers, and multiple computers can be used as “harvesters” in the farming step.
It is important to note that if multiple computers are used on the same network, only one should be running a full node and only that machine should have universal plug-and-play (UPnP) enabled. This setting is configured on your router. If you do not have UPnP enabled or if you have UPnP enabled on multiple machines on the same network, it will cause problems for you down the road.
This guide assumes that you are using a Windows machine as your main node and that you are using a Raspberry Pi 4 as a harvester machine. This setup is optimal because the Pi can take days just to fully synch the node, after which I have found it to run quite sluggishly. However, the Pi will serve just fine as a harvester, with the benefit of being cheap and drawing relatively little power at the wall.
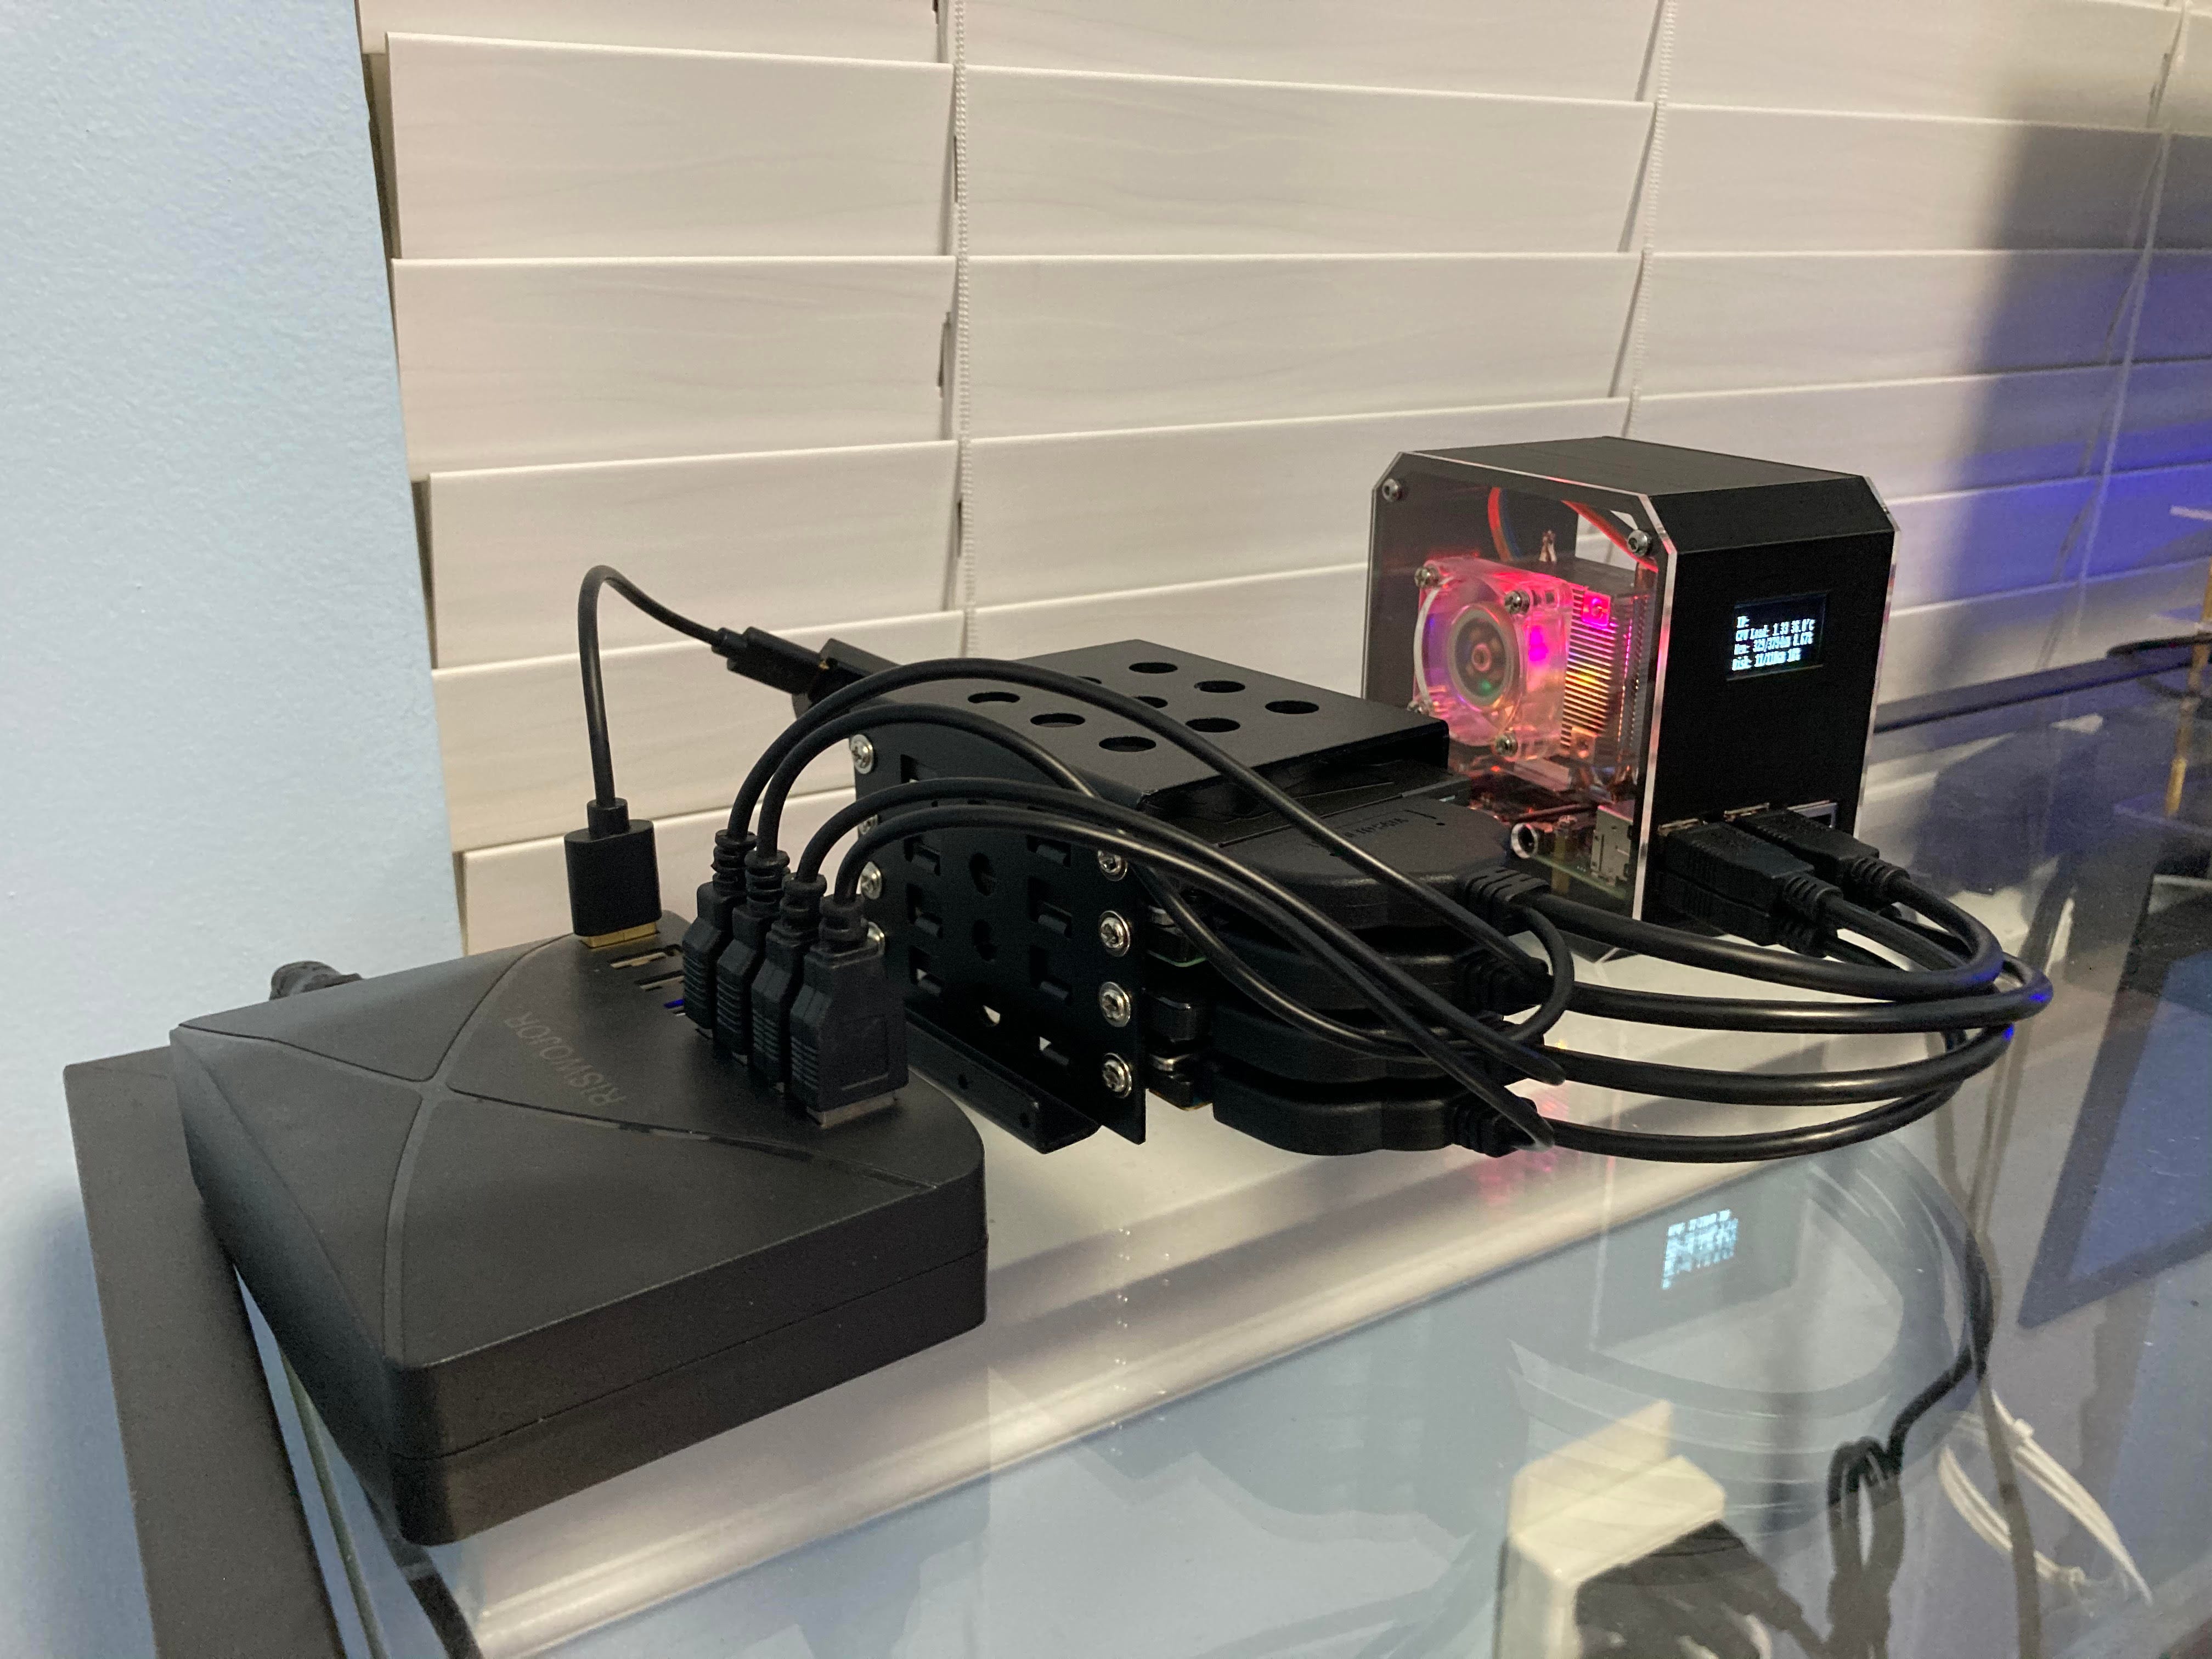
Make sure that you have a power source for the drives that are connected to the Pi. The Pi can power one or maybe two SDDs on its own, but it will struggle to power anything more. I have connected my drives to a powered USB strip using Sata-to-USB cords that have an additional power only USB connection (see the image above). If you do something similar, you should also be aware that the Pi may not reboot properly due to back power. That is, some power from the power strip may flow back from the connected drives to the Pi. I understand that this is generally not a problem provided that your power-strip also has some sort of surge protection in place. In any event, I have found that simply disconnecting any of the extra drives from the power strip prior to booting the Pi avoids any issues with turning the Pi on. You can then plug the drives back in once the Pi is running.
II. Setting Up the Pi
The Chia software only works on a 64 bit operating system. Therefore, the first step is to download the 64 bit version of Raspbian and flash it to a micro SD card. The 64 bit version is currently in beta and it is not available on Raspberry Pi Imager.
You can access the most recent image directly from the Raspberry Pi foundation (which is the one dated 04/09/21 as of the date of this article). Simply download the .zip file from the link and save it to your computer. Then, flash the image from the download to a micro SD card using Raspberry Pi Imager or BalenaEtcher. Please note that flashing the image to the SD card will also wipe anything saved on the card — so be sure to either use a new card or to have backed up any files you need to keep.
Once you start up the Pi, go through the basic setup. Once the setup is complete, you can optionally add the following configurations:
- Setup the Pi to boot from an SSD: I have found that the Pi generally runs better when it uses an SSD rather than the micro SD card. To do this, open a new terminal and use sudo raspi-config to launch the configuration tool. Choose Advanced Options and then Bootloader Version. Select Latest, then Ok and then No. Then return to the main menu. From there, choose Advanced Options again and then Boot Order. Then select SD Card Boot and then Ok. The Pi will then ask if you would like to reboot — select No. Finally, select Finish and close out of the configuration tool. After this, use the SD Card Copier tool, which can be found in under Accessories in the application menu, to clone your micro SD card to your attached SSD (this will wipe the SSD). You can then shutdown your Pi from the terminal using sudo shutdown now , remove the micro SD card, and restart the Pi. It will now boot from your SSD.
- Enable VNC: VNC allows you to access the Pi remotely from your desktop computer without needing to hook the Pi up to its own display, keyboard, and mouse (a so-called “headless” configuration). Detailed instructions can be found here.
- Install Samba: Samba allows you to easily move files between your desktop and the Pi as if it were a server. Detailed instructions for setting up Samba can be found here.
You will also need to complete the following:
- Increase Swap Space: Depending on how much RAM you have on your Pi, the Chia creators recommend you increase your swap space by 1024 MiB. Detailed instructions on how to do this are available in this article.
III. Installing Chia
Here is where things start to get fun for those of us that are less comfortable with the command line. Chia does have a graphical user interface, but it runs very slowly on the Pi and does not offer the same level of control as the command line does. At least for now, it is best to use the command line to install, configure, and run Chia on the Pi.
Open a command terminal and install Chia using the following commands:
Then, import your keys from your 24 words using chia keys add . Chia is now installed on the Pi. Leave the terminal open so that you may continue to use it in the next step.
IV. Configuring Chia
You now need to configure Chia so that it will run as a harvester. This process will involve both your Windows computer running the main node (which I will henceforth refer to as the “main computer”) and the Pi. Complete the following steps:
- Shut down Chia on your main computer by fully exiting out of the GUI.
- On your main computer, navigate to the CA folder. This folder is probably located at C:\Users\[Your User Name]\.chia\mainnet\config\ssl\ca. Make a copy of the CA folder and save the copy of the folder to your Pi’s desktop using a flash drive or Samba.
- In the open terminal window on your Pi, use chia init -c [directory] , where [directory] is the file path to the copy of the CA folder. If you saved it to your desktop, then this command should look like chia init -c /home/pi/Desktop/ca .
- Now on your main computer, locate your main computer’s IP address. You can do this in the command prompt using ipconfig . In the Wireless LAN adapter Wi-Fi section, your main computer’s IP address will appear on the IPv4 Address line.
- Returning to the open terminal window of the Pi, use chia configure —set-farmer-peer [Main Computer IP Address]:8447 , where[Main Computer IP Address] is the IP address from the last step.
- Next, disable UPnP on the Pi using chia configure -upnp false .
- At this point, you need to connect the drives with your plots to the Pi and add the plots to the harvester. For each drive, you can add your plots to the Pi using the command chia plots add -d [File Path to Plots] , where [File Path to Plots] is the file path to the drive containing your plots.
- Returning to your main computer, you can now relaunch Chia.
- Finally, in the open terminal on your Pi use chia start harvester to connect the Pi to your main computer.
You can tell that this process has worked if you now see the plots connected to the Pi show up in the Last Attempted Proof section of the Farm tab on the GUI. You should see two different totals for the plots on your main computer and the plots on your Pi circulating through this section.

Please be aware that as of the most recent Chia release at the date of this article (1.1.4), the information in the Your Farm Overview section only displays the information for the main computer. So your plot count, total size of plots and estimated time to win will not update to reflect the plots from the Pi. Hopefully this will be updated in a future Chia release.
V. Conclusion
Once your harvester is set up, you can pretty much keep it running in the background with only minimal additional maintenance. You will want to make sure that your Pi is always running the latest version of Chia, which can be updated using the following sequence of commands in a clean terminal:
It’s an exciting time to be getting into farming Chia. I hope that this guide will have helped you towards expanding and managing your Chia farm. Happy harvesting.
Источник