Chia plotting powershell script
A repo for powershell module that helps Chia Plotting.
Open a powershell as administrator and run the following command:
If you want to update to the latest version, run this command:
If you get and error like the following «The ‘Command’ command was found in the module ‘PSChiaPlotter’, but the module could not be loaded.» then you will need to set your Execution Policy to remote signed by running the command below. Please note that execution policy is not a security feature, so changing it will not make your system more or less secure. Execution Policy is used to prevent you from accidentally running scripts that goes aganist the policy, but it does not prevent those scripts being ran in bypass mode. You can read more about Execution Policy on its about page here
Run this in Powershell one time to add the Chia.exe directory to your $ENV:Path in your profile script so that it is available every time you open powershell. This is not necessary to use the module but very useful for quickly using the chia.exe cli tool.
If you get an error stating «Add-Content : Could not find a part of the path «C:\Users\yourUSERNAME\Documents\WindowsPowerShell\profile.ps1″.» Then you made need to create any missing folders in that path.
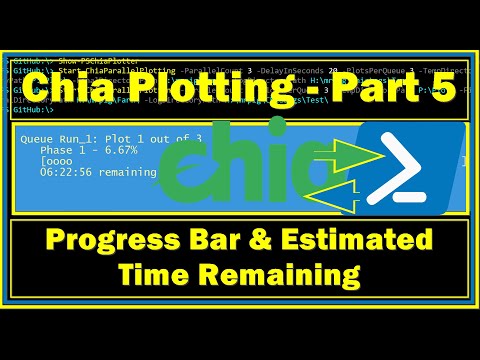
Using the PSChiaPlotter Plot Manager GUI

Basic Chia Plotting Using Powershell Guide

Advanced Chia Plotting Using Powershell — Adding Progress Bar
How to user Start-ChiaHarvesterWatcher and Get-ChiaHarvesterActivity To Check Harvester Health

The following is a list of things I want to add or improve on in the module. Not listed in any particular order.
- Add blue color block when a proof is found. Also change RGB to last look up time — Version 1.0.29+
- Add DarkMode and NoWalls — Version 1.0.29+
- Add phase 1 concurrent plot limiter
- Add Tab page to show a datagrid with all plotting stats
- Add Current and Completed Tabs for Queue groupbox
- Add seeing RAID drives — Version 1.0.28+
- Update module when pool plotting comes out
- Add buckets parameter
- Add option to remove safety feature that prevents over allocating space when plotting — Version 1.0.28+
- Add KSize option instead of having K32 only
- Add Job Name — Version 1.0.28+
- Add Drive Rotation in final and temp drives — Version 1.0.28+
- Add PSChiaPlotter Version on summary groupbox or somewhere — Version 1.0.30+
- Add Auto Check For Updates (or maybe a buttont to check for updates) — Version 1.0.30+
- Add Logging Capabaility with different logging levels — Version 1.0.30+
- Have GUI window not dependent on the Powershell window that started it — Version 1.0.30+
- Add the ability to add and remove columns on datagrids
- Add Phase % text and progress bar in background of the cell
- Notifications Integration (Discord, Toast, etc.)
- Add which KSize parameter to filter out which KSizes you want
4. All Functions
- Add Comment Based Help with at least 2 examples for each
- Add ValueFromPipeline for functions that could use it
If you want a very basic chia scripting file for parallel plotting with delays you can use the one below. Chia.exe directory must be added to $ENV:Path as shown above. Please note this script has nothing to do with the functions in this module and is only here to show people who want to write their own scripts using powershell.
If you find these tools useful and want to donate you can send XCH to the below address. XCH: xch1xlsrczvnfzjfeg7ejpaxy7evcn0nvsr73s4gcmzdqd7zkzlvy8ds49qvv2
About
A repo for powershell module that helps Chia Plotting
Источник
Plotting with PowerShell on Windows
Windows PowerShell has developed into a great tool to manage and execute scripts on Windows machines. Its built into every install of Windows 10. In this post, we go into how to run plotters with PowerShell. There are a few advantages to running plotters in PowerShell:
- Plotting is not tied to the Chia GUI. If the Chia client experiences a crash or bug, your plotter will continue to work while the client recovers.
- Every PowerShell window is one plotter. If you plan to perform plotting in parallel (running multiple plotters on the same machine) then this is a perfect way to visibly see how many plotters are running and how far along they are.
- You can cancel a plotter queue after the current plot. Each plotter has its own queue length in PowerShell. Something that I discovered by accident, you can click the PowerShell window and press CTRL-C. Nothing will confirm the key command, but at the end of the current plot, the plotter will abort the queue.
- You can create a PowerShell script to run all your plotters. Possibly the best feature, you can run a script and all of your plotters are launched, with their own settings, in their own individual windows. Perfect.
There are a few house keeping rules first before using PowerShell so you don’t hit the pitfalls that I have. Perform these steps:
- Open Powershell by pressing the Windows key and typing “PowerShell”
- When the PS window opens, click the top left of the window to open a menu. In that menu, click “Properties.”
- In the new window, Uncheck the box that says “QuickEdit mode”. Normally this feature is great when you want to highlight text in the window and copy it out to another place. But, it has the bad side effect of pausing whatever is running in the window. This is bad if a plotter is plotting and you accidentally click the window while dragging it around. Disabling QuickEdit mode prevents this from happening. If you want to select text in the future, just right-click inside the PS window and select “Mark”.
- Next, click the “Layout” tab. Locate the “Height” field. This is how much scroll back you want. I like a ton of scroll back so I max this out at 9999. This is so that you can view the progress info of many plots to see times.
- Click the OK button once complete.
- If you ever plan executing your own PowerShell scripts, enter the command below in an Administrator PowerShell Window so that it is enabled:
Now that PowerShell is setup to prevent you from making my horrible mistake, we can proceed with how to get a plotter started. In your PS window, enter the following command:
In the command above, note the two bolded locations. The “ ” needs to be replaced with YOUR username on your machine. Next the “app-1.0.5” is going to be replaced with the version of chia that you are running. Currently the latest is 1.0.5. But it won’t be like this always.
After you Change Directories (cd) to that folder, enter the following command to begin a plotter:
There is a lot of information here so I’ll break it up:
- .\chia.exe plots create – This is pretty self explanatory. I want chia to create a plot.
- -k 32 – This is the size of plot you want to create. K=32 is the minimum size of a plot that is considered valid on the Chia Network. It is also the fastest to create. You can go smaller on the K value but those plots are not valid on the network.
- -b 3389 – This is the amount of ram you want to allocate to the plotter. It does not use all this ram at once, its just the limit. But, windows will preallocate this amount and call it “committed” which might push other applications to virtual memory on disk if committed is maxed. 3389 is the perfect amount if you are using 2 threads. I have found that 4 threads requires a minimum of 3408; 6 threads 3416; 8 threads 3424.
- -u 128 – This is the bucket size. Essentially its how many pieces you want the workload to be divided in. If you change this to 64, then you have to double the ram amount. From my experience, there is no change in plot speed messing with this number. So leave it at 128.
- -r 2 – This is the number of threads you want for the plotter. The plotter works in four phases. This number only affects phase 1 of a plot. Phase 2, 3, and 4 are all single threaded. In my testing, I saw a 30 minute speed improvement from using 2 threads to 4 threads. Then, I only saw a 5 minute improvement from 4 threads to 6 threads. There is diminishing returns definitely. Always try to use at least 2 though, because 1 thread is really slow.
- –t E:\temp – This is your temporary directory. Remember to pick a fast drive here.
- -d D:\plot – This is your final directory. This can be an external usb drive or another type of fat spinny hard drive.
- -n 1 – Finally this is your queue. How many plots do you want to make with these settings? Remember, you can set any number here and then stop it with CTRL-C.
- Since we are plotting on the same machine as the farmer, the keys needed to generate the plots are automatically brought in. So we don’t need to specify those here.
That’s pretty much it for the PowerShell command. Executing this command will start the plotter on its journey and it will print its progress in the window. Next is the scripting part. Below I have placed the script I use on my machine. Copy and paste this script into notepad and save the file as plotterscript.ps1, while selecting “All Files” for the file type:
Here is the script. Copy/paste the invoke-expression line for each plotter you wish to start :
Lets breakdown the script above. You will see semicolons in the script above. These separate each command of the new PowerShell window.
- invoke-expression ‘cmd /c start powershell -NoExit – This first part is what tells PowerShell to open another PowerShell window. The -NoExit flag is to not close the window when complete. Just in case you want to review the results.
- -Command
– The -Command here is the commands we want to pass to the new PowerShell window that opens up. - $host.ui.RawUI.WindowTitle = “t1p1” – This command allows you to rename the title of the PowerShell window. This is to keep track which window it is. Here, the name scheme I’m using is tempdrive 1, plotter 1. Since I have two plotter drives.
- start-sleep 0 – This next command is critical. When running plots in parallel you need to space them out a bit so that all of them are not trying to write to the final directory at the same time. If using an external drive, this causes a major headache. The value here is in seconds. For example, if you want an hour between plotters, it would be 0 for the first plotter, 3600 for the second plotter, 7200 for the third, etc.
- .\chia.exe plots create -k 32 -b 3389 -u 128 -r 2 -t E:\temp -d D:\plot -n 1 – This is the Chia plotter command that was explained above. Update this to your settings.
- Read-Host -Prompt “press enter to exit” – This was a hold-me-over from a previous version of the script incase for some reason the “-NoExit flag didn’t work.
There you have it, this should provide you with enough information in order to create and tweak your own scripts in order to maximize your plotters on your machine without having to worry about Chia Client issues.
With the file saved, all you need to execute it is to right click the file and select “Run with PowerShell”.
Источник
Скрипт для быстрого плотинга и другие полезные скрипты для майнинга Чиа 1.0
Kralex
Местный
Yuri31
Местный
Валентин
Новичок
nemzy
Новичок
Новичок
nemzy
Новичок
Justimba
Новичок
sage: chia.exe plots create [OPTIONS]
Try ‘chia.exe plots create -h’ for help.
Error: Got unexpected extra argument (Plots\)
press enter to exit:
Justimba
Новичок
все разобрался кому будет полезным: t F:\Temp Plots\ ТУТ пробел был после Temp
Usage: chia.exe plots create [OPTIONS]
Options:
-k, —size INTEGER Plot size [default: 32]
—override-k Force size smaller than 32 [default: False]
-n, —num INTEGER Number of plots or challenges [default: 1]
-b, —buffer INTEGER Megabytes for sort/plot buffer [default:
3389]
-r, —num_threads INTEGER Number of threads to use [default: 2]
-u, —buckets INTEGER Number of buckets [default: 128]
-a, —alt_fingerprint INTEGER Enter the alternative fingerprint of the key
you want to use
-c, —pool_contract_address TEXT
Address of where the pool reward will be
sent to. Only used if alt_fingerprint and
pool public key are None
-f, —farmer_public_key TEXT Hex farmer public key
-p, —pool_public_key TEXT Hex public key of pool
-t, —tmp_dir PATH Temporary directory for plotting files
[default: .]
-2, —tmp2_dir PATH Second temporary directory for plotting
files
-d, —final_dir PATH Final directory for plots (relative or
absolute) [default: .]
-i, —plotid TEXT PlotID in hex for reproducing plots
(debugging only)
-m, —memo TEXT Memo in hex for reproducing plots (debugging
only)
-e, —nobitfield Disable bitfield
-x, —exclude_final_dir Skips adding [final dir] to harvester for
farming
-h, —help Show this message and exit.
press enter to exit:
Gerassimus
Новичок
я сделал себе таким образом:
1-ый батник запускает плоты подряд
2-ой батник запускает плоты после того, как пройдет 1800 с. Почему 1800? потому что время копирования готового плота с SSD на HDD у меня порядка 20 минут. От того, что задержки не будет, оба плота будут перемещаться на HDD дольше
3-ий ставишь 1800+1800=3600
и так далее
Потом выделяешь через шифт столько батников, сколько хочешь, чтобы плотилось параллельно, запускаешь и спишь спокойно
время задержки устанавливается в батнике заменой «start-sleep 0» на «start-sleep 1800»
Ты можешь ориентироваться только на это
Justimba
Новичок
Новичок
Источник