- Приватный ключ биткоина (private key) – что это такое, как выглядит, как получить и безопасно сохранить
- Как внешне выглядят публичный и приватный ключи кошелька биткоина
- Публичный адрес (ключ)
- Как создать приватные биткоин-ключи
- Как получить (экспортировать) приватный ключ биткоина
- Извлечение (экспорт) приватных ключей из криптокошельков
- Получение приватного ключа из онлайн-кошелька Blockchain
- Получение ключа в бумажного кошельке
- Что такое детерминированный кошелек (HD wallet), seed фраза
- Как безопасно хранить приватные ключи
- How to generate your very own Bitcoin private key
- Do I need to generate a private key?
- What exactly is a private key?
- Naive method
- Cryptographically strong RNG
- Specialized sites
- Bitaddress: the specifics
- Doing it yourself
- Initializing the pool
- Seeding with input
- Generating the private key
- In action
- Conclusion
Приватный ключ биткоина (private key) – что это такое, как выглядит, как получить и безопасно сохранить
Сегодня рассмотрим значение слов «приватный ключ биткоина» – для чего он нужен, как получить и как правильно хранить.
В то время как публичный ключ, или адрес, представляет собой средство идентификации кошелька, подобие логина, приватный ключ – строго конфиденциальная информация. Внешне выглядит как набор символов, введя которые, пользователь получает доступ к управлению счетом. Приватные (их еще называют частными или закрытыми) ключи хранятся в специальном файле, публичные –формируются криптографическим методом именно на основе приватных.
Как внешне выглядят публичный и приватный ключи кошелька биткоина
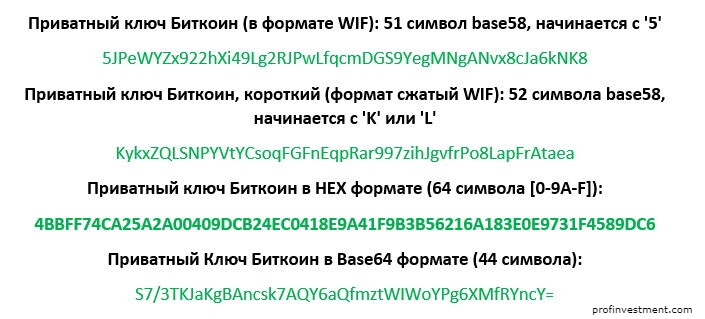
Приватный ключ биткоина кодируется в следующих форматах: Base64, MINI, Hex, WIF, сжатый WIF. Все они взаимосвязаны и преобразуются один в другой:
- Формат WIF (51 символ, «5» в начале): 5JPeWYZx922hXi49Lg2RJPwLfqcmDGS9YegMNgANvx8cJa6kNK8.
- Большинство криптовалютных кошельков, используют для хранения приватных ключей WIF-сжатый формат (52 символа, начинается с «L» или «K»): KykxZQLSNPYVtYCsoqFGFnEqpRar997zihJgvfrPo8LapFrAtaea.
- Формат Hex (64 символа): 4BBFF74CA25A2A00409DCB24EC0418E9A41F9B3B56216A183E0E9731F4589DC6.
- Формат Base64 (44 символа): S7/3TKJaKgBAncsk7AQY6aQfmztWIWoYPg6XMfRYncY=.
На картинке один приватный ключ биткоина в разных форматах:
Публичный адрес (ключ)
Внешний вид публичного биткоин-ключа в различных форматах:
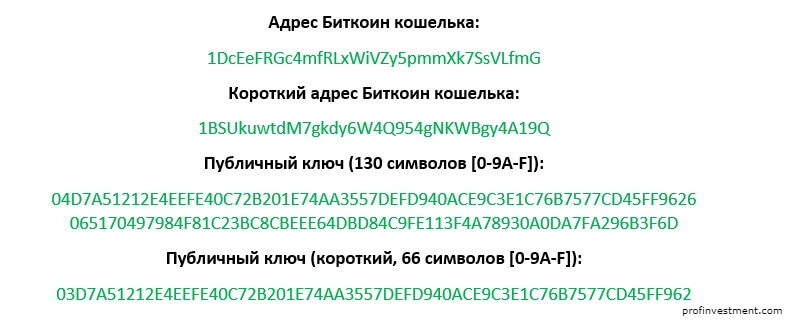
- Наиболее используемый в кошельках — короткий адрес. Он имеет вид 1BSUkuwtdM7gkdy6W4Q954gNKWBgy4A19Q и всегда начинается с единицы или тройки (segwit address).
Публичные ключи (public key) видны всем желающим и используются как адрес для отправки или получения биткоинов. В одном кошельке можно сгенерировать неограниченное количество публичных ключей. Каждому будет соответствовать свой приватный ключ.
Как создать приватные биткоин-ключи
При создании любого кошелька для биткоина создается приватный ключ. В зависимости от вида бумажников можно обладать контролем над ними или нет. Последний случай больше относится к онлайн-сервисам, на которых можно пройти простую регистрацию, получить адрес биткоина, но приватные ключи не доступны. Контроль над ними имеют владельцы данных онлайн-кошельков. Поэтому рекомендуем выбирать криптокошельки с возможностью выгрузки приватных ключей или сохранением seed.
- Локальные. Устанавливаются на десктопные или мобильные устройства. К ним относят Jaxx, Electrum, Coinomi, Exodus и другие. Делятся на «тонкие» и «толстые», в зависимости от способа обращения к блокчейн-сети.
- Онлайн-кошельки. Для их создания обычно нужно указать email и пароль. Такие сервисы могут предоставлять возможность просмотра приватных ключей или не иметь такой функции. Популярные сайты для хранения криптомонет: blockchain.com.
- Биржи криптовалют. После создания счета доступны кошельки для криптовалют, которые в листинге площадки. Приватные ключи не предоставляются. Можно вносить депозит на предоставленный адрес, торговать криптовалютой и совершать вывод. Популярные торговые платформы: LocalBitcoins (ЛокалБиткоинс), EXMO, Binance, Huobi, BitMEX и другие.
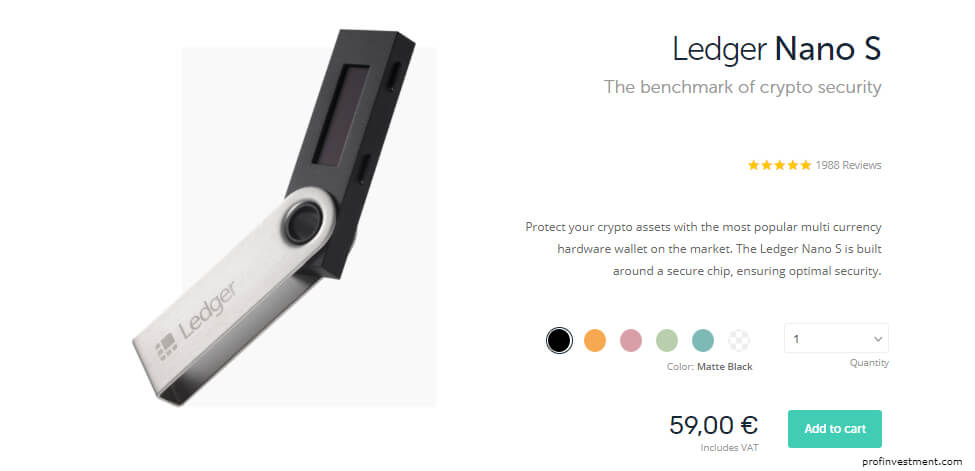
- Аппаратные кошельки. Наиболее безопасный вариант сохранить криптоактивы в безопасности. Владелец имеет полный контроль над всеми приватными ключами, а их кража невозможна. Выпускают аппаратные устройства Ledger, Trezor и другие.

- Бумажные. Это может быть просто записанный приватный ключ на бумаге или сервисы, которые его генерируют и предоставляют возможность распечатать и сохранить. Способ относится к «холодному» хранению криптовалют.
Как получить (экспортировать) приватный ключ биткоина
Бывают ситуации, когда необходимо получить свой приватный ключ из кошелька для тех или иных целей. Разберем, как это сделать.
Извлечение (экспорт) приватных ключей из криптокошельков
В качестве примера используется «тонкий» десктопный кошелек Exodus. В нем нужно произвести операцию экспорта приватного биткоин-ключа. Изначально она надежно скрыта, поскольку разработчики справедливо считают, что неопытному пользователю лучше не пытаться ее произвести. Неверные действия чреваты потерей средств из кошелька.
Инструкция по экспорту:
- Активировать «Developer Menu». В Windows и Linux это действие производится нажатием сочетания клавиш Ctrl+Shift+D.
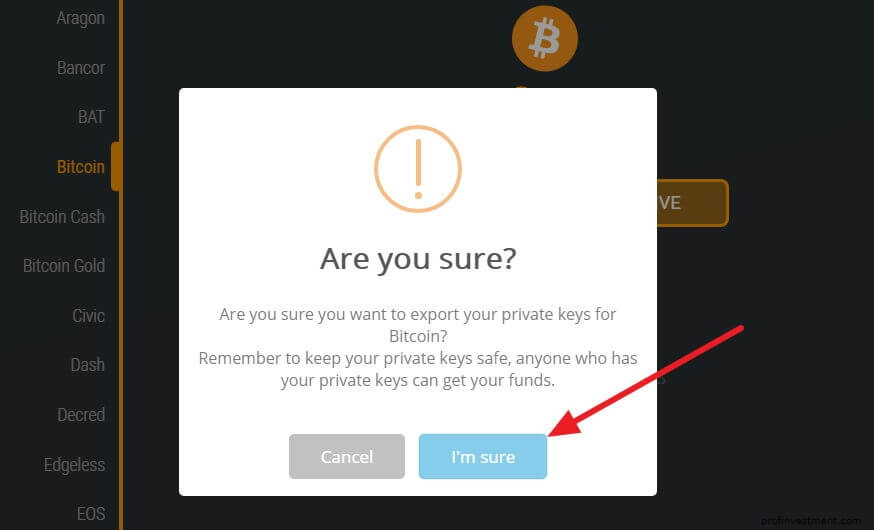
- Выбрать ту криптовалюту, частный ключ которой интересует в текущий момент. Перейти по пунктам: «Developer» – «Assets» – «Bitcoin» или иная выбранная валюта – «Export Private Keys».
- В появившемся окне подтвердить свое желание нажатием кнопки «I’m sure».
- На рабочем столе появится папка под названием «Exodus-export», внутри – файл формата CSV. Это файл скопировать в надежное место, папку сразу удалить.
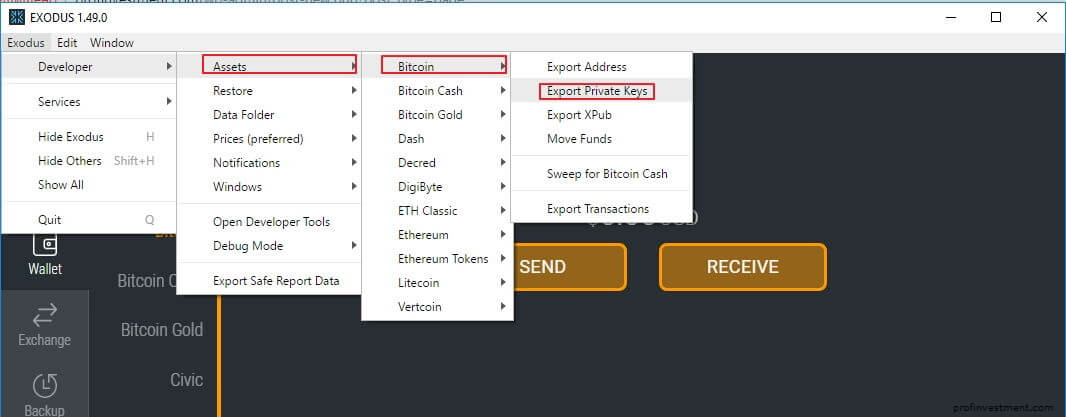
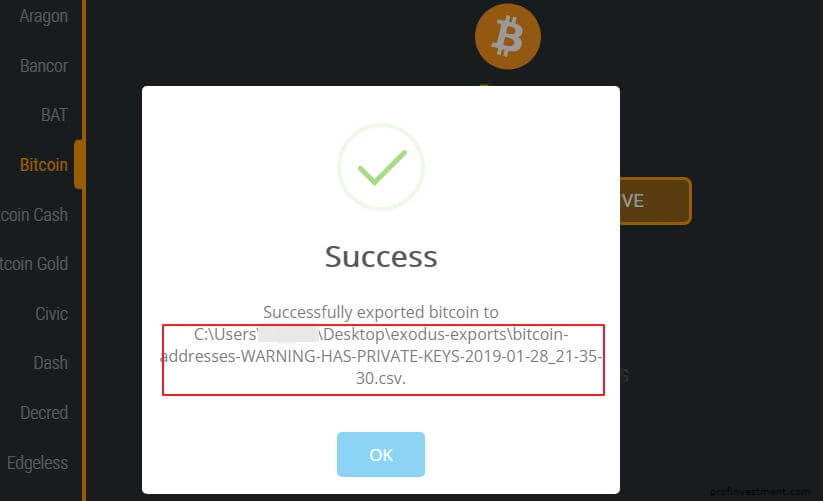
Открыть файл можно через текстовый редактор Libre Office, Wordpad, Exel, стандартный Блокнот и т. д. В графе «PRIVKEY» будет буквенно-цифровое сочетание – это и есть приватный (закрытый) ключ биткоина: 
Получение приватного ключа из онлайн-кошелька Blockchain
Рассмотрим, как получить приватный ключ в популярном онлайн-кошельке Блокчейн. В настройках функции экспорта ключей нет. Нужно воспользоваться seed-фразой, которая находится по адресу «Настройки» — «Безопасность» — «Фраза для восстановления кошелька». Скопировать все слова и перейти в генератор iancoleman.io . Указать количество слов (12) и вставить их в форму «BIP39 Mnemonic». 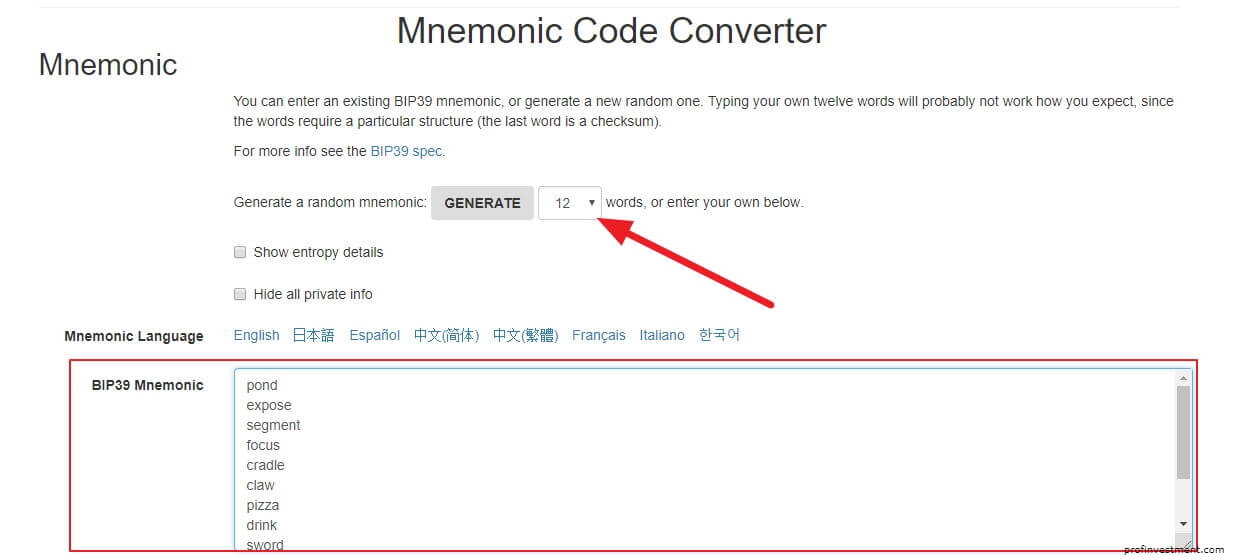
Опуститься вниз страницы в раздел «Derived Addresses». В нем будет адрес, публичный и приватный ключ. 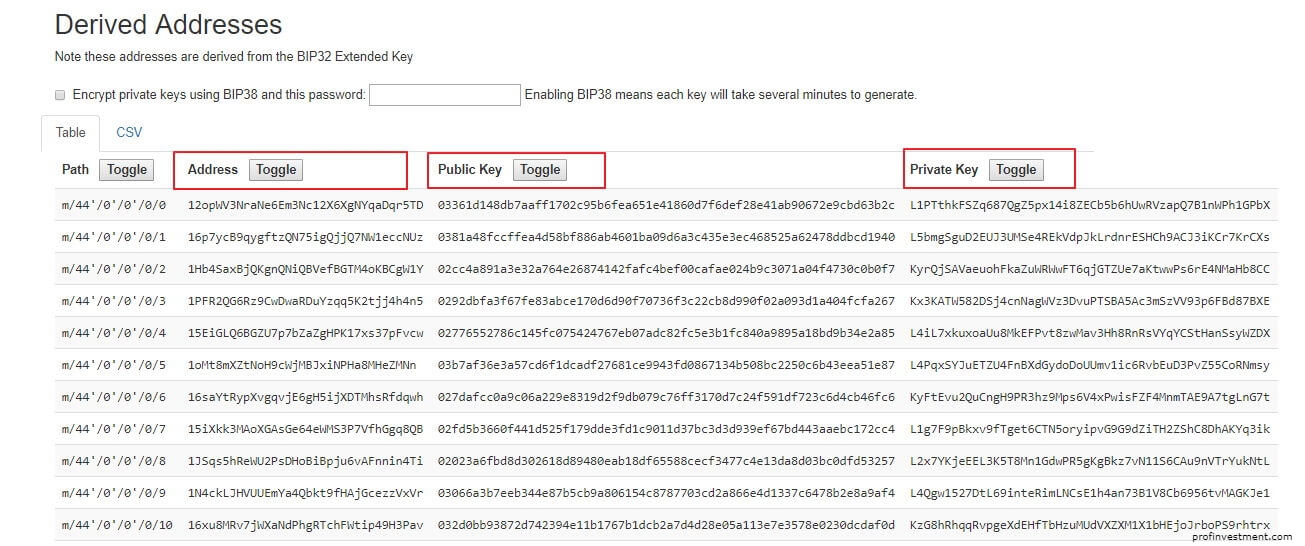
Получение ключа в бумажного кошельке
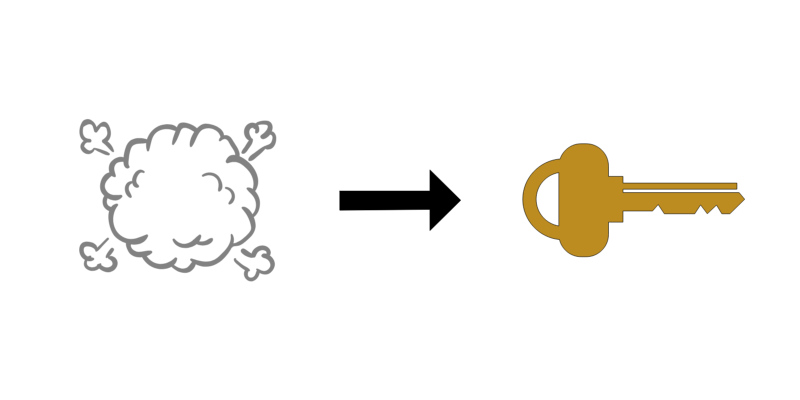
Бумажные кошельки генерируют приватные ключи локально с помощью выполнения скрипта в браузере.
После сбора случайной энтропии высветится сжатый адрес биткоина и приватный ключ в сжатом WIF-формате. Что с ними делать, понятно по картинке:
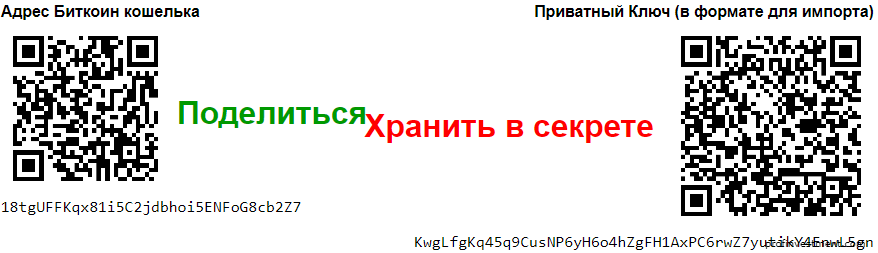
Сервис для создания бумажных кошельков: bitaddress.org.
Что такое детерминированный кошелек (HD wallet), seed фраза
В 2011 году для решения ряда проблем с анонимностью разработчики Bitcoin Core выпустили такую разработку, как HD Wallet. HD расшифровывается «hierarchical deterministic», то есть «иерархически детерминированный». Звучит непонятно, но по факту все не так сложно.
В контексте криптовалют словом «иерархия» обозначают связь между элементами. В данном случае появляется возможность использовать один адрес для выяснения второго, а также применять секретную seed-фразу для генерации сразу многих связанных между собой адресов.
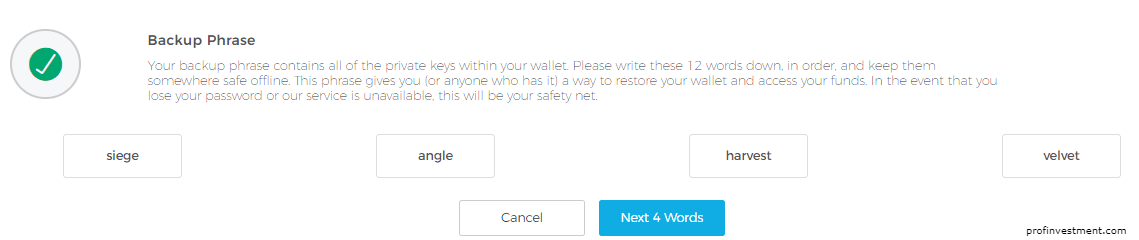
Пример seed (backup phase) в кошельке Blockchain (всего 12 слов):
 «Детерминированная» система – та, где недопустимы никакие случайности в процессе формирования будущих состояний. То есть конкретные вводные данные всегда будут выдавать конкретный результат.
Преимущества технологии HD wallet:
- Усиление анонимности. Владелец HD wallet обладает одной копией программного бумажника с одним тайным ключом (называемым также «семя» или «master key»). При объединении семени с хеш-функциями образуется бесконечное количество связанных между собой адресов. Связь невидима со стороны. Это адреса называют «дочерними».
- Легкость запоминания сид-фразы. Записать или выучить код из 12 слов намного легче, чем хранить приватные ключи для каждого отдельного адреса биткоина.
- Комфортное резервное копирование. Многие пользователи сталкиваются с проблемами резервного копирования мобильных кошельков на iOS или Android – возникает необходимость использовать один и тот же ключ, а это прямая угроза для безопасности. HD кошелек вообще не требует создания резервных копий, достаточно распечатать или сохранить в надежном месте сид-фразу.
Технология реализована в надстройке Armory для Bitcoin Core, кошельках Electrum, MultiBit HD, BitGo, CarbonWallet, The Hive, Mycelium Bitcoin Wallet, Green Address, Trezor и других.
Как безопасно хранить приватные ключи
Используя интернет-кошельки, следует понимать, что ключи хранятся на серверах компании-разработчика. Пользователь лично владеет private key лишь в случае использования десктопных, аппаратных или бумажных кошельков.
Варианты хранения кода:
- На бумаге.
- На флешке в виде скриншота или фотографии, pdf-файла.
- На жестком диске, в том числе съемном.
- На физической монете, металлической пластине (своеобразный аналог аппаратного «холодного» кошелька в форме криптовалютной монеты).
- В памяти.
Ни один из перечисленных способов не дает 100%-ную гарантию сохранности ключа, в каждом случае есть вероятность физического повреждения, взлома или кражи. Так что выбор каждый делает, исходя из своих соображений.
В Сети сейчас много злоумышленников, которые мечтают украсть приватный ключ биткоина. Они могут соблазнять бесплатными токенами, предлагать получить новые монеты, а взамен просят загрузить в сеть или созданную ими программу частный ключ. Делать этого ни в коем случае нельзя.
Источник
How to generate your very own Bitcoin private key
In cryptocurrencies, a private key allows a user to gain access to their wallet. The person who holds the private key fully controls the coins in that wallet. For this reason, you should keep it secret. And if you really want to generate the key yourself, it makes sense to generate it in a secure way.
Here, I will provide an introduction to private keys and show you how you can generate your own key using various cryptographic functions. I will provide a description of the algorithm and the code in Python.
Do I need to generate a private key?
Most of the time you don’t. For example, if you use a web wallet like Coinbase or Blockchain.info, they create and manage the private key for you. It’s the same for exchanges.
Mobile and desktop wallets usually also generate a private key for you, although they might have the option to create a wallet from your own private key.
So why generate it anyway? Here are the reasons that I have:
- You want to make sure that no one knows the key
- You just want to learn more about cryptography and random number generation (RNG)
What exactly is a private key?
Formally, a private key for Bitcoin (and many other cryptocurrencies) is a series of 32 bytes. Now, there are many ways to record these bytes. It can be a string of 256 ones and zeros (32 * 8 = 256) or 100 dice rolls. It can be a binary string, Base64 string, a WIF key, mnemonic phrase, or finally, a hex string. For our purposes, we will use a 64 character long hex string.
The same private key, written in different formats.
Why exactly 32 bytes? Great question! You see, to create a public key from a private one, Bitcoin uses the ECDSA, or Elliptic Curve Digital Signature Algorithm. More specifically, it uses one particular curve called secp256k1.
Now, this curve has an order of 256 bits, takes 256 bits as input, and outputs 256-bit integers. And 256 bits is exactly 32 bytes. So, to put it another way, we need 32 bytes of data to feed to this curve algorithm.
There is an additional requirement for the private key. Because we use ECDSA, the key should be positive and should be less than the order of the curve. The order of secp256k1 is FFFFFFFFFFFFFFFFFFFFFFFFFFFFFFFEBAAEDCE6AF48A03BBFD25E8CD0364141 , which is pretty big: almost any 32-byte number will be smaller than it.
Naive method
So, how do we generate a 32-byte integer? The first thing that comes to mind is to just use an RNG library in your language of choice. Python even provides a cute way of generating just enough bits:
Looks good, but actually, it’s not. You see, normal RNG libraries are not intended for cryptography, as they are not very secure. They generate numbers based on a seed, and by default, the seed is the current time. That way, if you know approximately when I generated the bits above, all you need to do is brute-force a few variants.
When you generate a private key, you want to be extremely secure. Remember, if anyone learns the private key, they can easily steal all the coins from the corresponding wallet, and you have no chance of ever getting them back.
So let’s try to do it more securely.
Cryptographically strong RNG
Along with a standard RNG method, programming languages usually provide a RNG specifically designed for cryptographic operations. This method is usually much more secure, because it draws entropy straight from the operating system. The result of such RNG is much harder to reproduce. You can’t do it by knowing the time of generation or having the seed, because there is no seed. Well, at least the user doesn’t enter a seed — rather, it’s created by the program.
In Python, cryptographically strong RNG is implemented in the secrets module. Let’s modify the code above to make the private key generation secure!
That is amazing. I bet you wouldn’t be able to reproduce this, even with access to my PC. But can we go deeper?
Specialized sites
There are sites that generate random numbers for you. We will consider just two here. One is random.org, a well-known general purpose random number generator. Another one is bitaddress.org, which is designed specifically for Bitcoin private key generation.
Can random.org help us generate a key? Definitely, as they have service for generating random bytes. But two problems arise here. Random.org claims to be a truly random generator, but can you trust it? Can you be sure that it is indeed random? Can you be sure that the owner doesn’t record all generation results, especially ones that look like private keys? The answer is up to you. Oh, and you can’t run it locally, which is an additional problem. This method is not 100% secure.
Now, bitaddress.org is a whole different story. It’s open source, so you can see what’s under its hood. It’s client-side, so you can download it and run it locally, even without an Internet connection.
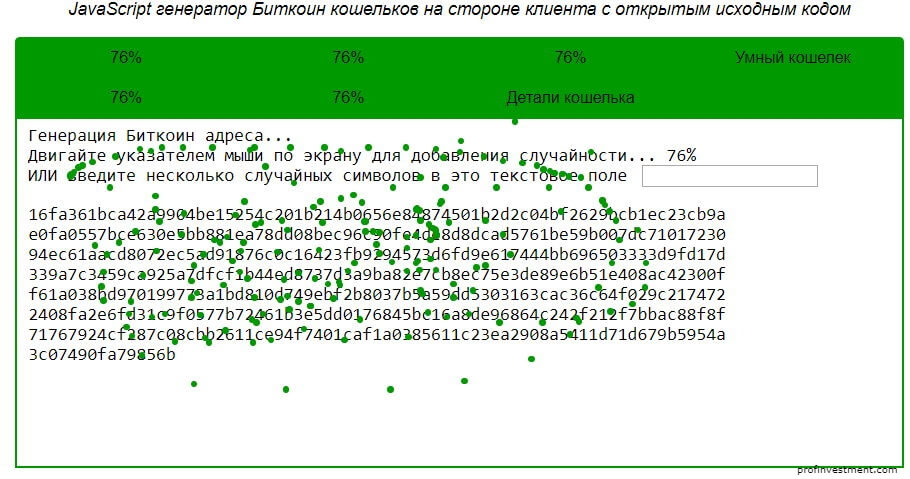
So how does it work? It uses you — yes, you — as a source of entropy. It asks you to move your mouse or press random keys. You do it long enough to make it infeasible to reproduce the results.
The process of generation an entropy by randomly moving the mouse. The large chunk of symbols shows the pool.
Are you interested to see how bitaddress.org works? For educational purposes, we will look at its code and try to reproduce it in Python.
Quick note: bitaddress.org gives you the private key in a compressed WIF format, which is close to the WIF format that we discussed before. For our purposes, we will make the algorithm return a hex string so that we can use it later for a public key generation.
Bitaddress: the specifics
Bitaddress creates the entropy in two forms: by mouse movement and by key pressure. We’ll talk about both, but we’ll focus on the key presses, as it’s hard to implement mouse tracking in the Python lib. We’ll expect the end user to type buttons until we have enough entropy, and then we’ll generate a key.
Bitaddress does three things. It initializes byte array, trying to get as much entropy as possible from your computer, it fills the array with the user input, and then it generates a private key.
Bitaddress uses the 256-byte array to store entropy. This array is rewritten in cycles, so when the array is filled for the first time, the pointer goes to zero, and the process of filling starts again.
The program initiates an array with 256 bytes from window.crypto. Then, it writes a timestamp to get an additional 4 bytes of entropy. Finally, it gets such data as the size of the screen, your time zone, information about browser plugins, your locale, and more. That gives it another 6 bytes.
After the initialization, the program continually waits for user input to rewrite initial bytes. When the user moves the cursor, the program writes the position of the cursor. When the user presses buttons, the program writes the char code of the button pressed.
Finally, bitaddress uses accumulated entropy to generate a private key. It needs to generate 32 bytes. For this task, bitaddress uses an RNG algorithm called ARC4. The program initializes ARC4 with the current time and collected entropy, then gets bytes one by one 32 times.
This is all an oversimplification of how the program works, but I hope that you get the idea. You can check out the algorithm in full detail on Github.
Doing it yourself
For our purposes, we’ll build a simpler version of bitaddress. First, we won’t collect data about the user’s machine and location. Second, we will input entropy only via text, as it’s quite challenging to continually receive mouse position with a Python script (check PyAutoGUI if you want to do that).
That brings us to the formal specification of our generator library. First, it will initialize a byte array with cryptographic RNG, then it will fill the timestamp, and finally it will fill the user-created string. After the seed pool is filled, the library will let the developer create a key. Actually, they will be able to create as many private keys as they want, all secured by the collected entropy.
Initializing the pool
Here we put some bytes from cryptographic RNG and a timestamp. __seed_int and __seed_byte are two helper methods that insert the entropy into our pool array. Notice that we use secrets .
Seeding with input
Here we first put a timestamp and then the input string, character by character.
Generating the private key
This part might look hard, but it’s actually very simple.
First, we need to generate 32-byte number using our pool. Unfortunately, we can’t just create our own random object and use it only for the key generation. Instead, there is a shared object that is used by any code that is running in one script.
What does that mean for us? It means that at each moment, anywhere in the code, one simple random.seed(0) can destroy all our collected entropy. We don’t want that. Thankfully, Python provides getstate and setstate methods. So, to save our entropy each time we generate a key, we remember the state we stopped at and set it next time we want to make a key.
Second, we just make sure that our key is in range (1, CURVE_ORDER ). This is a requirement for all ECDSA private keys. The CURVE_ORDER is the order of the secp256k1 curve, which is FFFFFFFFFFFFFFFFFFFFFFFFFFFFFFFEBAAEDCE6AF48A03BBFD25E8CD0364141 .
Finally, for convenience, we convert to hex, and strip the ‘0x’ part.
In action
Let’s try to use the library. Actually, it’s really simple: you can generate a private key in three lines of code!
You can see it yourself. The key is random and totally valid. Moreover, each time you run this code, you get different results.
Conclusion
As you can see, there are a lot of ways to generate private keys. They differ in simplicity and security.
Generating a private key is only a first step. The next step is extracting a public key and a wallet address that you can use to receive payments. The process of generating a wallet differs for Bitcoin and Ethereum, and I plan to write two more articles on that topic.
If you want to play with the code, I published it to this Github repository.
I am making a course on cryptocurrencies here on freeCodeCamp News. The first part is a detailed description of the blockchain.
I also post random thoughts about crypto on Twitter, so you might want to check it out.
Read more posts by this author.
If you read this far, tweet to the author to show them you care. Tweet a thanks
Learn to code for free. freeCodeCamp’s open source curriculum has helped more than 40,000 people get jobs as developers. Get started
freeCodeCamp is a donor-supported tax-exempt 501(c)(3) nonprofit organization (United States Federal Tax Identification Number: 82-0779546)
Our mission: to help people learn to code for free. We accomplish this by creating thousands of videos, articles, and interactive coding lessons — all freely available to the public. We also have thousands of freeCodeCamp study groups around the world.
Donations to freeCodeCamp go toward our education initiatives and help pay for servers, services, and staff.
Источник