- Bitcoin cli create wallet
- Команды консоли RPC кошелька Bitcoin core — списки вызовов API клиента Bitcoin-qt
- Графический интерфейс Bitcoin core и CLI / API
- Окно консоли Bitcoin core
- Команды консоли Bitcoin
- Список команд консоли Bitcoin Core
- Блокчейн
- Контроль
- Создание
- Майнинг
- Необработанные транзакции
- Утилиты
- Кошелек
Bitcoin cli create wallet
3.3: Setting Up Your Wallet
You’re now ready to start working with Bitcoin. To begin with, you’ll need to create an address for receiving funds.
Create an Address
The first thing you need to do is create an address for receiving payments. This is done with the bitcoin-cli getnewaddress command. Remember that if you want more information on this command, you should type bitcoin-cli help getnewaddress . Currently, there are three types of addresses: legacy and the two types of SegWit address, p2sh-segwit and bech32 . If you do not otherwise specify, you’ll get the default, which is currently bech32 .
However, for the next few sections we’re instead going to be using legacy addresses, both because bitcoin-cli had some teething problems with its early versions of SegWit addresses, and because other people might not be able to send to bech32 addresses. This is all unlikely to be a problem for you now, but for the moment we want to get your started with transaction examples that are (mostly) guaranteed to work.
You can require legacy address either with the second argument to getnewaddress or with the named addresstype argument.
Note that this address begins with an «m» (or sometimes an «n») to signify a testnet Legacy address. It would be a «2» for a P2SH address or a «tb1» for a Bech32 address.
🔗 TESTNET vs MAINNET: The equivalent mainnet address would start with a «1» (for Legacy), «3» (for P2SH), or «bc1» (for Bech320.
Take careful note of the address. You’ll need to give it to whomever will be sending you funds.
📖 What is a Bitcoin address? A Bitcoin address is literally where you receive money. It’s like an email address, but for funds. Technically, it’s a public key, though different address schemes adjust that in different ways. However unlike an email address, a Bitcoin address should be considered single use: use it to receive funds just once. When you want to receive funds from someone else or at some other time, generate a new address. This is suggested in large part to improve your privacy. The whole blockchain is immutable, which means that explorers can look at long chains of transactions over time, making it possible to statistically determine who you and your contacts are, no matter how careful you are. However, if you keep reusing the same address, then this becomes even easier.
📖 What is a Bitcoin wallet? By creating your first Bitcoin address, you’ve also begun to fill in your Bitcoin wallet. More precisely, you’ve begun to fill the wallet.dat file in your
/.bitcoin/testnet3 /wallets directory. The wallet.dat file contains data about preferences and transactions, but more importantly it contains all of the key pairs that you create: both the public key (which is the source of the address where you receive funds) and the private key (which is how you spend those funds). For the most part, you won’t have to worry about that private key: bitcoind will use it when it’s needed. However, this makes the wallet.dat file extremely important: if you lose it, you lose your private keys, and if you lose your private keys, you lose your funds!
With a single address in hand, you could jump straight to the next section and begin receiving funds. However, before we get there, we’re going to briefly discuss the other sorts of addresses that you’ll meet in the future and talk about a few other wallet commands that you might want to use in the future.
Knowing Your Bitcoin Addresses
There are three types of Bitcoin addresses that you can create with the getnewaddress RPC command. You’ll be using a legacy (P2PKH) address here, while you’ll move over to a SegWit (P2SH-SegWit) or Bech32 address in §4.6: Creating a Segwit Transaction.
As noted above, the foundation of a Bitcoin address is a public key: someone sends funds to your public key, and then you use your private key to redeem it. Easy? Except putting your public key out there isn’t entirely secure. At the moment, if someone has your public key, then they can’t retrieve your private key (and thus your funds); that’s the basis of cryptography, which uses a trap-door function to ensure that you can only go from private to public key, and not vice-versa. But the problem is that we don’t know what the future might bring. Except we do know that cryptography systems eventually get broken by the relentless advance of technology, so it’s better not to put raw public keys on the ‘net, to future-proof your transactions.
Classic Bitcoin transactions created P2PKH addresses that added an additional cryptographic step to protect public keys.
📖 What is a Legacy (P2PKH) address? This is a Legacy address of the sort used by the early Bitcoin network. We’ll be using it in examples for the next few sections. It’s called a Pay to PubKey Hash (or P2PKH) address because the address is a 160-bit hash of a public key. Using a hash of your public key as your address creates a two-step process where to spend funds you need to reveal both the private key and the public key, and it increases future security accordingly. This sort of address remains important for receiving funds from people with out-of-date wallet software.
As described more fully in §4.6: Creating a Segwit Transaction, the Block Size Wars of the late ’10s resulted in a new sort of address: SegWit. This is the preferred sort of address currently, and should be fully integrated into Bitcoin-Core at this point, but nonetheless we’re saving it for §4.6.
SegWit simply means «segregated witness» and it’s a way of separating the transaction signatures out from the rest of the transaction to reduce transaction size. Some SegWit addresses will sneak into some of our examples prior to §4.6 as change addresses, which you’ll see as addresses that begin with «tb». This is fine because the bitcoin-cli entirely supports their usage. But we won’t use them otherwise.
There are two addresses of this sort:
📖 What is a P2SH-SegWit (aka Nested SegWit) address? This is the first generation of SegWit. It wraps the SegWit address in a Script hash to ensure backward compatibility. The result creates transactions that are about 25%+ smaller (with corresponding reductions in transaction fees).
📖 What is a Bech32 (aka Native SegWit, aka P2WPKH) address? This is the second generation of SegWit. It’s fully described in BIP 173. It creates transactions that are even smaller but more notably also has some advantages in creating addresses that are less prone to human error and have some implicit error-correction beyond that. It is not backward compatible like P2SH-SegWit was, and so some people may not be able to send to it.
There are other sorts of Bitcoin addresses, such as P2PK (which paid to a bare public key, and is deprecated because of its future insecurity) and P2SH (which pays to a Script Hash, and which is used by the first-generation Nested SegWit addresses; we’ll meet it more fully in a few chapters).
Optional: Sign a Message
Sometimes you’ll need to prove that you control a Bitcoin address (or rather, that you control its private key). This is important because it lets people know that they’re sending funds to the right person. This can be done by creating a signature with the bitcoin-cli signmessage command, in the form bitcoin-cli signmessage [address] [message] . For example:
You’ll get the signature as a return.
📖 What is a signature? A digital signature is a combination of a message and a private key that can then be unlocked with a public key. Since there’s a one-to-one correspendence between the elements of a keypair, unlocking with a public key proves that the signer controlled the corresponding private key.
Another person can then use the bitcoin-cli verifymessage command to verify the signature. He inputs the address in question, the signature, and the message:
If they all match up, then the other person knows that he can safely transfer funds to the person who signed the message by sending to the address.
If some black hat was making up signatures, this would instead produce a negative result:
Optional: Dump Your Wallet
It might seem dangerous having all of your irreplaceable private keys in a single file. That’s what bitcoin-cli dumpwallet is for. It lets you make a copy of your wallet.dat:
The mywallet.txt file in your home directory will have a long list of private keys, addresses, and other information. Mind you, you’d never want to put this data out in a plain text file on a Bitcoin setup with real funds!
You can then recover it with bitcoin-cli importwallet .
But note this requires an unpruned node!
Optional: View Your Private Keys
Sometimes, you might want to actually look at the private keys associated with your Bitcoin addresses. Perhaps you want to be able to sign a message or spend bitcoins from a different machine. Perhaps you just want to back up certain important private keys. You can also do this with your dump file, since it’s human readable.
More likely, you just want to look at the private key associated with a specific address. This can be done with the bitcoin-cli dumpprivkey command.
You can then save that key somewhere safe, preferably somewhere not connected to the internet.
You can also import any private key, from a wallet dump or an individual key dump, as follows:
Again, expect this to require an unpruned node. Expect this to take a while, as bitcoind needs to reread all past transactions, to see if there are any new ones that it should pay attention to.
ℹ️ NOTE: Many modern wallets prefer mnemonic codes to generate the seeds necessary to create the private keys. This methodology is not used bitcoin-cli , so you won’t be able to generate handy word lists to remember your private keys.
You’ve been typing that Bitcoin address you generated a lot, while you were signing messages and now dumping keys. If you think it’s a pain, we agree. It’s also prone to errors, a topic that we’ll address in the very next section.
Summary: Setting Up Your Wallet
You need to create an address to receive funds. Your address is stored in a wallet, which you can back up. You can also do lots more with an address, like dumping its private key or using it to sign messages. But really, creating that address is all you need to do in order to receive Bitcoin funds.
Step back from «Understanding Your Bitcoin Setup» with Interlude: Using Command-Line Variables.
Источник
Команды консоли RPC кошелька Bitcoin core — списки вызовов API клиента Bitcoin-qt
В этой статье мы расскажем про некоторые основные команды, которые вы можете использовать для взаимодействия с консолью RPC Bitcoin core.
Клиент QT Bitcoin core — это оригинальный Биткойн-кошелек. Он имеет функции, которых нет у большинства других Биткойн-кошельков. Bitcoin core обеспечивает высокий уровень конфиденциальности, безопасности и стабильности.
Кошелек доступен для следующих операционных систем: Windows, Mac и Linux. Если на вашем компьютере еще не установлен Bitcoin core, вы можете скачать его отсюда.
Перед загрузкой и установкой обязательно проверьте пропускную способность и место на жестком диске (SSD).
Core Walle должен полностью подтверждать транзакции и блоки – поэтому он выкачивает весь блокчейн криптовалюты Bitcoin.
На момент написания этой статьи минимальные требования к месту на диске для работы Bitcoin core составляют более 350 ГБ. Он обрабатывает огромные объемы данных, поэтому убедитесь, что у вас хорошее подключение к Интернету.
Графический интерфейс Bitcoin core и CLI / API
После загрузки и установки кошелька дождитесь его полной синхронизации. Если у вас возникли проблемы с синхронизацией кошелька, ознакомьтесь с этим руководством:
После полной синхронизации ваш кошелек готов к использованию, и вы можете начать взаимодействие с ним.
Программное обеспечение Core wallet имеет как графический интерфейс (GUI), так и консольный интерфейс (CLI).
Графический интерфейс удобен для новичков. Можно легко и быстро просматривать текущий баланс, последние транзакции, отправлять и получать монеты BTC, настраивать комиссии, есть контроль монет и некоторые другие основные функции.
Но чтобы использовать программное обеспечение в полной мере и иметь полный контроль над своими Биткоинами, вам нужно научиться использовать окно консоли.
Далее мы покажем вам, как использовать окно консоли отладки в кошельке Bitcoin-qt.
Но, прежде чем вы перейдете к этому руководству и перед тем, как начнете вводить какие-либо команды в окне консоли, мы надеемся, что ваш кошелек зашифрован и у вас есть резервная копия.
Окно консоли Bitcoin core
В более старой версии кошелька Bitcoin вы должны увидеть окно отладки в разделе «Help> Debug window», где вы можете начать вводить команды bitcoin-cli.

В последней версии выберете выпадающее меню «window» и откройте «console».
Вы должны увидеть следующее предупреждение.
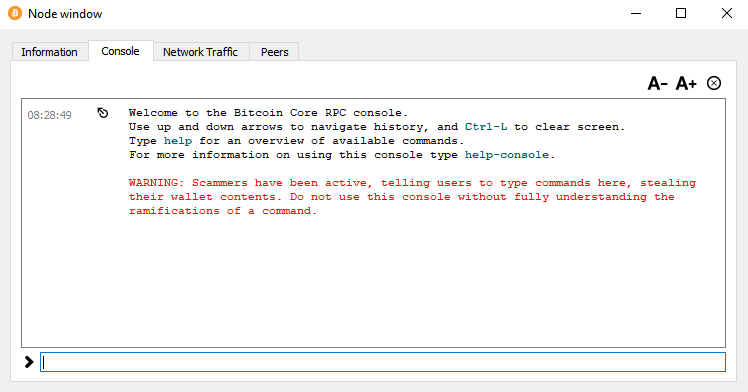
«Welcome to the Bitcoin Core RPC console.
Use up and down arrows to navigate history, and Ctrl-L to clear screen. Type help for an overview of available commands. For more information on using this console type help-console.»
«WARNING: Scammers have been active, telling users to type commands here, stealing their wallet contents. Do not use this console without fully understanding the ramifications of a command.»
Добро пожаловать в консоль Bitcoin Core RPC.
Используйте стрелки вверх и вниз для навигации по истории и Ctrl-L для очистки экрана. Введите help для обзора доступных команд. Для получения дополнительной информации об использовании этой консоли введите help-console.
ВНИМАНИЕ: существуют мошенники, которые просят пользователей вводить команды, которые крадут содержимое кошельков. Не используйте эту консоль, не понимая полностью смысл команды.
Как следует из предупреждения, не вводите команды, с которыми вы не знакомы, и не передавайте никому информацию, которая в вашем окне консоли, особенно ту, которая включает кодовую фразу кошелька и приватные ключи.
Команды консоли Bitcoin
Окно консоли Bitcoin RPC принимает множество команд. Введите «help». Вы увидите список команд, которые в настоящее время работают в консоли. Ниже мы перечислим все доступные команды.

Мы не будем вдаваться в подробности, чтобы познакомить вас с окном консоли, мы покажем несколько основных команд.
Отображает текущий блок
Отображает общий доступный баланс вашего кошелька
Отображает количество активных подключений к сети Биткойн.
Отображает объект, содержащий информацию о вашем кошельке
<
«walletname»: «»,
«walletversion»: xxxxxxx,
«balance»: 0.00000000,
«unconfirmed_balance»: 0.00000000,
«immature_balance»: 0.00000000,
«txcount»: 0,
«keypoololdest»: xxxxxxxxxx,
«keypoolsize»: xxxx,
«hdseedid»: «xxxxxxxxxxxxxxxxxxxxxxxxxx»,
«keypoolsize_hd_internal»: xxxx,
«unlocked_until»: x,
«paytxfee»: 0.00000000,
«private_keys_enabled»: true,
«avoid_reuse»: false,
«scanning»: false
>
Отображает информацию о текущем блокчейне Биткойна. Вы можете использовать эту команду для определения размера блокчейна, сложности и т. д.
<
«chain»: «main»,
«blocks»: 653527,
«headers»: 653587,
«bestblockhash»: «0000000000000000000313ef2b2930ecbc3fe05de391bc439xxxxxxxxxxxxxx»,
«difficulty»: 19996789994446.11,
«mediantime»: yyyyyyyyyyyy,
«verificationprogress»: 0.4544565953577,
«initialblockdownload»: false,
«chainwork»: «0000000000000000000000000000000000000000454dff6n25j34597dfvjkn45»,
«size_on_disk»: 656738766,
«pruned»: true,
«pruneheight»: 653202,
«automatic_pruning»: true,
«prune_target_size»: 576716800,
«softforks»: <
«bip34»: <
«type»: «buried»,
«active»: true,
«height»: 227931
>,
«bip66»: <
«type»: «buried»,
«active»: true,
«height»: 363725
>,
«bip65»: <
«type»: «buried»,
«active»: true,
«height»: 388381
>,
«csv»: <
«type»: «buried»,
«active»: true,
«height»: 419328
>,
Вы также можете использовать команду
Чтобы получить более точную информацию о количестве блоков, текущей сложности сети и найти количество транзакций в пуле транзакций (mempool).
<
«blocks»: 653597,
«difficulty»: 19994576894446.11,
«networkhashps»: 1.24389066767887e+020,
«pooledtx»: 1637,
«chain»: «main»,
«warnings»: «»
>
Есть много информации, которую вы можете получить из окна консоли Bitcoin core, используя команды, перечисленные ниже.
Вам не обязательно знать все эти команды. Однако, если вы разработчик и хотите разрабатывать приложения Биткойн, такие как block explorer или пулы для майнинга, понимание этих команд имеет важное значение.
Консоль RPC — отличный способ узнать о блокчейне Биткойн, сети, транзакциях и информации о майнинге.
Список команд консоли Bitcoin Core
Ниже мы пречислим все команды, которые нужны для различных решений: Блокчейн, Контроль, Создание (кошелька), Майнинг, Сеть (информация), Необработанные транзакции, Утилита, Кошелек, Zmq.
Блокчейн
Ниже перечислены все команды для блокчейн проверок
Контроль
Создание
Команды создания кошелька и другие функции
generatetoaddress nblocks «address» ( maxtries )
generatetodescriptor num_blocks «descriptor» ( maxtries )
Майнинг
Команды для майнинга
addnode «node» «command»
clearbanned
disconnectnode ( «address» nodeid )
getaddednodeinfo ( «node» )
getconnectioncount
getnettotals
getnetworkinfo
getnodeaddresses ( count )
getpeerinfo
listbanned
ping
setban «subnet» «command» ( bantime absolute )
setnetworkactive state
Необработанные транзакции
analyzepsbt «psbt»
combinepsbt [«psbt». ]
combinerawtransaction [«hexstring». ]
converttopsbt «hexstring» ( permitsigdata iswitness )
createpsbt [<"txid":"hex","vout":n,"sequence":n>. ] [<"address":amount>,<"data":"hex">. ] ( locktime replaceable )
createrawtransaction [<"txid":"hex","vout":n,"sequence":n>. ] [<"address":amount>,<"data":"hex">. ] ( locktime replaceable )
decodepsbt «psbt»
decoderawtransaction «hexstring» ( iswitness )
decodescript «hexstring»
finalizepsbt «psbt» ( extract )
fundrawtransaction «hexstring» ( options iswitness )
getrawtransaction «txid» ( verbose «blockhash» )
joinpsbts [«psbt». ]
sendrawtransaction «hexstring» ( maxfeerate )
signrawtransactionwithkey «hexstring» [«privatekey». ] ( [<"txid":"hex","vout":n,"scriptPubKey":"hex","redeemScript":"hex","witnessScript":"hex","amount":amount>. ] «sighashtype» )
testmempoolaccept [«rawtx». ] ( maxfeerate )
utxoupdatepsbt «psbt» ( [«»,<"desc":"str","range":n or [n,n]>. ] )
Утилиты
createmultisig nrequired [«key». ] ( «address_type» )
deriveaddresses «descriptor» ( range )
estimatesmartfee conf_target ( «estimate_mode» )
getdescriptorinfo «descriptor»
signmessagewithprivkey «privkey» «message»
validateaddress «address»
verifymessage «address» «signature» «message»
Кошелек
abandontransaction «txid»
abortrescan
addmultisigaddress nrequired [«key». ] ( «label» «address_type» )
backupwallet «destination»
bumpfee «txid» ( options )
createwallet «wallet_name» ( disable_private_keys blank «passphrase» avoid_reuse )
dumpprivkey «address»
dumpwallet «filename»
encryptwallet «passphrase»
getaddressesbylabel «label»
getaddressinfo «address»
getbalance ( «dummy» minconf include_watchonly avoid_reuse )
getbalances
getnewaddress ( «label» «address_type» )
getrawchangeaddress ( «address_type» )
getreceivedbyaddress «address» ( minconf )
getreceivedbylabel «label» ( minconf )
gettransaction «txid» ( include_watchonly verbose )
getunconfirmedbalance
getwalletinfo
importaddress «address» ( «label» rescan p2sh )
importmulti «requests» ( «options» )
importprivkey «privkey» ( «label» rescan )
importprunedfunds «rawtransaction» «txoutproof»
importpubkey «pubkey» ( «label» rescan )
importwallet «filename»
keypoolrefill ( newsize )
listaddressgroupings
listlabels ( «purpose» )
listlockunspent
listreceivedbyaddress ( minconf include_empty include_watchonly «address_filter» )
listreceivedbylabel ( minconf include_empty include_watchonly )
listsinceblock ( «blockhash» target_confirmations include_watchonly include_removed )
listtransactions ( «label» count skip include_watchonly )
listunspent ( minconf maxconf [«address». ] include_unsafe query_options )
listwalletdir
listwallets
loadwallet «filename»
lockunspent unlock ( [<"txid":"hex","vout":n>. ] )
removeprunedfunds «txid»
rescanblockchain ( start_height stop_height )
sendmany «» <"address":amount>( minconf «comment» [«address». ] replaceable conf_target «estimate_mode» )
sendtoaddress «address» amount ( «comment» «comment_to» subtractfeefromamount replaceable conf_target «estimate_mode» avoid_reuse )
sethdseed ( newkeypool «seed» )
setlabel «address» «label»
settxfee amount
setwalletflag «flag» ( value )
signmessage «address» «message»
signrawtransactionwithwallet «hexstring» ( [<"txid":"hex","vout":n,"scriptPubKey":"hex","redeemScript":"hex","witnessScript":"hex","amount":amount>. ] «sighashtype» )
unloadwallet ( «wallet_name» )
walletcreatefundedpsbt [<"txid":"hex","vout":n,"sequence":n>. ] [<"address":amount>,<"data":"hex">. ] ( locktime options bip32derivs )
walletlock
walletpassphrase «passphrase» timeout
walletpassphrasechange «oldpassphrase» «newpassphrase»
walletprocesspsbt «psbt» ( sign «sighashtype» bip32derivs )
Источник