- Настройка работы Bitcoin через TOR
- Bitcoin and tor browser
- Настройка работы Bitcoin через TOR
- Tor installation & use
- Bitcoin Core
- bitcoind
- Hidden services
- Pooled Mining
- Linux / BSD
- Windows / OS X
- Register your nick with freenode nickserv
- Add SASL support to your mIRC installation
- setup mIRC to use Tor
- How Tor works
- Exchange Restrictions
Настройка работы Bitcoin через TOR


TOR (сокр. от англ. The Onion Router) — свободное программное обеспечение для реализации второго поколения так называемой «луковой маршрутизации». Это система, позволяющая устанавливать анонимное сетевое соединение, защищённое от прослушивания. Рассматривается как анонимная сеть, предоставляющая передачу данных в зашифрованном виде. Написана программа преимущественно на языке программирования Си и на конец 2010 года имеет более 100 000 строк программного кода.
С помощью TOR пользователи могут сохранять анонимность при посещении веб-сайтов, публикации материалов, отправке сообщений и при работе с другими приложениями, использующими протокол TCP. Безопасность трафика обеспечивается за счёт использования распределённой сети серверов (нод — «узлов»), называемых «многослойными маршрутизаторами» (onionrouters). Технология TOR также обеспечивает защиту от механизмов анализа трафика, которые ставят под угрозу не только анонимность пользователя, но также конфиденциальность бизнес-данных, деловых контактов и др. TOR оперирует сетевыми уровнями onion-маршрутизаторов, позволяя обеспечивать анонимные исходящие соединения и анонимные скрытые службы.
Для начала устанавливаем TOR клиент. Скачать его можно с официального сайта:
https://www.torproject.org/
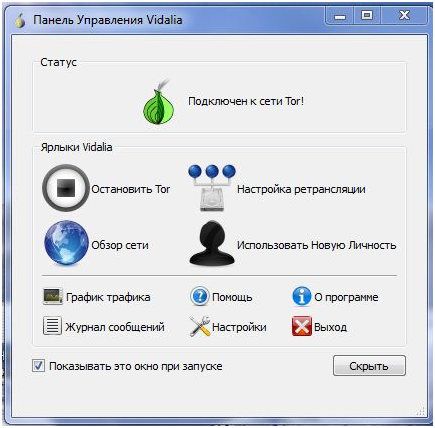
TOR не требует установки на компьютер, а запускается «из коробки». После того, как TOR будет загружен, распаковываем его в любую папку и запускаем:

Все, TOR запущен, теперь открываем наш биткоин кошелек, а далее:
Настройки -> Опции -> Сеть
Ставим галочку напротив «Подключаться через SOCKS4 прокси»
Указываем следующие параметры:
IP Прокси: 127.0.0.1
Порт: 9150 (стандартный порт TOR)
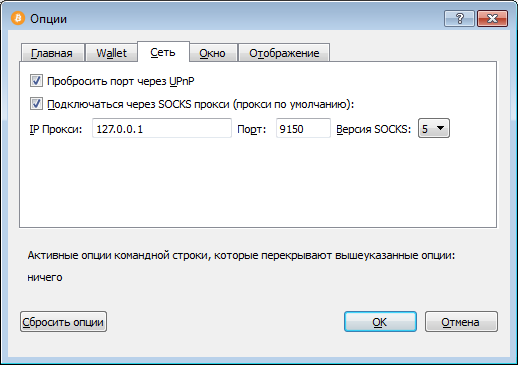
Все, ваш bitcoin кошелек работает через анонимную сеть TOR.
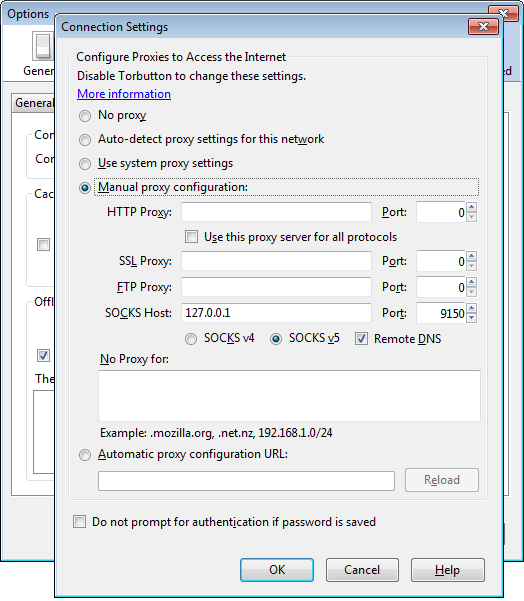
Если вдруг эти настройки не помогли, то можно посмотреть актуальные настройки в Tor Browser. Для этого в окне браузе жмем Alt, в строке меню выбираем Tools, в выпадающем списке Options. В открывшемся окне в разделе Adwanced выбираем вкладку Network и нажимаем кнопку Settings. В открывшейся вкладке будут отображены параметры, которые нужны для подключения к сети TOR.
Теперь разберемся, как настроить связку TOR + bitcoind на Linux, для примера на Debian. Уже предполагается, что bitcoind настроен и работает на системе.
Устанавливаем TOR под Linux:
После установки, проверяем, запустился ли демон:
Как мы видим, TOR успешно стартанул и висит на адресе 127.0.0.1, слушая порт 9050 Дальше необходимо прописать настройки прокси сервера для bitcoind. Для этого открываем файл /home/user/.bitcoin/bitcoin.conf и дописываем в конец следующую строчку:
Также можно запустить bitcoind без внесения изменений в основной конфигурационный файл, просто добавив строчку -proxy=127.0.0.1:9150
Дальше перезапускаем bitcoin и наслаждаемся анонимной работой системы.
Источник
Bitcoin and tor browser
TOR SUPPORT IN BITCOIN
It is possible to run Bitcoin Core as a Tor onion service, and connect to such services.
The following directions assume you have a Tor proxy running on port 9050. Many distributions default to having a SOCKS proxy listening on port 9050, but others may not. In particular, the Tor Browser Bundle defaults to listening on port 9150. See Tor Project FAQ:TBBSocksPort for how to properly configure Tor.
How to see information about your Tor configuration via Bitcoin Core
There are several ways to see your local onion address in Bitcoin Core:
- in the debug log (grep for «tor:» or «AddLocal»)
- in the output of RPC getnetworkinfo in the «localaddresses» section
- in the output of the CLI -netinfo peer connections dashboard
You may set the -debug=tor config logging option to have additional information in the debug log about your Tor configuration.
CLI -addrinfo returns the number of addresses known to your node per network type, including Tor v2 and v3. This is useful to see how many onion addresses are known to your node for -onlynet=onion and how many Tor v3 addresses it knows when upgrading to current and future Tor releases that support Tor v3 only.
1. Run Bitcoin Core behind a Tor proxy
The first step is running Bitcoin Core behind a Tor proxy. This will already anonymize all outgoing connections, but more is possible.
In a typical situation, this suffices to run behind a Tor proxy:
2. Automatically create a Bitcoin Core onion service
Bitcoin Core makes use of Tor’s control socket API to create and destroy ephemeral onion services programmatically. This means that if Tor is running and proper authentication has been configured, Bitcoin Core automatically creates an onion service to listen on. The goal is to increase the number of available onion nodes.
This feature is enabled by default if Bitcoin Core is listening ( -listen ) and it requires a Tor connection to work. It can be explicitly disabled with -listenonion=0 . If it is not disabled, it can be configured using the -torcontrol and -torpassword settings.
To see verbose Tor information in the bitcoind debug log, pass -debug=tor .
You may need to set up the Tor Control Port. On Linux distributions there may be some or all of the following settings in /etc/tor/torrc , generally commented out by default (if not, add them):
Add or uncomment those, save, and restart Tor (usually systemctl restart tor or sudo systemctl restart tor on most systemd-based systems, including recent Debian and Ubuntu, or just restart the computer).
On some systems (such as Arch Linux), you may also need to add the following line:
Connecting to Tor’s control socket API requires one of two authentication methods to be configured: cookie authentication or bitcoind’s -torpassword configuration option.
For cookie authentication, the user running bitcoind must have read access to the CookieAuthFile specified in the Tor configuration. In some cases this is preconfigured and the creation of an onion service is automatic. Don’t forget to use the -debug=tor bitcoind configuration option to enable Tor debug logging.
If a permissions problem is seen in the debug log, e.g. tor: Authentication cookie /run/tor/control.authcookie could not be opened (check permissions) , it can be resolved by adding both the user running Tor and the user running bitcoind to the same Tor group and setting permissions appropriately.
On Debian-derived systems, the Tor group will likely be debian-tor and one way to verify could be to list the groups and grep for a «tor» group name:
You can also check the group of the cookie file. On most Linux systems, the Tor auth cookie will usually be /run/tor/control.authcookie :
Once you have determined the $
Then restart the computer (or log out) and log in as the $
For the -torpassword=password option, the password is the clear text form that was used when generating the hashed password for the HashedControlPassword option in the Tor configuration file.
The hashed password can be obtained with the command tor —hash-password password (refer to the Tor Dev Manual for more details).
3. Manually create a Bitcoin Core onion service
You can also manually configure your node to be reachable from the Tor network. Add these lines to your /etc/tor/torrc (or equivalent config file):
The directory can be different of course, but virtual port numbers should be equal to your bitcoind’s P2P listen port (8333 by default), and target addresses and ports should be equal to binding address and port for inbound Tor connections (127.0.0.1:8334 by default).
In a typical situation, where you’re only reachable via Tor, this should suffice:
(obviously, replace the .onion address with your own). It should be noted that you still listen on all devices and another node could establish a clearnet connection, when knowing your address. To mitigate this, additionally bind the address of your Tor proxy:
If you don’t care too much about hiding your node, and want to be reachable on IPv4 as well, use discover instead:
and open port 8333 on your firewall (or use port mapping, i.e., -upnp or -natpmp ).
If you only want to use Tor to reach .onion addresses, but not use it as a proxy for normal IPv4/IPv6 communication, use:
Источник
Настройка работы Bitcoin через TOR
Настройка работы Bitcoin через TOR

TOR (сокр. от англ. The Onion Router) — свободное программное обеспечение для реализации второго поколения так называемой «луковой маршрутизации». Это система, позволяющая устанавливать анонимное сетевое соединение, защищённое от прослушивания. Рассматривается как анонимная сеть, предоставляющая передачу данных в зашифрованном виде. Написана программа преимущественно на языке программирования Си и на конец 2010 года имеет более 100 000 строк программного кода.
С помощью TOR пользователи могут сохранять анонимность при посещении веб-сайтов, публикации материалов, отправке сообщений и при работе с другими приложениями, использующими протокол TCP. Безопасность трафика обеспечивается за счёт использования распределённой сети серверов (нод — «узлов»), называемых «многослойными маршрутизаторами» (onionrouters). Технология TOR также обеспечивает защиту от механизмов анализа трафика, которые ставят под угрозу не только анонимность пользователя, но также конфиденциальность бизнес-данных, деловых контактов и др. TOR оперирует сетевыми уровнями onion-маршрутизаторов, позволяя обеспечивать анонимные исходящие соединения и анонимные скрытые службы.
Для начала устанавливаем TOR клиент. Скачать его можно с официального сайта:
https://www.torproject.org/
TOR не требует установки на компьютер, а запускается «из коробки». После того, как TOR будет загружен, распаковываем его в любую папку и запускаем:
Все, TOR запущен, теперь открываем наш биткоин кошелек, а далее:
Настройки -> Опции -> Сеть
Ставим галочку напротив «Подключаться через SOCKS4 прокси»
Указываем следующие параметры:
IP Прокси: 127.0.0.1
Порт: 9150 (стандартный порт TOR)

Все, ваш bitcoin кошелек работает через анонимную сеть TOR.
Если вдруг эти настройки не помогли, то можно посмотреть актуальные настройки в Tor Browser. Для этого в окне браузе жмем Alt, в строке меню выбираем Tools, в выпадающем списке Options. В открывшемся окне в разделе Adwanced выбираем вкладку Network и нажимаем кнопку Settings. В открывшейся вкладке будут отображены параметры, которые нужны для подключения к сети TOR.
Источник
Tor installation & use
todo explain: onion routing (how tor network helps to anonymize), encryption used, exit nodes, routers
Please follow the instructions provided with installation files and read the list of warnings. Tor doesn’t magically anonymize all your traffic just because you install it.
Down the page you can find examples how to configure applications to use Tor to anonymize the origin of your traffic.
This is a detailed installation guide for Windows. Before you setup Bitcoin or mIRC to use Tor, please install Tor and start in. 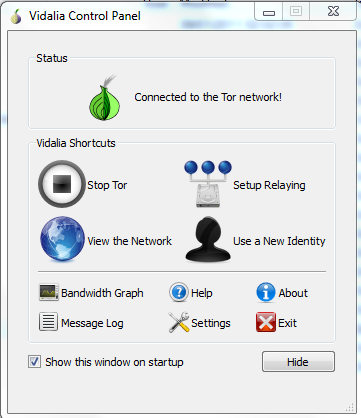 On the taskbar of your compute you’ll see a small green onion when Tor is running.
Bitcoin Core
Once you have your Tor client up & running, you can configure your Bitcoin client to use it.
Select in menu Settings -> Options 
Check «Connect through socks 4 proxy» with the address 127.0.0.1 and port 9050 (the Tor default port number) 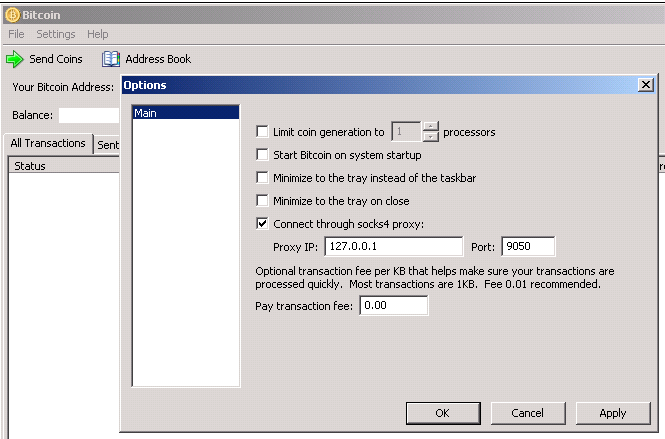
Configuring an application to use Tor is also called to torify it. (needs a brief howto here)
the note about bitcoin-otc promote on a more appropriate place in this page? reference to trading and IRC Conducting business using bitcoin-otc can be done more anonymously when directly connected to a Freenode IRC hidden service.
bitcoind
Run bitcoind with -proxy=127.0.0.1:9050 (or whatever your SocksPort is).
bitcoind will detect that you are using a proxy on 9050 and will force the «nolisten» flag. If you are not running tor on 9050, you need to set «nolisten» manually otherwise you will listen on your public IP and possibly reveal that you are running a node.
Hidden services
Hidden services run within the Tor network and can be connected to using the -connect= parameter to bitcoind so long as bitcoin is configured to use a Tor proxy. Bitcoin users do not need to use hidden services, since Tor can be used to increase anonymity of normal internet traffic, including bitcoin connections, but there are some technical reasons why hidden services may be beneficial; for more information see the Tor project’s documentation.
Services are listed at Fallback_Nodes#Tor_network along with instructions for using them.
Pooled Mining
Some mining pools are available as a hidden service on the tor network. Any pool can be reached over tor. The general methodology here is to tell your mining client to use your local Tor proxy. This is client specific but there are some helpful hints.
Linux / BSD
Any client can have its traffic routed via Tor by using the torify command and invoking the miner with that. Another method is to set the http_proxy environment variable as some miners use libraries which support that.
Windows / OS X
It is possible to set the http_proxy environment variable as some miners use libraries which support that.
mIRC is a popular IRC client. This is a guide how to connect to Freenode IRC using Tor + SASL + mIRC.
Register your nick with freenode nickserv
Freenode only allows SASL authenticated users to connect to the onion IRC server. SASL authentication works only with a registered nickname.
Connect to Freenode IRC without using tor & execute
/msg nickserv register
You will see something like this
-NickServ- An email containing nickname activation instructions has been sent to
-NickServ- If you do not complete registration within one day, your nickname will expire.
To finish your nick registration go the provided email and copy/paste the command from e-mail to irc.
Add SASL support to your mIRC installation
Download the SASL.dll and sasl.mrc files and copy them to your mIRC installation directory
Load sasl.mrc script (Alt + R to open script editor, Ctrl + L to load file, browse to sasl.mrc, press OK or «save & exit»). 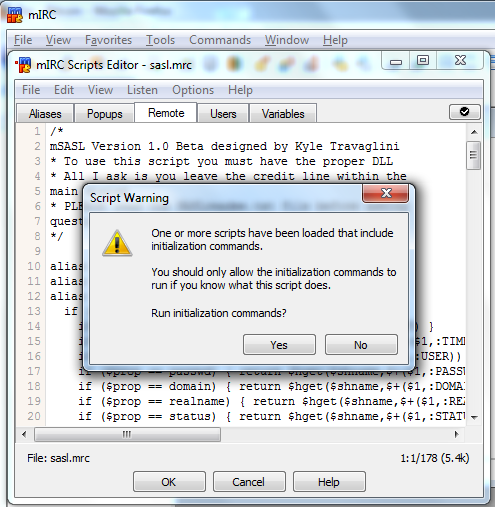
Type /dialog -m SASL.main SASL.main to open the SASL connection manager. 
Add Freenode entry. 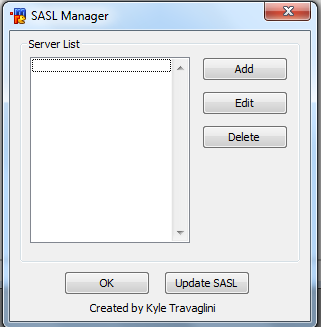
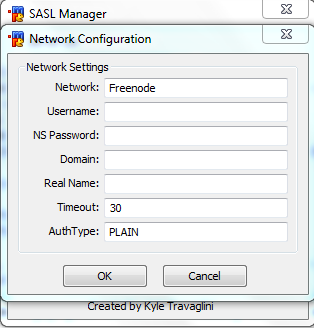
Network is Freenode.
Username and NS Password must match your nickserv reservation.
Auth Type can be PLAIN
setup mIRC to use Tor
Add the entry for Freenode onion IRC server 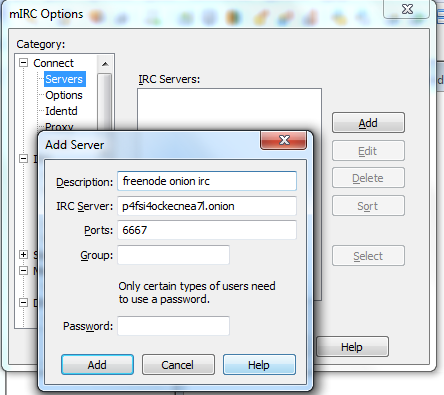
Configure mIRC to use a Proxy (your local Tor proxy) 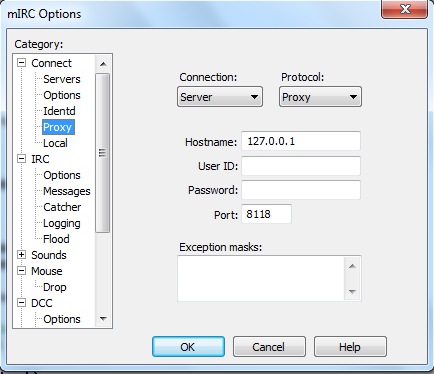
How Tor works
Unlike Freenet, I2P, etc., Tor’s security is very well-defined. While weaknesses do exist (described below), they have been known since Tor was created, and new weaknesses of significance are not expected.
Tor sends TCP packets over 3 (normal) or 7 (hidden services) Tor relays. This is why it is so slow: your packet might have to go through 100 computers (counting Internet routers) before it reaches its destination. Tor uses multiple layers of encryption that are pulled away for each node. Hence the name The Onion Router, which is always capitalized as Tor, and never TOR or t.o.r.
Say that I want to connect to bitcoin.org through Tor. I first select three Tor relays that I know about. Then, I send a message to my ISP that looks like this:
When Relay1 receives this, he decrypts the payload using his private key. The payload contains this:
Relay2 decrypts his payload:
Relay3 receives the real TCP payload, which he sends to the destination:
The payload is not and can not be further encrypted by Tor. However, if the protocol itself uses encryption (HTTPS, SSH, etc.), the data will be encrypted. This means that the last node (the exit node) can see everything you do on HTTP sites, and can steal your passwords if they are transmitted unencrypted. Many people become exit nodes just so they can view this information — Tor is much more dangerous than open WiFi for snooping!
The encryption arrangement described above ensures that no single Tor node knows both the sender and the destination. Relay1 and your ISP know that you are using Tor and sending a packet at a certain time, but they don’t know what you’re sending or who you’re sending to. Relay3 knows exactly what you’re sending, but he can’t determine who is sending it because Relay2 and Relay1 are blocking him. All three relays need to work together in order to conclusively connect the sender and the destination.
However, Tor is weak to a timing attack that allows only two participants in certain positions to determine the sender with high accuracy. Consider this Tor connection:
If the sender’s ISP (S-ISP) and the destination are working together, they can record the size and times of packets sent and received. Over a large number of packets, they can determine with very high accuracy that the sender is, in fact, the person sending packets to the destination. This requires active surveillance or detailed logging by both sides. Relay1 can also perform the same role as S-ISP.
Additionally, more configurations are possible if the underlying connection is not encrypted (normal HTTP, for example):
- S-ISP & Relay3
- Relay1 & Relay3
- S-ISP & D-ISP
- Relay1 & D-ISP
This second set can always see that the sender is connected to the destination, but they can only see what the sender is doing on the site if the connection is not encrypted. (Pathnames are encrypted in HTTPS.)
Because the first relay (the entry node) is a weak point in the connection, Tor takes certain defensive measures. When you first start Tor, it chooses three entry guards that don’t change for the entire time that you run Tor. You will always use one of those three unless one goes down. If all of those nodes are safe and your ISP is safe, then you are OK.
These timing attacks are of special importance to Bitcoin because anyone can be the «destination» in a connection. Packets are broadcast to every peer in the Bitcoin network. This might allow your ISP alone to associate your transactions to you without much difficulty. However, a timing attack relies on receiving at least several dozen packets from the sender, so the «destination» might actually have to be one of your direct Bitcoin peers. It’s not too difficult to flood the Bitcoin network with peers, though. Because of this attack, it is wise to use an EWallet instead of the Bitcoin client when using Tor.
To discover Tor relays, Tor uses a centralized directory server model. There are nine authoritative directory servers. To become a relay, you register with one of these. The directory servers share their data and produce a network status consensus document every so often containing all Tor nodes. Tor clients don’t connect directly to the authoritative directory servers — they connect to one of many directory mirrors, which have a copy of the network status consensus. Since there is no peer-to-peer bootstrap mechanism in Tor, the entire network can be destroyed if half of the authoritative directory servers are destroyed, and the entire network can be subverted if half of the authoritative directory servers become evil.
Hidden services allow both the sender and destination to remain anonymous. A hidden service connection is made like this:
- The destination tells several Tor relays to act as introduction points for the hidden service. The destination stays connected to all of these introduction points through a regular three-node Tor circuit.
- The destination registers these introduction points on a Tor DHT. The introduction points are associated with the first 16 characters of an encoded SHA-1 hash of the destination’s key. This is the information in .onion addresses. The use of SHA-1 is a possible weakness.
- The sender creates a four-node Tor circuit. The fourth node is called the rendezvous point.
- The sender searches the DHT for the introduction points of the desired hidden service. The sender connects to one through a regular three-node Tor circuit and, through the introduction point, tells the destination about the rendezvous point he has chosen.
- The destination connects to the rendezvous point over a three-node Tor circuit. The sender and destination are now in contact over a seven-node connection.
For clients, hidden services are more secure than encrypted Tor HTTPS connections because:
- If the destination remains anonymous, they are less likely to become controlled by an evil party.
- The destination’s ISP isn’t involved as they are in the HTTPS case. Only these configurations are possible for a timing attack:
- S-ISP & Destination
- Relay1 & Destination
Running a hidden service is more dangerous, however. A simple intersection attack can be performed by the hidden service’s ISP alone:
- Your Internet service is cut off.
- If the hidden service went down at that exact moment, you are unmasked.
The same sort of timing attacks as above are also possible.
See the Tor design paper for more info.
Exchange Restrictions
Some exchanges will treat activity occurring through Tor with greater precautions. For instance, the now-defunct Mt. Gox signup sheet read:
Please be advised that accessing your account via the Tor network and/or public proxies may result in a temporary suspension of your account, and having to submit AML documents.
Источник